Moving Sites to Zorruno Hosting
To move your existing site or parked domain name over to Zorruno Hosting, follow the steps below.
We will assume you have been assigned the server Toaster, but if you have been assigned something else, replace for that name. We will use the domain name of easydirectmail.com as an example.

Log in to the Hosting Server
- Ensure you know your login and password to the Toaster server (assigned by the hosting admin) and log in at https://toaster.zorruno.com:8080 . This will take you to Hosting Control Panel.
Add some DNS Records for your domain
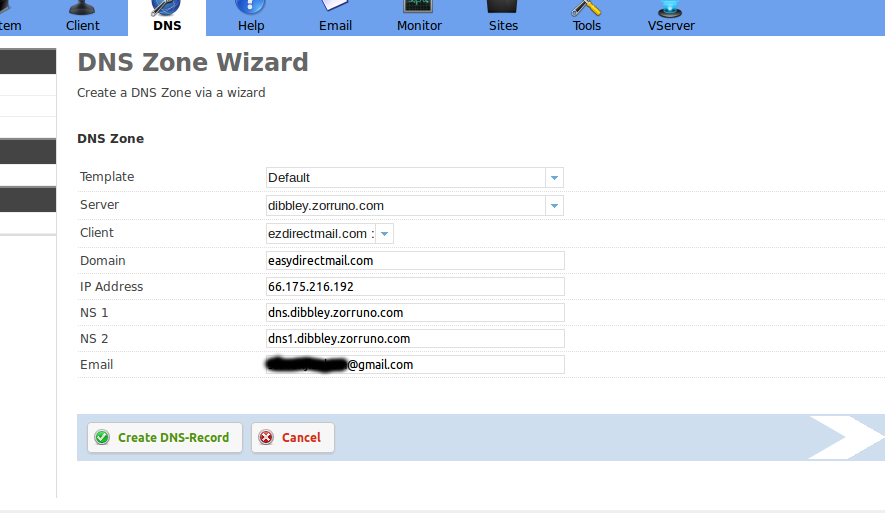
- Once logged in, start by adding a DNS record using the ‘DNS’ button at the top of panel
- choose the DNS wizard option
- enter data similar to below (but with the domain name you are setting up, and your own email address)
– Template: Default
– IP Address 66.175.216.192
– NS1: dns.toaster.zorruno.com
– NS2: dns1.toaster.zorruno.com
Add your Website
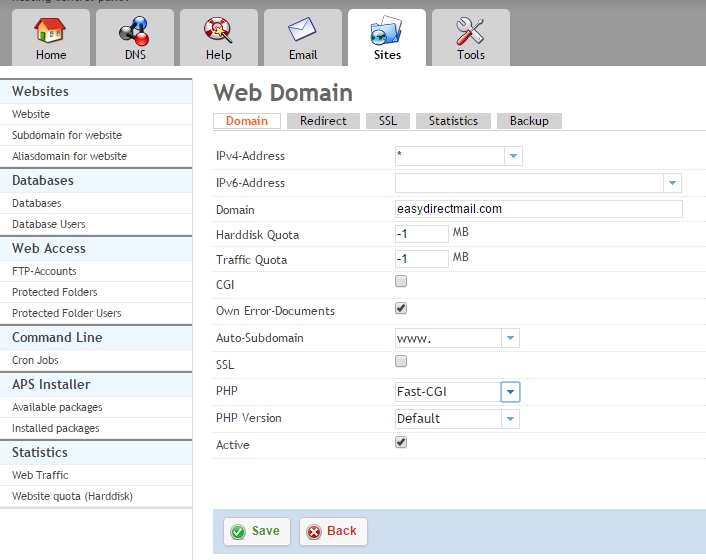
- Add a website by using the ‘Sites’ button at top of panel then click the ‘Add new website’ button that will appear.
- Fill in the details. You can use all the defaults, just type in your domain name without the www, as per the screenshot below, then click save.
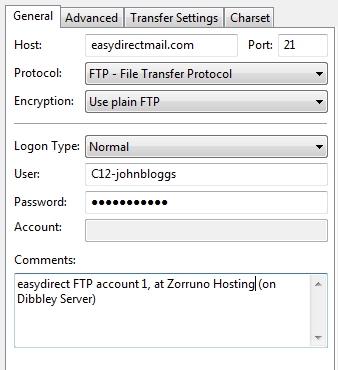
- Click the ‘Add ftp user’ link on the left and add yourself an ftp user, which will enable you to easily send files to and from your web space storage.
- Note ftp usernames will all start with your client number and an underscore, then the login name you choose e.g. C12_jsmithftp
- Use an FTP programme (such as filezilla or cuteftp etc) to upload your old site content. Anything you want to be visible on the web would go in the ‘web’ folder (sometimes labelled ‘www’ or ‘htdocs’ on other servers). Remember to upload ALL of your old content, including any files that start with a period such as .htaccess (sometimes some software will hide these files, so check the option for ‘show hidden files’ in your ftp software is set)
- create databases as needed with the ‘Databases’ and ‘Database Users’ links on the left panel menu. You will need to add one or more database users, before you can add a database.
- you can check the web content out immediately at “easydirectmail.com.dibbley.zorruno.com” (obviously using your own domain name there)
Setup Email
- Start by clicking the ‘Email’ button in the menu, and then click the ‘Add new domain’ button.
- Fill in your domain name as per the screenshot below.
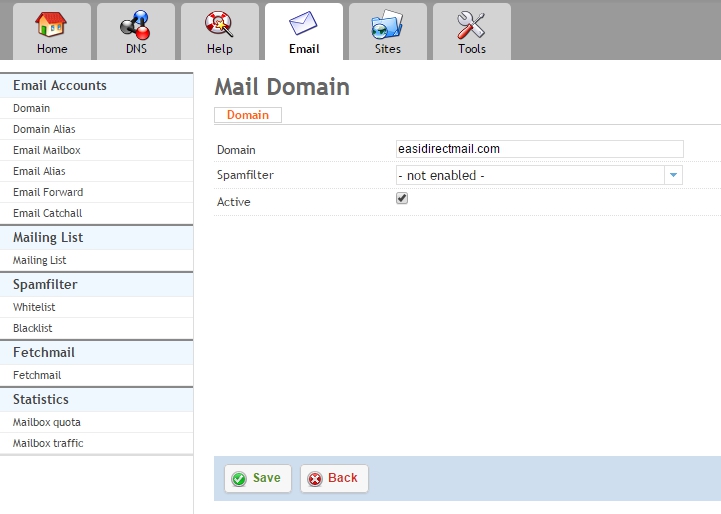
- Set up your email redirects, catch-alls, mailing lists and POP accounts with the menu options at the side of panel. (note that if you set up a ‘catchall’ address it may override any forwarding you have)
Change your Current DNS Server Setting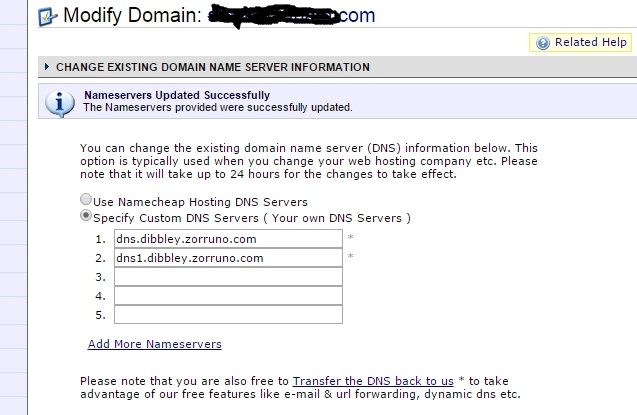
- Log in to your domain registration company account (e.g. freeparking.co.nz, namecheap.com etc)
- Change the DNS servers that are ‘authoritative for your domain’ over to the ones at Zorruno Hosting.
- Use dns.toaster.zorruno.com and if you need to put in a second DNS server, use dns1.toaster.zorruno.com If you get an error saying the second one doesn’t exist, just ignore that error.
Check your Website, and Email etc all work
Everything should then work, but it may take a few hours for the DNS records to become correct around the internet as the records get passed from host to host. If it doesn’t work after about 12 hours, there is something likely wrong, so seek some assistance.
For the more advanced user…
Here are some other possibilities you can set in the hosting panel.
Note that not all options are immediately available to all users, but if you need it just ask.
[Show the Options for advanced users]
Checking if your website and account is actually working
- As per above, you can check if your website is active by putting your domain in front of toaster.zorruno.com (e.g. easydirectmail.com.toaster.zorruno.com) . This will show you the home page, but depending on how the links in your site work, it might link to the previous (still live) website, so be sure you are looking at the new one.
- It can be useful to make a subtle change in your website when you upload (e.g. add or delete a word), just so you can be sure that you are either looking at the new site or old. Remember to refresh your browser also to get the latest.
- All the permissions you have from your old website should remain the same if you are using ftp, but you might like to check anything that requires special permissions and change them as needed.
Secure your web and email traffic
- You can buy an SSL certificate, create a self signed SSL certificate (or even get a free Class 1 cert from startssl.com) and upload this into the panel. Once uploaded, you can create a secure ‘https’ version of your site (especially where you are carrying out ecommerce), and also use secure email (POPS and SMTPS) for your email. You can also upload with secure SFTP.
- Advanced users may be able to use SSH to directly talk to the server and make changes, check with the admins for details.
Mail additions
- Set up ‘Anti-spam’ options for your mail accounts. These should work whether you forward your email somewhere, or set up a mail account on the server. There are options for how ‘tough’ it is on checking (e.g. just checking for viruses, or checking for common spam and key words), and also the ability to create a whitelist or blacklist email addresses for each account.
- Set up a ‘Fetchmail’ instance, to grab email from another email account you own (e.g. xtra or yahoo) and put it on your own account or even forward it somewhere else.
- Setup a ‘Mailing List’ so that if email goes to one address, it automatically gets set out to a bunch of other addresses
- View and monitor your mail traffic (ie how much data is being sent/received) and quotas (mailbox limits)
- Terminology for mail is that a ‘Mailbox’ is a physical store on the hosting server that you need to use POP/IMAP etc to retrieve. A ‘Forward’ will send mail that comes in for a mail address (eg. jsmith@easydirectmail.com) to another address not necessarily on this server (e.g. jb_smith@gmail.com). An ‘Alias’ sends mail from one address on the server to another, as though it was the same address (eg. director@easydirectmail.com to jsmith@easydirectmail.com). A ‘Catchall’ sends every bit of mail that comes in for that domain, no matter what is before the @ to somewhere else e.g. (@easydirectmail.com to jsmithltd45@yahoo.com)
Web Site Additions
- You can add ‘Subdomains’ for your domain, which can give you a completely new space to add a website. e.g. if you have easydirectmail.com, you can easily add a new site at blog.easydirectmail.com. Use the ‘Subdomain for Website’ link under ‘Sites’
- You can also add ‘Alias Domains’ under that menu which just point to the same space, eg directmaileasy. could point to easydirectmail.com as a domain alias.
- You can create ‘Protected Folders’. These are folders that the webserver will not allow people to access without the correct username and password (they will be presented with a popup box). You can control the users and passwords with the ‘Protected Folder Users’ Links. This might be a good way to store stuff for yourself securely, or a simple way to make available some files or photos for multiple clients or family members.
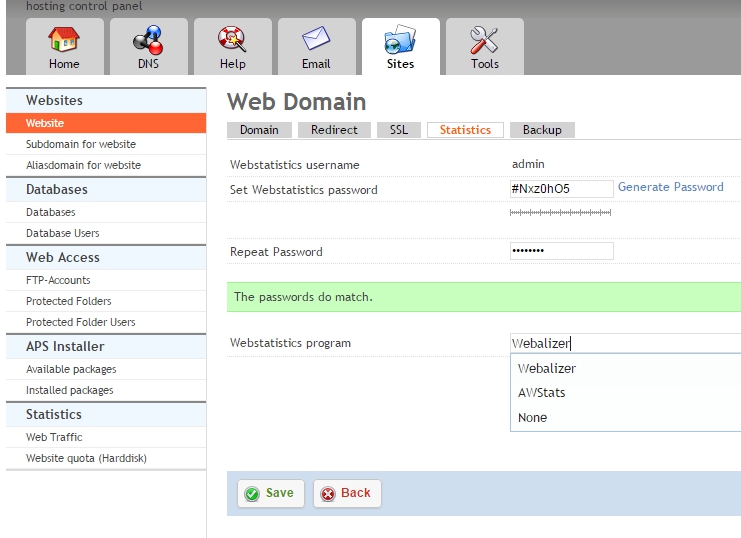
Detailed Site Statistics
-
- You can simply monitor your website use (traffic) and Hard drive space Limits (Quotas) from the panel.
- Full graphical statistics are also built in that tell you how many people are visiting, which countries they come from etc, and there are two different monitoring programmes (AWStats and Webalizer) to choose from. To view your stats, go to the Website configuration options, Statistics tab as seen in the below screenshot. Add a password where it says ‘Set Webstatistics password’, and choose the starts software you wish to use (Webalizer is the default). Go to your domains stats page which is eg http://easydirectmail.com/stats and you will be prompted to enter the username (which is always ‘Admin’) and the password you just set.
Install some Packages Automagically
-
-
-
- Under the ‘Sites Menu’ on the side is an option called ‘APS Installer’. This allows you to choose from and install many useful web packages such as WordPress, Gallery 3, osCommerce and many more. We haven’t tested the automated installation of many these, so have a go and let us know how you get on.
-
-
Wow, this is brilliant! Nice job and thanks ever so much!
Can you confirm that the new site should be uploaded to the “web/” folder.
Good question, yes it should… I’ve added this to the notes.
I’ve clarified a few more steps in the ‘adding a website’ and ‘adding email’ process, with a couple more screenshots too.