Tasmota based Equipment Cabinet Fan Controller

Summary
More an exercise in playing with Tasmota & documenting how Tasmota Rules work, this overly complex fan setup is a standalone fan controller/thermostat for my equipment cupboard.
- Use a pair of fans (out of an old tower server) to provide some redundancy if one fails.
- Measure RPM of both fans to ensure they are running.
- The fans are to run in parallel. 2 speed control is by running them on 5V normally, or the relay switches them to 12V to boost cooling.
- Use a
DHT11DHT22 (AM2301) to do temp measurements, ie standalone thermostat function (no additional head end control needed). NOTE: if you see DHT11 settings here, they need to change to AM2301 as I haven’t retaken screenshots of the Tasmota config. - Thermostat hysteresis values are set with MQTT (as well as thermostat on/off setting)
Equipment
- ESP8266 based control single relay board (Yunshan HW-622) (~$6-$10)
- Buck regulator for 5V control of the fan (~$5)
- 2x old 120mm Server Fans (Reclaimed)
- 2x Vacuum filter squares (Reclaimed)
- 1x Equipment box (from the parts cupboard)
- Mounting screws, plywood, hookup wire etc
- Power supply (reclaimed 12V plugpack, but will be powered from another cupboard supply later)
Board Notes
- My Tasmota board flashing notes: https://zorruno.com/2020/yunshan-hw-622-network-relay-module/
- A bunch of diagrams show the board having relay NC in the top corner – it isn’t on mine, this is NO
- If the fans were smaller, you could do this without a buck converter, as the board has a 5V regulator, but I wasn’t comfortable with the continual 5V load.
- The
DHT11DHT22 signal needs to feed 3.3V to the micro, so I took 3.3 supply directly off the LM117 regulator (up by the Relay) - Full load comes in at under 200mA continuous operation and up to 700mA with the fans on 12V (about 2W and 9W)
- 5V is about as low as I’d want to go with the fans so they don’t stall, but with the adjustable buck I can ramp them up higher if need be (or if more continual airflow is needed).
Tasmota notes (for those who haven’t used the project much)
Tasmota is very versatile but is a fast moving project. Currently a bunch of items aren’t documented well, and well documented examples of rules etc are not common.
Also, as the project has evolved from controlling a single relay sonoff to multiple device types, some items are not as intuitive as the could be due to backwards compatibility. Googling for help sometimes brings up old documentation, or documentation inside the github forks.
Finally note that for Rules and commands, case is not important and some items that were single commands have involved over time to multiple, so documentation doesn’t always reflect this. eg, “Rule1 1”, “Switchmode1”, “SwitchMode 1” can be confusing when reading old documents.
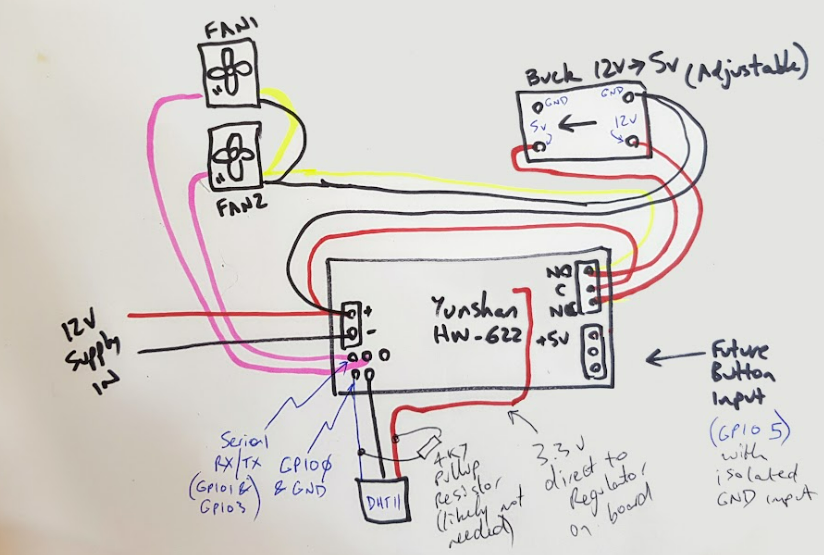
Schematic sketch
Notes re Sketch:
- Obviously the buck converter GND is connected to the input Ground/-ve, not +ve as shown in the sketch
- DHT11 was replaced with a DHT22
- The ‘Future Input’ on the right hand side on the board needs to have +ve 5V connected to it to activate (it is opto-isolated). You can’t pull it low. I eventually used this with a reed switch to monitor the open/closed state of the equipment cupboard door.
Yunshan Board Schematic
Tasmota Module Configuration
Fan RPM Count Rules
First Setup
TelePeriod is a standard value of time when certain things happen, mainly when a number of “Tele” messages are pushed to MQTT with many of the tasmota state values included. By default this is 300, or every 5 minutes, but we will set to 60. (We don’t need to do this obviously if already set for another ruleset)
So we use the console to set the teleperiod.
TelePeriod 60Fan Count Rules
At the end of each Tele time, publish the vars to a MQTT topic as JSON and reset the counters.
Using this method, you get a reasonably accurate count of revolutions per minute published for the two fans.
We will do this all with one ruleset (Tasmota has 4 available as standard build), but be mindful of the current 512 character limit for a rule. Laying it out as multiple rules might look nicer, but this project has multiple needs for rules.
Note that with a counter input, counter#c1 will trigger any time the counter changes (with the current counter value of counter1), but tele-counter#c1 is the value triggered at TelePeriod (which is what we want here… trigger once per minute).
These are the rules, spaced out for visibility.
rule1
on tele-counter#c1>0 do backlog
		publish stat/%topic%/Fan1Count {"Fan1":%value%} ;
		counter1 0 endon
on tele-counter#c2>0 do backlog
		publish stat/%topic%/Fan2Count {"Fan2":%value%};
		counter2 0 endon
This is the ruleset on one line for easier copy/paste
rule1 on tele-counter#c1>0 do backlog publish stat/%topic%/Fan1Count {"Fan1":%value%} ; counter1 0 endon on tele-counter#c2>0 do backlog publish stat/%topic%/Fan2Count {"Fan2":%value%} ; counter2 0 endonFan Count Rules Explanation
on tele-counter#c1>0 do
When the value of TelePeriod hits (we previously set it to 60 secs), and the tasmota counter number 1 is greater than zero implement the rule. The value %value% will be the current C1 count.
backlog
Just allows multiple commands in one line. Use semi-colons to separate them
publish stat/%topic%/Fan1Count {“Fan1”:%value%}
Publish the fan rotation count value (ie a one minute shapshot with TelePeriod set to 60) to MQTT as a pair of JSON values. With MQTT, we don’t have to pre-declare any MQTT topics or other variables, we just publish the MQTT topic name that we choose to (in this case I’ve called them Fan1Count and Fan2Count as the topic and Fan1, Fan2 as the count name)
counter1 0 ;
Zero the counters
Now do the same with counter 2
Thermostat Control
Variable Use
We need to pick some variables to use. Mem variables are saved in flash even after a power outage. The Var variables aren’t.
Mem1 1: <- thermostat status: 0-off 1-enabled – View or set by MQTT cmnd/mqttTopic/mem1
Mem2 26: <- setpoint Temp lower limit – View or set by MQTT cmnd/mqttTopic/mem2
Mem3 28: <- setpoint Temp upper limit – View or set by MQTT cmnd/mqttTopic/mem3
Var3 0: <- thermostat true status: 1-OK 0-NOT READY – View by MQTT cmnd/mqttTopic/var3
Setup Console Commands
backlog SwitchMode1 2; Rule2 1; Rule2 4; TelePeriod 60; SetOption26 1; SetOption0 0; poweronstate 0; mem1 1; mem2 26; mem3 28; var3 0Console Commands Explanation
SwitchMode1 2: Set the first input switch to send an MQTT message of ‘ON’ or ‘OFF’. eg it will send “stat/mqttTopic/STATUS10 message of Switch1=ON when our door is closed”. Once a rule is added to control the relay, pressing the button won’t control the relay directly anymore. Using SwitchMode1 2 rather than SwitchMode1 1 is inverted mode as we are using it with a doorswitch that is normally closed (we want the thermostat on when the door is closed), and it this case being closed pulls the input high the way I have wired it.
Rule2 1: Turn on Rule 2 (which obviously is blank to start with won’t do anything until you add a rule.
Rule2 4: Set the rule (2nd rule, but any one of the 3 rules will do) so that it will always fire if the condition is met – ie ensure one-shot mode is not enabled
TelePeriod 60: We will check temp every ‘TelePeriod’, so let’s make it once per minute. We want this for the fan rev speed above anyway (and you can’t have 2 TelePeriods)
SetOption26 1: Tasmota used to use ‘POWER’ on MQTT messages when it was built for just one relay. Now it can have multiple outputs, you can use POWER or POWER1 on the first output. This option sets it to use POWER1
PowerOnState 0: Startup with relay off.
Mem1 1: Set Mem1 to 1, or thermostat enabled
Mem2 26: Set lower limit for temp (ie when relay turns off/fans go low speed)
Mem3 28: Set upper limit for temp (ie when relay turns on/fans go high speed)
Var3 0: Initialise the thermostat status setting it to 0
Rules for thermostat control
These are the rules, spaced out for visibility. We’ll use rule 3 (as we used the others previously) but a rule can have many commands in one set:
Rule3 on system#boot do RuleTimer1 70 endon
on switch1#state do backlog
		mem1 %value% ;
		publish stat/%topic%/DoorSwitch {"DoorState":"%mem1%"} endon
on Rules#Timer=1 do backlog var3 0; RuleTimer1 70; power1 0 endon
on tele-SI7021#temperature do backlog
	var3 1 ;
	RuleTimer1 70 ;
	event ctrl_ready=1 ;
	event temp_demand=%value% ;
	publish stat/%topic%/ThermostatSP {"SetpointLow":%mem2%,"SetpointHigh":%mem3%}
	endon
on event#ctrl_ready>%mem1% do var3 0 endon
on event#temp_demand<%mem2% do power1 0 endon
on event#temp_demand>%mem3% do power1 %var3% endon
This is the same rule3 set, with no linebreaks for a cut/paste:
Rule3 on system#boot do RuleTimer1 70 endon on switch1#state do backlog mem1 %value% ; publish stat/%topic%/DoorSwitch {"DoorState":%value%} endon on Rules#Timer=1 do backlog var3 0 ; RuleTimer1 70 ; power1 0 endon on tele-SI7021#temperature do backlog var3 1 ; RuleTimer1 70 ; event ctrl_ready=1 ; event temp_demand=%value% ; publish stat/%topic%/ThermostatSP {"SetpointLow":%mem2%,"SetpointHigh":%mem3%} endon on event#ctrl_ready>%mem1% do var3 0 endon on event#temp_demand<%mem2% do power1 0 endon on event#temp_demand>%mem3% do power1 %var3% endonPotential Improvements
- Add a rule to publish warnings to MQTT such as fan stall
- Add pressure sense for filter change warning?
- A button on GPIO5?
Fan boost maybe(used as cupboard door open sense AND thermostat on off) Fix issue with temp sense on GPIO0 meaning occasionally micro doesn’t boot. Current fix is to no turn it off…. or remove the DHT22 temporarily on a reboot.yes, the DHT22 pulls GPIO0 low on boot… see below.- –
– Switch to a DHT22 for prettier graphs (more resolution!)
ESP8266 GPIO & boot
A rookie mistake is forgetting that some GPIO has a specific purpose on boot. GPIO0 for example…. doesn’t let the microprocessor boot if pulled low, and which means this fan controller didn’t always boot up because I hadn’t really realised that the temp sensor would pull low (mostly, but not always) on boot. To run it, I had to ensure I booted up then then plugged in the temp sensor. This was dumb of me and I and there other gotchas like that with some ESP8266 GPIO. Using other available GPIO is much better.
GPIO Reference:
https://randomnerdtutorials.com/esp8266-pinout-reference-gpios/
I have however now solved this with a small timer relay board I had… on power up the relay doesn’t activate for a few seconds and the DHT22 input is wired through the relay. An annoying fix (as the relay board, even though it was only a couple of $ is probably as complex as the Yunshan board itself!).


