Tasmota Rules Examples
Below are some rules for Tasmota that I’ve used over the years, including doing basic standalone automations (no Home Assistant, no Node Red, or other additional tools). Standalone automation can be handy, and in simple cases you don’t need any working wireless for basic functions. If you install smart devices, you can safely disconnect your networking (eg if you sell your house) and still have some basic smart functions.
But what about changing values or times etc? Well a couple of examples below show that yes you can, via MQTT and variables in Tasmota. You can still report values via MQTT also.
You can even get Tasmota devices to talk to each other via IP address directly, usual occasionally… but of course again you still need working wireless.
Always remember to run “Rule1 1” etc to switch on your rules!
Using a Tasmota device to remotely turn on a light
Here, I had already used a Node red script to turn on a light when I walked into the laundry, and turn it off after a period of time. The PIR was connected to a different device than the one the light was on (it was set as ‘Switch1 on a NodeMCU’).
The automation became quite slow (likely due to a processing power of the box running Node Red, plus more flows and other things added over time) so I also added a Tasmota rule to the device with the PIR to turn the light on directly. The flow is still there to turn the light off again (obviously runtime is not critical, but a responsive turn on is)
- We set “Rule1” with the rule between ON and ENDON. (You could also set Rule2 or Rule3)
- The IP address of the other Tasmota device needs to be in square brackets
- The state of switch one is 1=ON, 0=Off, 2=toggle, and 3=hold
- Here we send 1 to Power 1 on the remote device to turn it on
Rule1 ON Switch1#state=1 do WebSend [192.168.2.68] Power1 1 ENDONRemember to turn the rule on with
Rule1 1I also had a rule that in one area of my house, if you hold the button down for 4 seconds, it would turn all the other lights off in the area. This is probably better done with a higher level control, but worked fine at the time. Note that state3 means HOLD and the admin:pass are the credentials for the Tasmota web interface.
Rule2 on button1#state=3 do backlog WebSend [192.168.1.51,admin:passwd] Power1 off; WebSend [192.168.1.51,admin:passwd] Power2 off; WebSend [192.168.1.53,admin:passwd] Power1 off; WebSend [192.168.1.53,admin:passwd] Power2 off;WebSend [192.168.1.55,admin:passwd] Power1 off; WebSend [192.168.1.55,admin:passwd] Power2 off; WebSend [192.168.1.57,admin:passwd] Power1 off endonRules to notify that washer, drier or other appliance is complete
I don’t actually recommend implementing this, as I have a whole (more reliable) setup using Node Red for appliance completion notification. But this is the simple setup I started with, and the rules are set in something like a Sonoff POW, or a plug in power monitor that has tasmota.
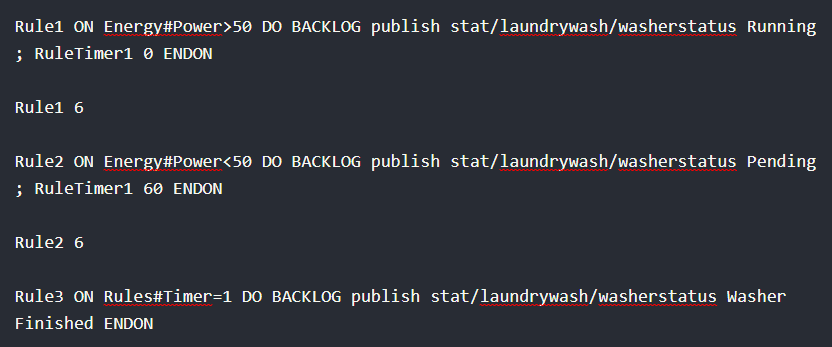
- Setting Rule 1 to the value 6 makes it a one shot action. The 3 rules monitor the power and start a timer if the energy goes below (in this case) 50W.
- If this occurs for longer than 60 seconds, it publishes “Finished” to MQTT.
- “Running” or “Pending” is published otherwise
Rule1 ON Energy#Power>50 DO BACKLOG publish stat/laundrywash/washerstatus Running ; RuleTimer1 0 ENDON

Rule1 6

Rule2 ON Energy#Power<50 DO BACKLOG publish stat/laundrywash/washerstatus Pending ; RuleTimer1 60 ENDON

Rule2 6

Rule3 ON Rules#Timer=1 DO BACKLOG publish stat/laundrywash/washerstatus Washer Finished ENDON

Rule3 1
In the above scenario, there are obviously other actions you could monitor (humidity, temp, current etc) and do similar actions. You could even make it fully standalone by connecting a buzzer or LED and this could come on instead when the power drops.
Rules to make a standalone thermostat controlled fan
You can make a fully fan controlled on/off switching thermostat with a Tasmota device and rules. I now have a full article on how I constructed one of these so there is little point explaining the rules here.
My fan controller
- Controls 2 computer fans (on/off, but in this case runs half speed and full via 5V/12V switching)
- Allows set points, hysteresis to be changed via MQTT (and these are remembered across reboots)
- Has a temp sensor connected directly (so all thermostat controls are in the controller itself – no network connection needed)
- Measures fan RPM to ensure they are spinning
I have however also been playing with PWM control in ESPHome so the fan can be ramped up and down in speed rather than just being switched.
Rules for a bathroom or other switch to set fan (or light) run-on
Also useful for other ‘timed’ functions, I use Rules in Tasmota for bathrooms to keep the fan spinning when an occupant leaves. There is no reason also you couldn’t combine this directly with humidity sensing to the same device, (or sensing temperature on a shower pipe) to make a fan come on for X minutes.
Rule to use a triple wallswitch to control a ceiling fan
I had an instance when it was easy to run lights from the relay in a fan controller (an IFan02/3 from Sonoff). It is common for existing light circuits to be run this way, if there is only one mains cable running to the centre of the room. The fan and light can be operated independently with an IFan02 controller, but only with the RF remote (or MQTT).
So if you want to add a Tasmota wallswitch, you can use a simple rule (as above) to tell the IFan02 to switch on its Light relay, and I did this from the top button of my triple smart switch. But you can also do a ramp up and down function from the bottom two switches with this rule.
rule2 on Switch2#state=1 do WebSend [192.168.1.50] FanSpeed + endon
rule3 on Switch3#state=1 do WebSend [192.168.1.50] FanSpeed - endon
The IP address is the IP of the IFan02, and the “Fanspeed +” and “Fanspeed -” are the commands to speed up and slow down the fan.
Using a tasmota switch to send an MQTT message
I had a button connected to a sonoff 4 channel switch that I had decoupled the relay from. I needed the switch to send an MQTT message however.
rule1 on Button1#state do publish viewroad-status/lightswitches/underhouselight1 %value% endonOther examples
There are plenty of more detailed examples around, and I highly recommend reading the Tasmota Rule Cookbook section of the Rules github page.