Upgrading a 5 Year Old Samsung Galaxy S2 to Android M

I needed a phone for my son as he had been given an older ZTE V795 phone running Android Gingerbread. The ridiculous thing about this is that besides the fact there is really no way to easily upgrade or change out the ROM on this phone… you can’t even update the current setup as any ‘play store’ updates fail even with the stock apps (and some deleted) due to lack of storage. Rooting the phone, trying links2sd tools and further trimming it down didn’t fix the issue, and even it if had you are still limited by the poor RAM size and internal storage etc.
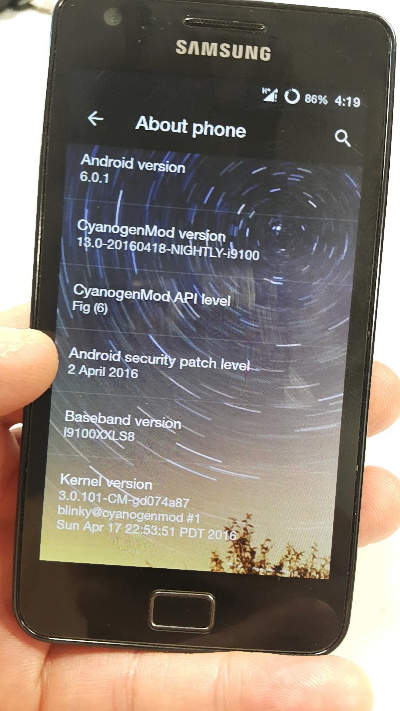
Luckily I was gifted an older Samsung Galaxy 2 phone by a colleague so I looked to rebuild it with a tidier more modern ROM, and chose the well maintained Cyanogenmod. The had recently released Version 13, which uses Android 6.0 (Marshmallow) as the base.
[slice src=’https://zorruno.com/w/SamsungGalaxyS2RomUpgrade/show-wordpressembed’ begin_tag=’Start of Upgrade Details’ end_tag=’End of Upgrade Details’]Note that at writing, CM13 for the S2 has no ‘release channel’ (or stable ROM), only nightly builds which can sometimes be a bit ‘leading edge’. After the install however, I found it pretty rock solid with impressive battery life for a 5 year old phone and battery, it is plenty fast enough and or course Cyanogenmod has plenty of customise-able features and themes (I haven’t yet tested all functions like bluetooth etc however)

G’day!
I have a Samsung Galaxy S2 (i9100) running Android 4.1.2 and its running Philz recovery. I want to install CM13 with TWRP recovery on it and I have followed the steps you have listed till step 3. I am unable to move beyond step 3 because after flashing the IsoRec TWRP via adb after I reboot to recovery I still get Philz CWM recovery. I tried flashing successfully via Heimdall as well but encountered the same issue. So, no matter what I try I can’t get TWRP recovery to replace the existing Philz recovery!!
I am beginning to think that the bootloder on my device is locked but all my research says it shouldn’t be, cause if it was I wouldnt be able to install a custom recovery apparently. So why then does my device launch Philz recovery each time instead of the freshly flashed TWRP recovery?
Any suggestions please!
Hi Maddy – hmmm yes I doubt would be a locked bootloader, a couple of things to try. How about trying the Lanchon-IsoRec zip file for TWRP? You could try flashing it directly with Phils… or use the flashify app (I haven’t tried either of those though sorry!). Does pushing via adb give any errors?
Hi Zorruno,
Thanks for the quick reply!! I am sorry I didn’t give the full story. Yes, I did indeed try to flash the recovery-Lanchon-IsoRec-TWRP-2.8.7.0-20160113-i9100-(by-arnab).zip recovery directly from within Phil’s recovery. I received a warning saying ‘this cannot be undone’. I clicked OK and the message was. Flashed successfully. When I power off and reboot into recovery – no sign of TWRP!!
I tried the above after spending hours yesterday (basically the whole day!) trying to flash via adb. I always got the ‘adbd cannot run as root in production builds’ error. After I failed the install from recovery I revisited the adb option again. I solved the error by installing the adbd-Insecure-v2.00.apk obtained from XDA. This app got rid of the adb error and I was able to successfully push the TWP recovery as per the command you have listed in point 3: adb push twrp-3.0.2-0-i9100.img /dev/block/mmcblk0p6
Reboot to recovery and no sign of TWRP but Philz recovery loads again.
Heimdall had failed previously giving exactly the same error message you had described. I had been working on a Windows 10 laptop. So, today I restarted a long unused desktop running Windows 7. After installing the Samsung drivers, and using a tool called USBDeview with which I could list/check status/terminate all USB connected devices I was able to get rid of all errors that Heimdall was throwing up. Each time Heimdall gave a error (protocol initialisation error or Unexpected Handshake received etc), I used USBDeview and disconnected the Samsung i9100, removed the cable from the device, closed Heimdall, reconnected the cable, checked the status in USBDeview and relaunched Heimdall again and successfully concluded the action (Saving the PIT file, Flashing the TWRP revovery etc). So, TWRP recovery was successfully flashed via Heimdall as well but, you guessed it, booting to recovery launched Phils recovery!
Now, I am hoping to get a non-IsoRec TWRP like say version 2.8.4 or above as the website : https://twrp.me/devices/samsunggalaxys2i9100.html lists that IsoRec TWRP 3.0.2 can be installed from within TWRP versions 2.8.4 or higher. So far no luck in obtaining any older versions (non-IsoRec) of TWRP….
I know what it is like 🙂 many hours lost with ROM upgrades… made even worse when I got my last Galaxy note and nearly bricked it on day two!
I’m wondering if Phils repatches itself. I have seen reference to running “fastboot reboot bootloader” straight after you use adb to push TWRP A quick google and it looks like other people are having trouble getting phils recovery removed. I tried pretty hard to get everything I did written down in order, so I’d be surprised if I missed a step in my instructions.
Another option could be to find another recovery – eg standard CWM as an intermediary . All this was on a Windows 7 laptop, not my daily OS choice, but I had spent a but of time previously getting all the Samsung ADB drivers etc working on it. Or maybe even try and get it back to stock? More wasted time obviously, but these things are set to try us right?! Also, I really don’t like Heimdall, I’ve had more success with Odin, so you could try to get a .tar recovery file (not sure whether a conversion of the binary works?)
As an aside, I got annoyed with that version of Cynogenmod (some bugs with the selfie cam and a few other issues), so have more recently gone back to a more stock Kitkat ROM for my Son – a build by ‘nameless’ nameless_i9100-userdebug4.4.4KTU84P228 is the build number.
Let me know how you get on with non-ISoRec versions…
Hi! Success at last!!! Not only did I manage to boot into TWRP 3.0.2, I also managed to install CM13!!
I read and re-read the XDA post of the IsoRec recovery and came to the conclusion that perhaps the JB 4.1.2 kernel in my phone wasn’t IsoRec compatible. The XDA post mentioned that an IsoRec compatible kernel would check the /dev/block/mmcblk0p6 for a valid image and if existed would ignore the pre-existing recovery and would boot the IsoRec kernel. So, I dumped my search for an non-IsoRec version of TWRP and went about locating an IsoRec compatible kernel for my version of Android (JB4.1.2). I located the Dorimanx JB 4.1.2 Kernel from this post:
http://forum.xda-developers.com/galaxy-s2/development-derivatives/kernel-dorimanx-jb-4-1-2-t3106241
and flashed it using Philz CWM recovery. Immediately after flashing, I switched off the device and booted into recovery using the hardware buttons and to my amazement saw the TWRP 3.0.2 that I had flashed multiple times load up! With this on, the next steps were easy.
I downloaded the most recent version (2016Sep23) of Lanchon’s REPIT file from here: https://www.androidfilehost.com/?w=files&flid=49911 and renamed it to increase system partition to 1GB, wipe the data partition after increasing it to 6GB and flashed it via TWRP. The script gave an error saying it couldn’t unmount /sdcard, so I re-launched it from /tmp (as the script was running from /sdcard, it had copied itself to /tmp), and the repartitioning was successfull. All within 3-4 minutes.
CM13 nightly build of Oct 30th was installed next and I rebooted forgetting to flash Gapps immediately after the ROM flashing. After rebooting, CM13 took a while to establish and when it did, I realised I had forgotten to install GApps and, more importantly, that I hadn’t checked whether TWRP 3.0.2 was overwritten by the newly installed ROM’s recovery. However, nothing to worry – going to recovery revealed that IsoRec recovey was still there and hadn’t been overwritten. I then flashed GApps and rebooted to configure the phone. So, after two days of not progressing beyond getting TWRP 3.0.2, I finally had CM13!!
I suspect, your device already had some form of an IsoRec compatible kernel and you therefore never faced the problems I faced with the stock (original Samsung JB Android 4.1.2) kernel installed in my i9100.
Having used the IsoRec TWRP 3.0.2 I feel Philz CWM touch recovery was more robust and had more options. To use CM13 requires IsoRec TWRP so that is the only reason I guess we’re doomed to use it. I certainly felt Philz recovery was better (though, in the quest to get IsoRec TWRP I couldnt wait to get rid of it!).
I write down all the links and the steps I took and problems I faced and your write up pretty much matched mine and no, there were no steps missed by you! The only comment I can make in relation to the steps you have listed is in this line you have written:
“I needed to enable usb debugging and adb root in developer settings on the phone (and again… a working root needs to be installed).”
In my case, the option to enable USB debugging was the only one present in Developer Settings. I couldn’t find the second option of enabling adb root at all. Maybe this is was a quirk in my version of the JB 4.1.2 ROM.
Yeah, the thought to install an intermediary version of CM with the Philz recovery did cross my mind after my second post to you, but it was my last option. With the thinking that the kernel probably needed to change to boot into IsoRec TWRP and then trying to go down that path led to the eventual success.
Speaking of Heimdall, I too don’t like it…I suspect the dev’s have gotten it developed to probably escape any Copyright infringement claims over Odin by Samsung. Just last week I read a YouTube channel owner being sent a cease and desist letter by Sammy’s lawyers over his parody of substituting exploding devices in the Grand Theft Auto game by Note 7. With their reputation taken a hit over the spontaneously combusting Note 7’s Samsung is a bit rattled and nervous lately..Odin is Samsung’s proprietary in-house software and the developers of Heimdall could have written it in anticpation of Samsung’s lack of co-operation or support at a future date.
When the CM13 I installed first started an error popped up saying “unfortunately the clock has stopped”. A little later after GApps was installed the error was “Unfortunately pico TTS has stopped”. These were the only errors I received. No errors of any kind after subsequent reboots. My observations are with regard to the UI – I didn’t like the CM13 user interface. The Google one was much neater. Also the sound quality or level is quite low I feel. I had to turn the volume to the fullest to hear just a bit. The (Selfie) camera too is rotten – but then I suppose it’s related to the poor hardware in the device. The phone is only meant as a temporary backup to be able to make and receive calls in the event my main phone dies and I need a device to put the SIM in, so I’m not too bothered by any user interface issues or camera faults..
The installation of Android M based CM13 onto a device which is more than 5 years old (I bought mine in August 2011!) was a journey!! Thanks for your excellent documentation and for your support in my journey!
That’s excellent followup – I really appreciate your updates thanks and hopefully it helps someone else. Yes I had done some other ROM changes previously so not even sure what the Kernel was when I started. Like you, it was more of a technical journey than anything else – and my son has now chosen to use an iPhone hand-me-down from other family members so this phone has been demoted to solely being a spotify controller for his portable PA. Oh well, at least he knows enough not to update to iOS10… he is now insisting I jailbreak it!
As Maddy has commented, you also need a IsoRec kernel to recognize the isorec recovery. Im using https://forum.xda-developers.com/galaxy-s2/orig-development/isorec-isolated-recovery-galaxy-s2-t3291176 to get the 12.1 kernel since I am on CM 12.1 right now. Please update your guide to atleast mention this requirement, since it is confusing now.
Amazing article.. i tried this method on my phone ad yes its worked 🙂 Thank you admin for sharing this amazing article.
Thanks Kaushik, glad it worked for you