mmWave occupancy, ESP32 and LD1125H

Changes
2024-05-11 V1.0 First version with LD1125H
2024-05-20 V2.0 Added YAML and details for similar setup but with LD2410
2024-05-20 V3.0 Split the LD2410 notes from the LD1125H
2024-07-01 V3.1 Added a warning about using Bluetooth on the ESP32
Summary
Use of an ESP32 running ESPHome to interface with a LD1125H mmWave occupancy sensor, ensuring I can manage the controls/sensitivity via ESPHome and Home Assistant + MQTT. Also monitor room temperature, humidity and pressure via the same device.
An alternative option is the LD2410 sensor, which is smaller and currently cheaper. See my notes on a similar setup with that module.
Having issues with your ESP32 booting, when running Bluetooth proxy as well as other components on the ESP32? See my warning below and the solution I used.
Equipment Used
- Hi-Link LD1125H mmWave 24GHz Occupancy sensor (Aliexpress)
- 80x80mm Vented wall case (Jaycar)
- BME280 SPI Digital Environment sensor (Aliexpress)
- ESP32 Dev Board (Aliexpress) Other ESP32s will obviously do.
- ESP32 Dev Breakout Board (Aliexpress) just for testing
- 230V-5V Isolated buck converter in case (Aliexpress). Other methods to get 5V will be fine obviously, eg just plugging the ESP32 in via USB lead.
- The LD1125H has a header with a small 2mm pitch. If you don’t have a 4 pin plug or a set of dupont jumpers that will fit with this pitch header, you’ll need to find one eg: https://www.aliexpress.com/item/1005003547145418.html
Sensor description & manual
The supplier Hi-link describes the LD1125H as:
…a high sensitivity 24GHz millimeter wave human presence detection radar module. Different from the traditional radar, which judges the existence of the human body by detecting the large-scale movements of the human body or the small-scale body movements, the main feature of this module is that on the basis of the functions of the traditional human-body induction radar, it also has the ability to detect and accumulate small-scale movements such as human respiration, to determine the function of the existence of the human body. Therefore, compared with traditional Doppler radar, it has presence detection within a certain range, with higher accuracy, and is not easy to miss reports.
The LD1125H is touted to allow a 4m range to detect ‘Static Human Presence’ (i.e. a heart beat and tiny movements) and an 8m range which will detect other general motion. The unit can output two detection notifications, one for small movements and above, and another for just larger movements.
The LD1125H outputs standard serial data, so ESPHome can use it’s internal libraries or a custom text and number serial sensor to take serial text and convert it in to the sensor numbers and binaries.
The Hi-Link manuals are downloadable below that shows more detail including the suggested installation coverage, heights etc
Hardware sensor project
There are now a bunch of similar mmWave sensors on the market. I bought some LD2410s recently, and some LD1125H modules back in 2023. My plan is to use a few of them around the house to automatically sense people, for turning on lights, fans, bathroom heating etc, and this was the first time I got to play with them.
The first project was to use one in my office/workshop, to turn on and off lights, and turn off various equipment when I wasn’t around. Much of the equipment in my office such as monitors, workbench power supplies, soldering iron, ELV test equipment is connected to controlled/switched power. When I’m not there, it is nice to have it automatically switch off. (obviously, overrides are needed if I want to run test equipment longer term, for example logging)
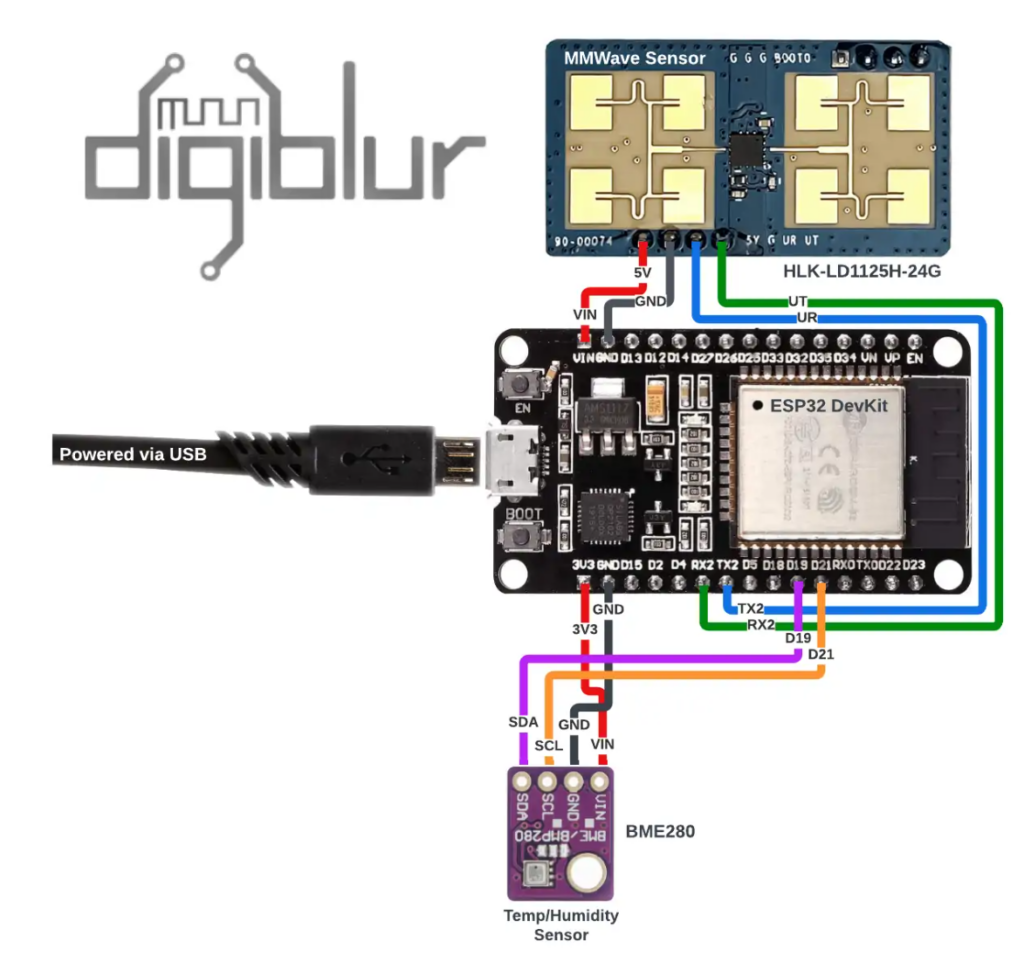

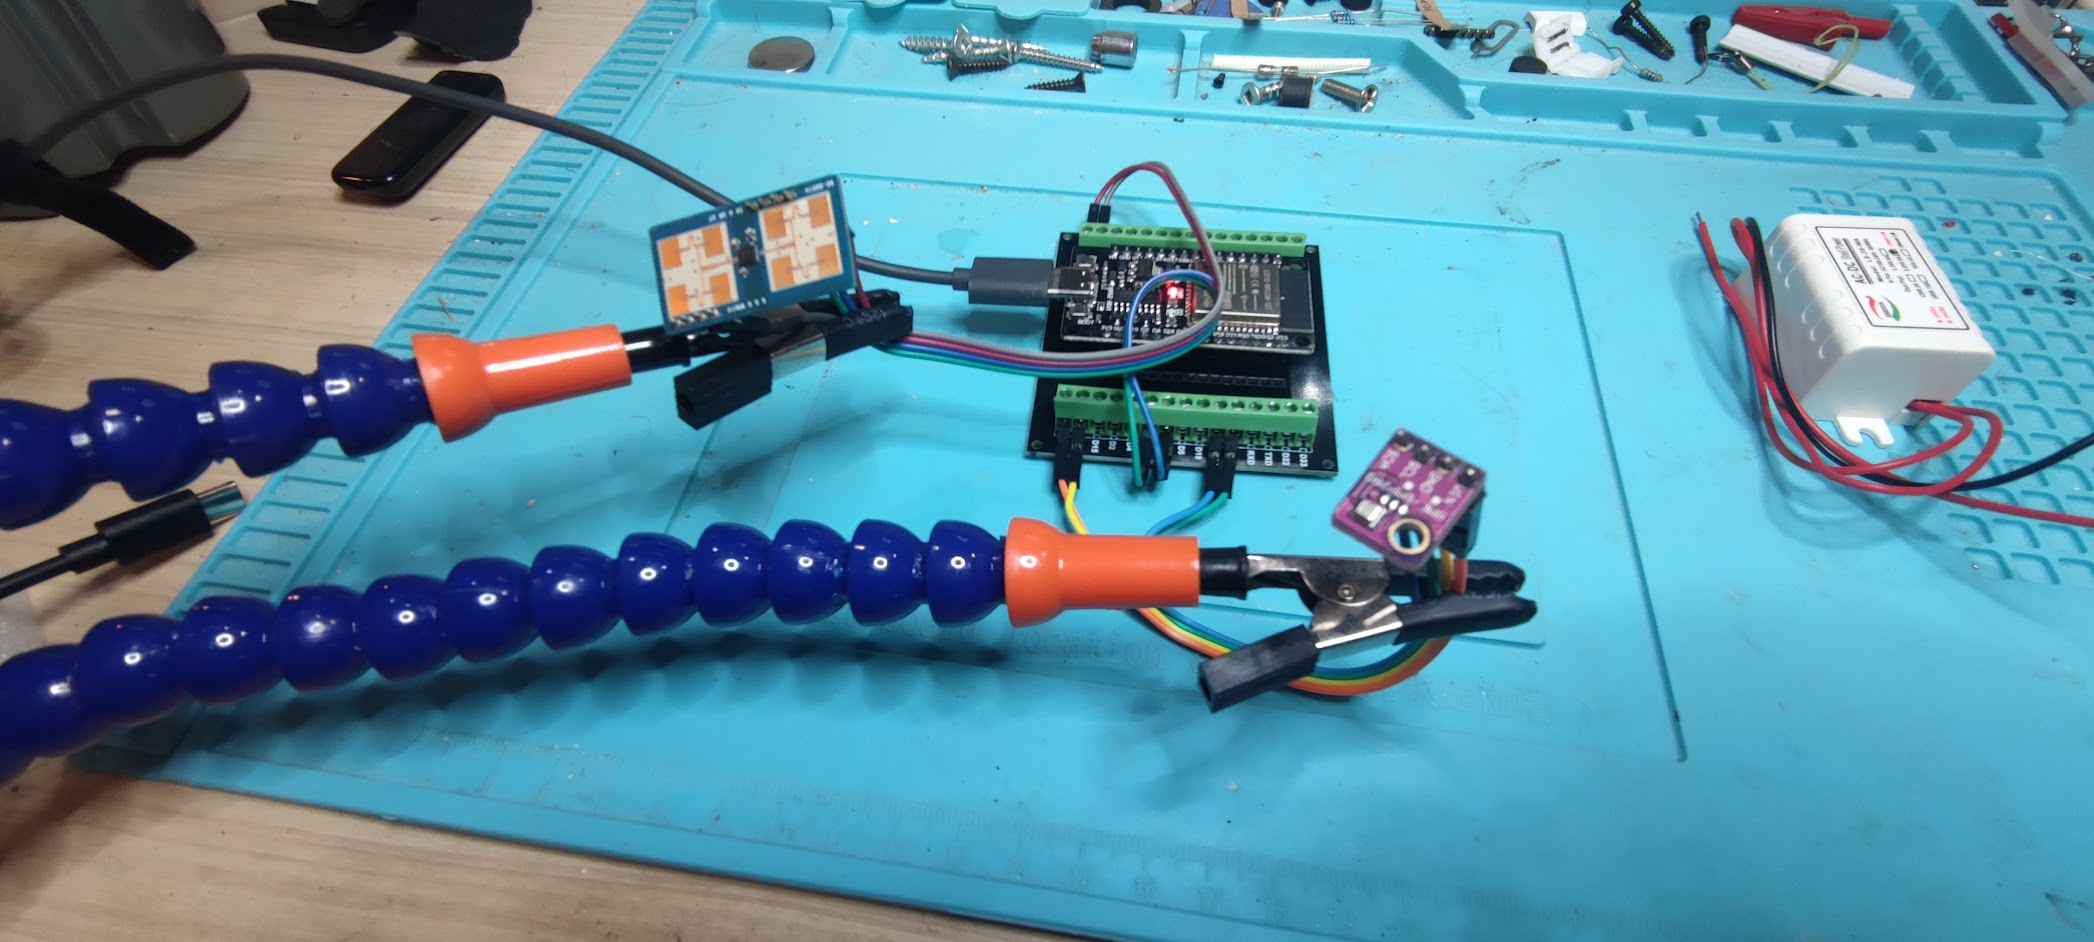
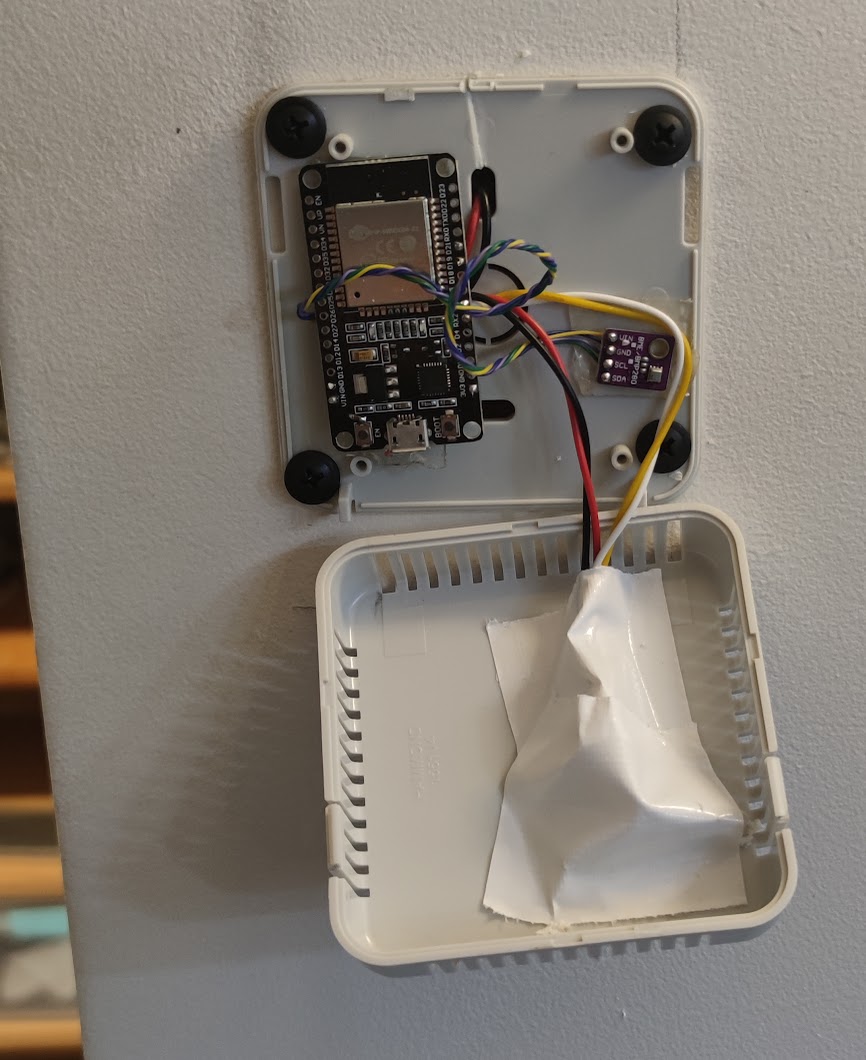
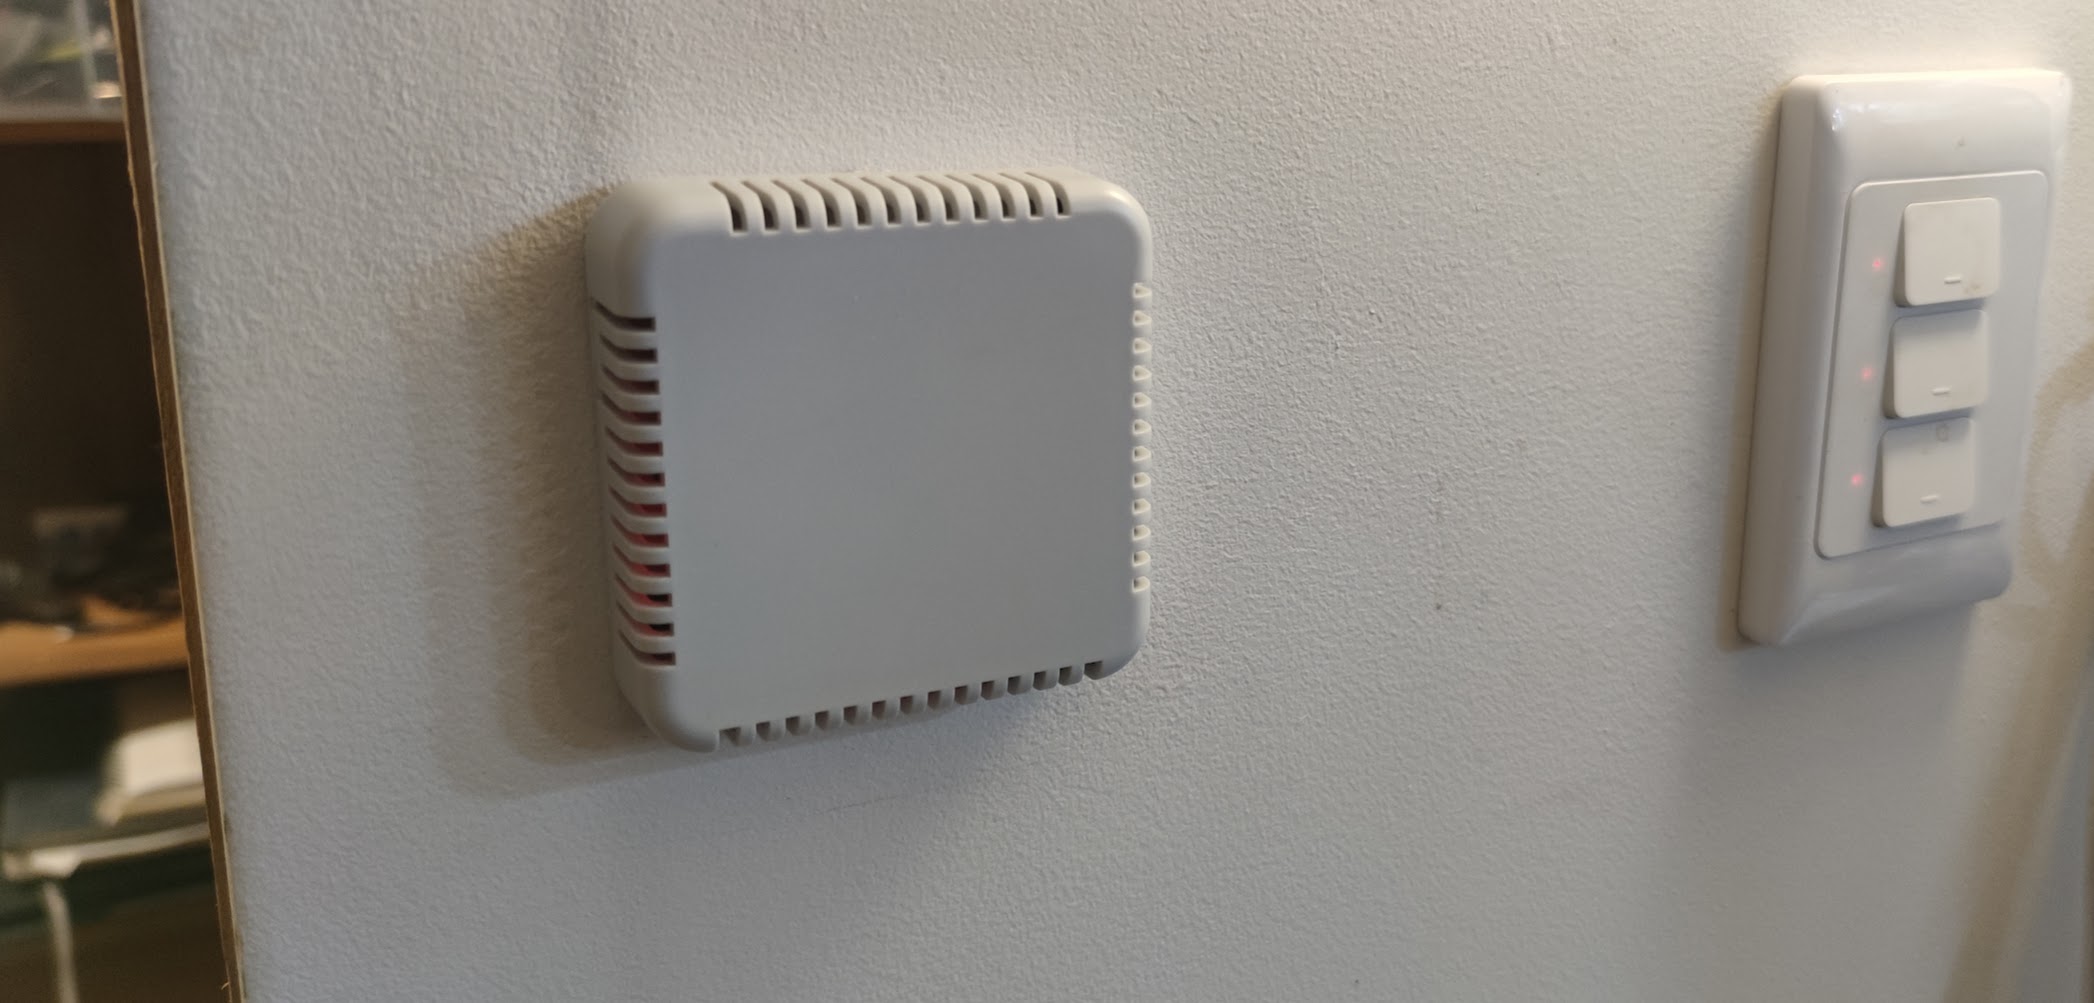
The photos show how I put the equipment together. I bought a cheap ‘temp sensor’ style wall case, and mounted inside an ESP32 Dev module, with a LD1125H on the front cover (facing straight out) and a BME280 on the inside for temp/humidity/pressure. I attempted to keep this away from the rest of the electronics and near the edge of the open sided case.
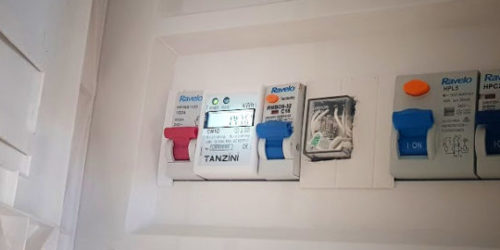
Power was with a small, 3W 250VAC-5VDC Buck Converter in a case (see pics). This was mounted in the wall behind and powered from the nearby light switch feed.

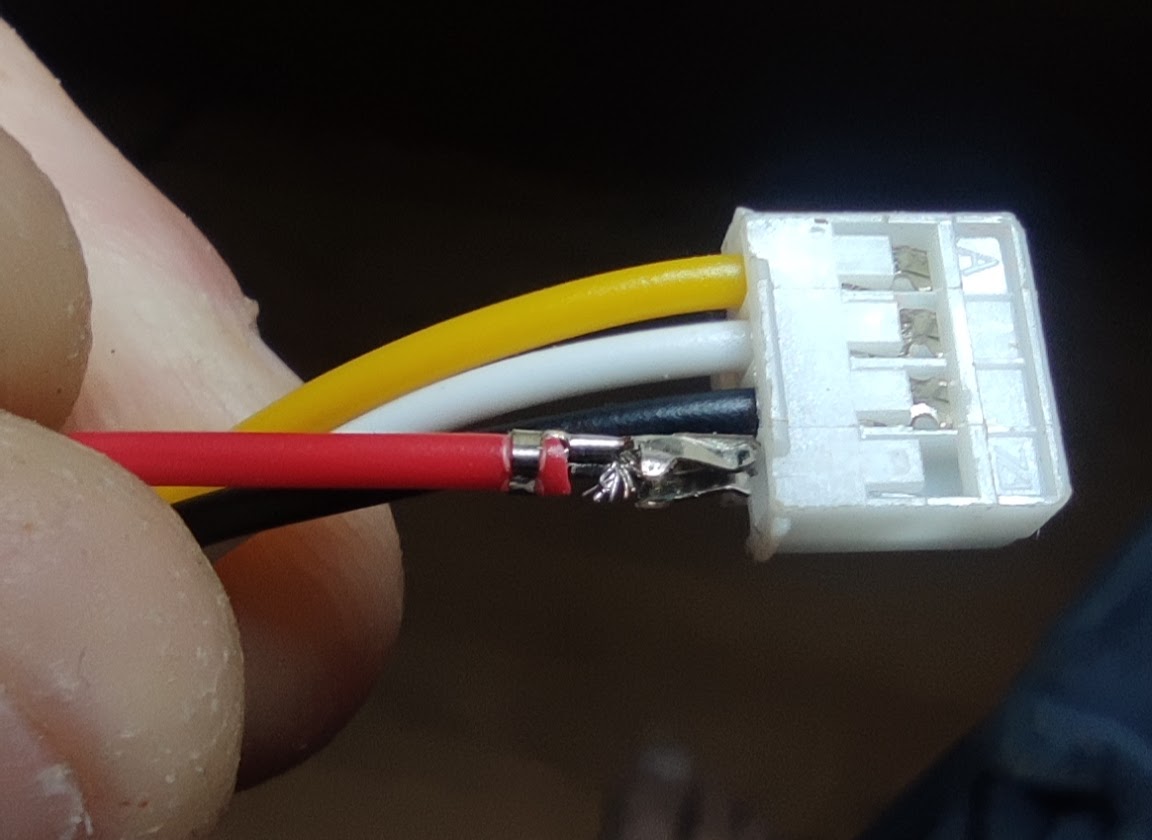
Above shows the components in the case ready to go after soldering everything together. The LD1125H was the only item in this lot that already had header pins on it, so it was easier to just plug this in than solder to it. It does however use smaller 2mm pitch headers though, so if you don’t have 2mm pitch plugs/cables then you’ll need to find some. The pic to the right shows me holding a connector that fits (and I swapped some pins around to match the colours correctly).
ESPHome LD1125H Web Interface Display/Control
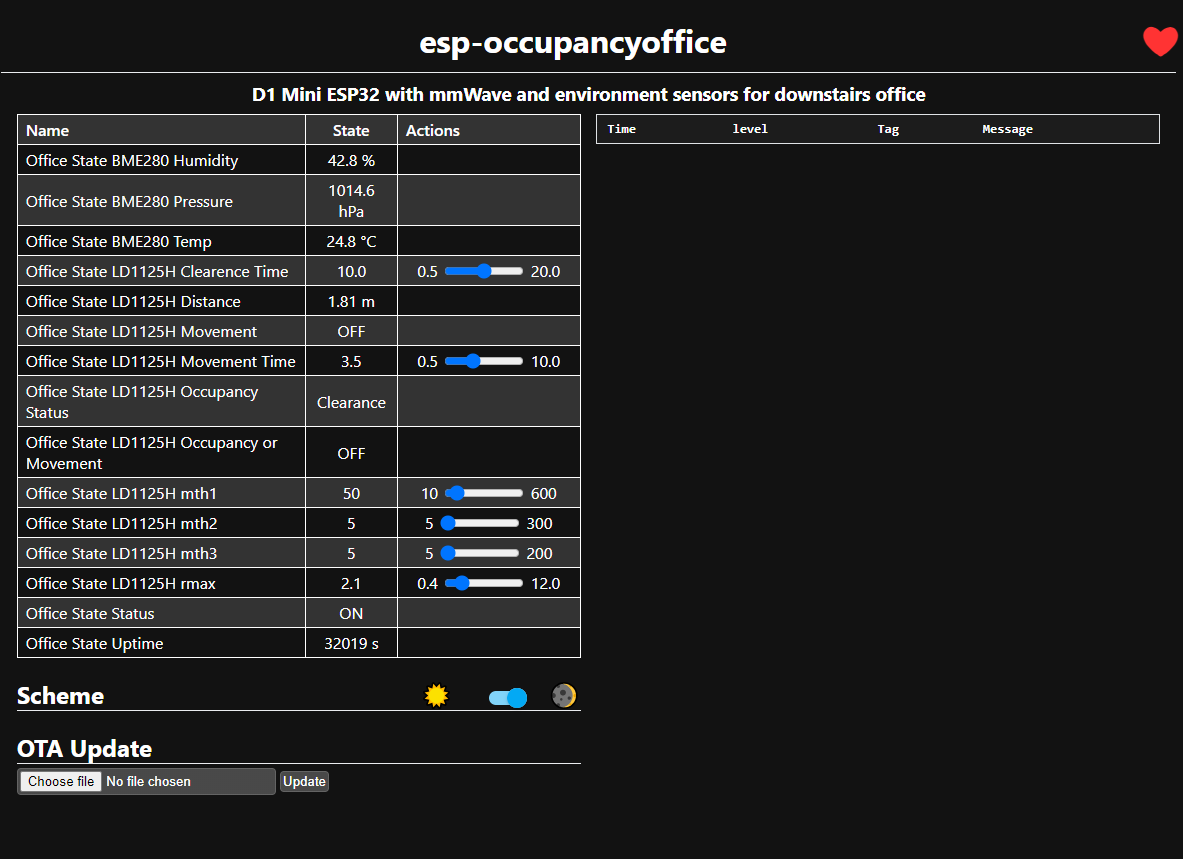
Tuning the LD1125H
mth1: This is the sensitivity setting for the sensing from 0 to 2.8m range. Lower is less sensitive (and 0 decimal places). This value corresponds to the signal threshold within 2.8 meters. (the default is 60).
mth2: This is as above, but from 2.8 to 8m range. The default is 30.
mth3: This is the sensitivity for anything above 8m. The default is 20.
rmax: This is the maximum distance, that you want to do any form of detection (only about 2.8m for my room). The distance value with one decimal place can be set, and the unit is meters. For example: Set the module to only detect targets within a distance of 6 meters. Targets 6 meters away or more will not trigger. The module defaults to rmax=6
When the unit detects a static human, or a very small amplitude movement (and also any larger movement), espHome will output “Occupancy” then after the clearance time “Clearance” (on the Occupancy or Movement Status binary sensor)
Clearance Time: This is the internal Mov/Occ to Clearance waiting time, i.e. the time to change from when someone is detected (and there is no more subsequent movement detected) to when it states ‘Clearance’
When it detects larger motion, it will output “ON” (on the Movement binary sensor) or “OFF” otherwise.
Movement Time: This is the time from when it thinks movement is no longer detected to when it notifies ‘OFF’
LD1125H ESPHome Configuration
Below is the config I used. I try to heavily comment my YAML so I can easily reuse it in ESPHome and don’t forget what it all does when I come back to fix something! You may not need all of this, eg Bluetooth proxy is useful if you have other Bluetooth devices on your ESPHome/home assistant network, but it has nothing specifically to do with this setup and the mmWave sensor (although the LD2410 sensor can use Bluetooth)
#############################################
#############################################
# HiLink LD1125H mmWave sensor, with BME280 Temp/Hum/Pres Sensor on an ESP32
# https://zorruno.com/2024/mmwave-occupancy-with-esp32-ld1125h/
#
# https://github.com/patrick3399/Hi-Link_mmWave_Radar_ESPHome/tree/main
# https://github.com/patrick3399/Hi-Link_mmWave_Radar_ESPHome/blob/main/LD1125H/ESP32-LD1125H-Complete.yaml
#
# mth1: 0 to 2.8m sensitive
# mth2: 2.8 to 8m sensitive
# mth3: above 8m sensitive
# rmax: max distance
# Clearance Time: Mov/Occ to Clearance waiting time
# Movement Time: Mov to Occ waiting time
#
#############################################
#############################################

#############################################
# VARIABLE SUBSTITUTIONS
# Give the device a useful name & description here
# and change values accordingly.
#############################################
substitutions:
  devicename: "esp-occupancyoffice"
  friendly_name: "Office State"
  description_comment: "D1 Mini ESP32 with LD1125H mmWave and environment sensors for downstairs office"

  #if NOT using a secrets file, just replace these with the passwords etc (in quotes)
  api_key: !secret esp-occupancyoffice_api_key #unfortunately you can't use substitutions inside secrets names
  ota_pass: !secret esp-occupancyoffice_ota_pass #unfortunately you can't use substitutions inside secrets names
  wifi_ssid: !secret wifi_ssid
  wifi_password: !secret wifi_password
  fallback_ap_password: !secret fallback_ap_password
  #Add these if we are giving it a static ip, or remove them in the Wifi section
  #static_ip_address: !secret esp-occupancyoffice_static_ip
  #static_ip_gateway: !secret esp-occupancyoffice_gateway
  #static_ip_subnet: !secret esp-occupancyoffice_subnet

  mqtt_server: !secret mqtt_server
  mqtt_username: !secret mqtt_username
  mqtt_password: !secret mqtt_password
  mqtt_topic: "esphome" #main topic for the mqtt server, call it what you like

  #web_server_username: !secret web_server_username
  #web_server_password: !secret web_server_password

  update_time: 30s #update time for for general temp sensors etc

#############################################
# ESPHome
# https://esphome.io/components/esphome.html
#############################################
esphome:
  name: ${devicename}
  comment: ${description_comment} #appears on the esphome page in HA
  on_boot:    #LD1125H Initial Setting, will remember previous values (if set)
    priority: -200
    then:
      - uart.write:
          id: LD1125H_UART_BUS
          data: !lambda |-
            std::string th1st = "mth1=" + str_sprintf("%.0f",id(LD1125H_mth1).state) +"\r\n";
            return std::vector<uint8_t>(th1st.begin(), th1st.end());
      - uart.write:
          id: LD1125H_UART_BUS
          data: !lambda |-
            std::string th2st = "mth2=" + str_sprintf("%.0f",id(LD1125H_mth2).state) +"\r\n";
            return std::vector<uint8_t>(th2st.begin(), th2st.end());
      - uart.write:
          id: LD1125H_UART_BUS
          data: !lambda |-
            std::string th3st = "mth3=" + str_sprintf("%.0f",id(LD1125H_mth3).state) +"\r\n";
            return std::vector<uint8_t>(th3st.begin(), th3st.end());
      - uart.write:
          id: LD1125H_UART_BUS
          data: !lambda |-
            std::string rmaxst = "rmax=" + str_sprintf("%.1f",id(LD1125H_rmax).state) +"\r\n";
            return std::vector<uint8_t>(rmaxst.begin(), rmaxst.end());

#############################################
# ESP Platform and Framework
# https://esphome.io/components/esp32.html
#############################################
esp32:
  #board: nodemcu-32s
  board: esp32dev
  framework:
    #type: arduino
    type: esp-idf  #Suggest using the ESP-IDF Framework. Changing from arduino to esp-idf needs a cabled download to change partitions
    version: recommended #recommended, latest or dev

#############################################
# i2s bus
# https://esphome.io/components/i2c.html
#############################################
i2c:
  sda: GPIO19
  scl: GPIO21
  scan: True
  frequency: 100kHz #10, 50, 100, 200, 800 are possible settings, 100kHz was reliable for me

#############################################
# ESPHome external or custom components to use
# https://esphome.io/components/external_components.html
# https://github.com/ssieb/esphome_components/tree/master/components/serial
#############################################
external_components:
  - source:
      type: git
      url: https://github.com/ssieb/custom_components #Thanks for @ssieb components.
    components: [ serial ]  #text_sensor that reads lines for a uart. Also, a sensor that reads single binary values from the uart.

#############################################
# ESPHome Logging Enable
# https://esphome.io/components/logger.html
#############################################
logger:
  level: INFO  #INFO Level suggested, or DEBUG for testing
  baud_rate: 0 #set to 0 for no logging via UART, needed if you are using it for other serial things (eg PZEM)
  #esp8266_store_log_strings_in_flash: false
  #tx_buffer_size: 64

#############################################
# Enable the Home Assistant API
# https://esphome.io/components/api.html
#############################################
api:
  encryption:
    key: ${api_key}

#############################################
# Enable Over the Air Update Capability
# https://esphome.io/components/ota.html?highlight=ota
#############################################
ota:
  safe_mode: true  #Safe mode will detect boot loops
  password: ${ota_pass}

#############################################
# Wifi Settings
# https://esphome.io/components/wifi.html
#
# Power Save mode (can reduce wifi reliability)
# NONE (least power saving, Default for ESP8266)
# LIGHT (Default for ESP32)
# HIGH (most power saving)
#############################################
wifi:
  ssid: ${wifi_ssid}
  password: ${wifi_password}
  #power_save_mode: LIGHT #https://esphome.io/components/wifi.html#wifi-power-save-mode
  #manual_ip: #optional static IP address
    #static_ip: ${static_ip_address}
    #gateway: ${static_ip_gateway}
    #subnet: ${static_ip_subnet}
  ap:   #Details for fallback hotspot (captive portal) in case wifi connection fails https://esphome.io/components/wifi.html#access-point-mode
    ssid: ${devicename} fallback AP
    password: ${fallback_ap_password}
    ap_timeout: 5min #default is 1min

#############################################
# Web Portal for display and monitoring
# Turning this off is probably a good idea to save resources.
# https://esphome.io/components/web_server.html
#############################################
#web_server:
#  port: 80
#  auth:
#   username: ${web_server_username} #probably a good idea to secure it
#   password: ${web_server_password}

#############################################
# MQTT Monitoring
# https://esphome.io/components/mqtt.html?highlight=mqtt
# MUST also have api enabled if you enable MQTT
#############################################
mqtt:
  broker: ${mqtt_server}
  topic_prefix: ${mqtt_topic}/${devicename}
  username: ${mqtt_username}
  password: ${mqtt_password}

#############################################
# Bluetooth
# https://esphome.io/components/bluetooth_proxy.html
# https://esphome.io/components/esp32_ble_tracker.html
# Remember that this takes a LOT of processing. On the
# ESP32, enable the  IDF framework, and disable the
# Web server component.  Changing to the IDF framework
# needs to be via cable not OTA to change the
# partition setup.
#############################################
#bluetooth_proxy:
#  active: true

#esp32_ble_tracker:

#############################################
# UART Serial
# hardware on EPS32, but software, and can be glitchy on ESP8266
# https://esphome.io/components/uart.html
#############################################
uart:
  id: LD1125H_UART_BUS
  rx_pin: GPIO16  #For ESP32, you can use any pin, Recommend Use UART_2, Don't use UART_0, It might Cause Boot Fail or System Hang
  tx_pin: GPIO17  #For ESP32, you can use any pin, Recommend Use UART_2, Don't use UART_0, It might Cause Boot Fail or System Hang
  baud_rate: 115200
  data_bits: 8
  stop_bits: 1
  parity: NONE

#############################################
# Global Variables for use in automations etc
# https://esphome.io/guides/automations.html?highlight=globals#global-variables
#############################################
globals:
  - id: LD1125H_Last_Time
    type: time_t
    restore_value: no
    initial_value: time(NULL)
  - id: LD1125H_Last_Mov_Time
    type: time_t
    restore_value: no
    initial_value: time(NULL)
  - id: LD1125H_Clearence_Status
    type: bool
    restore_value: no
    initial_value: "false"

#############################################
# General esp status LED
# https://esphome.io/components/status_led.html
#############################################
status_led:
  pin:
    number: GPIO2 #ESP32 Onboard LED
    ignore_strapping_warning: True #https://esphome.io/guides/faq.html#why-am-i-getting-a-warning-about-strapping-pins
    inverted: false

#############################################
# Interval Automations
# https://esphome.io/guides/automations.html
#############################################
interval:
  - interval: 1s #Clearance Scan Time
    setup_priority: -200
    then:
      lambda: |-
        if ((time(NULL)-id(LD1125H_Last_Time))>id(LD1125H_Clear_Time).state) {
          if ((id(LD1125H_Clearence_Status) == false) || (id(LD1125H_Occupancy).state != "Clearance")) {
            id(LD1125H_Occupancy).publish_state("Clearance");
            id(LD1125H_Clearence_Status) = true;
          }
          if (id(LD1125H_MovOcc_Binary).state == true) {
            id(LD1125H_MovOcc_Binary).publish_state(false);
          }
          if (id(LD1125H_Mov_Binary).state == true) {
            id(LD1125H_Mov_Binary).publish_state(false);
          }
        }

#############################################
# Number Sensors (custom component)
# refer https://github.com/ssieb/esphome_components/tree/master/components/serial
#############################################
number:
  - platform: template
    name: ${friendly_name} LD1125H mth1 #mth1 is 0~2.8m Sensitivity.
    id: LD1125H_mth1
    icon: "mdi:cogs"
    optimistic: true
    restore_value: true #If you don't want to store the setting at ESP, set it to false.
    initial_value: "60.0" #Default mth1 Setting
    min_value: 10.0
    max_value: 600.0
    step: 5.0
    set_action:
      then:
        - uart.write:
            id: LD1125H_UART_BUS
            data: !lambda |-
              std::string th1st = "mth1=" + str_sprintf("%.0f",x) +"\r\n";
              return std::vector<uint8_t>(th1st.begin(), th1st.end());
  - platform: template
    name: ${friendly_name} LD1125H mth2 #mth2 is 2.8~8m Sensitivity.
    id: LD1125H_mth2
    icon: "mdi:cogs"
    optimistic: true
    restore_value: true #If you don't want to store the setting at ESP, set it to false.
    initial_value: "30" #Default mth2 Setting
    min_value: 5
    max_value: 300
    step: 5
    set_action:
      then:
        - uart.write:
            id: LD1125H_UART_BUS
            data: !lambda |-
              std::string th2st = "mth2=" + str_sprintf("%.0f",x) +"\r\n";
              return std::vector<uint8_t>(th2st.begin(), th2st.end());
  - platform: template
    name: ${friendly_name} LD1125H mth3 #mth3 is above 8m Sensitivity.
    id: LD1125H_mth3
    icon: "mdi:cogs"
    optimistic: true
    restore_value: true #If you don't want to store the setting at ESP, set it to false.
    initial_value: "20" #Default mth3 Setting
    min_value: 5
    max_value: 200
    step: 5
    set_action:
      then:
        - uart.write:
            id: LD1125H_UART_BUS
            data: !lambda |-
              std::string th3st = "mth3=" + str_sprintf("%.0f",x) +"\r\n";
              return std::vector<uint8_t>(th3st.begin(), th3st.end());
  - platform: template
    name: ${friendly_name} LD1125H rmax #rmax is max detection distance.
    id: LD1125H_rmax
    icon: "mdi:cogs"
    optimistic: true
    restore_value: true #If you don't want to store the setting at ESP, set it to false.
    initial_value: "8" #Default rmax Setting
    min_value: 0.4
    max_value: 12
    step: 0.1
    set_action:
      then:
        - uart.write:
            id: LD1125H_UART_BUS
            data: !lambda |-
              std::string rmaxst = "rmax=" + str_sprintf("%.1f",x) +"\r\n";
              return std::vector<uint8_t>(rmaxst.begin(), rmaxst.end());
  - platform: template
    name: ${friendly_name} LD1125H Clearence Time
    id: LD1125H_Clear_Time
    icon: "mdi:cogs"
    optimistic: true
    restore_value: true #If you don't want to store the setting at ESP, set it to false.
    initial_value: "5" #LD1125H Mov/Occ > Clearence Time Here
    min_value: 0.5
    max_value: 20
    step: 0.5
  - platform: template
    name: ${friendly_name} LD1125H Movement Time
    id: LD1125H_Mov_Time
    icon: "mdi:cogs"
    optimistic: true
    restore_value: true #If you don't want to store the setting at ESP, set it to false.
    initial_value: "1" #LD1125H Mov > Occ Time Here
    min_value: 0.5
    max_value: 10
    step: 0.5

#############################################
# General Sensors
# https://esphome.io/components/sensor/index.html
#############################################
sensor:
  - platform: bme280_i2c
    temperature:
      name: ${friendly_name} BME280 Temp
      accuracy_decimals: 1
      oversampling: 2x
    pressure:
      name: ${friendly_name} BME280 Pressure
      oversampling: 2x
    humidity:
      name: ${friendly_name} BME280 Humidity
      accuracy_decimals: 1
      oversampling: 2x
    address: 0x76
    update_interval: ${update_time}
  - platform: uptime
    name: ${friendly_name} Uptime
  - platform: template
    name: ${friendly_name} LD1125H Distance
    id: LD1125H_Distance
    icon: "mdi:signal-distance-variant"
    unit_of_measurement: "m"
    accuracy_decimals: 2
    filters:    # Use Fliter To Debounce
    - sliding_window_moving_average:
        window_size: 8
        send_every: 2
    - heartbeat: 0.2s

#############################################
# Text Sensors
# refer https://esphome.io/components/text_sensor/index.html
#############################################
text_sensor:
  - platform: serial
    uart_id: LD1125H_UART_BUS
    name: ${friendly_name} LD1125H UART Text
    id: LD1125H_UART_Text
    icon: "mdi:format-text"
    internal: True #If Don't Want to See UART Receive Data, Set To True
    on_value:
      lambda: |-
        if (id(LD1125H_UART_Text).state.substr(0,3) == "occ") {
          id(LD1125H_Distance).publish_state(atof(id(LD1125H_UART_Text).state.substr(9).c_str()));
          if ((time(NULL)-id(LD1125H_Last_Mov_Time))>id(LD1125H_Mov_Time).state) {
            id(LD1125H_Occupancy).publish_state("Occupancy");
            if (id(LD1125H_MovOcc_Binary).state == false) {
              id(LD1125H_MovOcc_Binary).publish_state(true);
            }
            if (id(LD1125H_Mov_Binary).state == true) {
              id(LD1125H_Mov_Binary).publish_state(false);
            }
          }
          if (id(LD1125H_MovOcc_Binary).state == false) {
            id(LD1125H_MovOcc_Binary).publish_state(true);
          }
          id(LD1125H_Last_Time) = time(NULL);
          if (id(LD1125H_Clearence_Status) == true) {
            id(LD1125H_Clearence_Status) = false;
          }
        }
        else if (id(LD1125H_UART_Text).state.substr(0,3) == "mov") {
          id(LD1125H_Distance).publish_state(atof(id(LD1125H_UART_Text).state.substr(9).c_str()));
          id(LD1125H_Occupancy).publish_state("Movement");
          if (id(LD1125H_MovOcc_Binary).state == false) {
            id(LD1125H_MovOcc_Binary).publish_state(true);
          }
          if (id(LD1125H_Mov_Binary).state == false) {
            id(LD1125H_Mov_Binary).publish_state(true);
          }
          id(LD1125H_Last_Mov_Time) = time(NULL);
          id(LD1125H_Last_Time) = time(NULL);
          if (id(LD1125H_Clearence_Status) == true) {
            id(LD1125H_Clearence_Status) = false;
          }
        }
  - platform: template
    name: ${friendly_name} LD1125H Occupancy Status
    id: LD1125H_Occupancy
    icon: "mdi:motion-sensor"

#############################################
# Binary Sensors
# https://esphome.io/components/binary_sensor/index.html
#############################################
binary_sensor:
  - platform: status
    name: ${friendly_name} Status
  - platform: template
    name: ${friendly_name} LD1125H Occupancy or Movement
    id: LD1125H_MovOcc_Binary
    device_class: occupancy
  - platform: template
    name: ${friendly_name} LD1125H Movement
    id: LD1125H_Mov_Binary
    device_class: motion
A warning about running bluetooth proxy
Recently (July 2024) I have been playing more with Bluetooth and iBeacons. I thought I might like to run Bermuda on Home Assistant and replace my ESPresense nodes. This meant I could use existing ESPHome nodes, with Bluetooth Proxy running on them.
I managed to build one ESPHome node that had Bluetooth and mmWave running at the same time. My previous builds however would NOT boot if I enabled Bluetooth on the ESP32 with ESPHome. I suspect some of these dev boards are a bit fickle and it took me a fair while to get them both running successfully. Also note that one board would not recognise a BMP280 on I2C at 100kHz either (with poor error messaging. Setting the default 50kHz was fine)
The ESPHome settings I used are below, and they seem to work reliably now. I can move my iBeacons near each Bluetooth Proxy, and they nicely report on the area they are closest to.
Under the API component, you can turn on the BLE tracker, only when connected to Home Assistant via the API. Apparently this plays more nicely with Wifi, as per https://esphome.io/components/esp32_ble_tracker.html#use-on-single-core-chips
It is supposed to be a workaround for single core chips, but mine are both the same so I’m not sure why one works and the other doesn’t.
#############################################
# Enable the Home Assistant API
# https://esphome.io/components/api.html
#############################################
api:
  encryption:
    key: ${api_key}
  on_client_connected:
    - esp32_ble_tracker.start_scan:
       continuous: true
  on_client_disconnected:
    - esp32_ble_tracker.stop_scan:
I used these settings for bluetooth proxy and tracker:
#############################################
# Bluetooth
# https://esphome.io/components/bluetooth_proxy.html
# https://esphome.io/components/esp32_ble_tracker.html
# Remember that this takes a LOT of processing. On the
# ESP32, enable the  IDF framework, and disable the
# Web server component.  Changing to the IDF framework
# needs to be via cable not OTA to change the
# partition setup.
#############################################
bluetooth_proxy:
  active: true
  cache_services: true

esp32_ble_tracker:
    scan_parameters:
      continuous: false
Other LD1125H Links
Digiblur’s YouTube video on using a similar LD1125H setup:
https://digiblur.com/2023/05/24/esphome-mmwave-presence-how-to-guide/
Another Digiblur video on why he likes the LD1125H
https://www.youtube.com/watch?v=9j5Yy5M8YOs
patrick3399’s HiLink mmWave ESPHome configs on Github:
https://github.com/patrick3399/Hi-Link_mmWave_Radar_ESPHome/tree/main
A quick LD1125H short range test demonstration (Useful Electronics)
https://www.youtube.com/watch?v=hZ1jm6BMlOE
Another video on the LD1125H (Useful Electronics)
https://www.youtube.com/watch?v=RXj-JX6W-YE