mmWave occupancy, ESP32 and LD2410 (UART)
Changes
2024-05-30 V1.0 moved notes from page on LD1125H, it is a similar setup but with LD2410
2024-06-09 V1.1 added a couple of photos of how I mounted the esp32 etc
2024-06-09 V1.12 added a note about fixing issues with Bluetooth proxy (on previous mmwave page)
Summary
Use of an ESP32 running ESPHome to interface with a LD2410 (with UART/Serial, directly connected and not Bluetooth). This 24GHz microwave sensor has a native ESPHome component. I’ve provided my ESPHome YAML setup also below. This was the second mmWave sensor I played with, see here for my LD1125H Setup
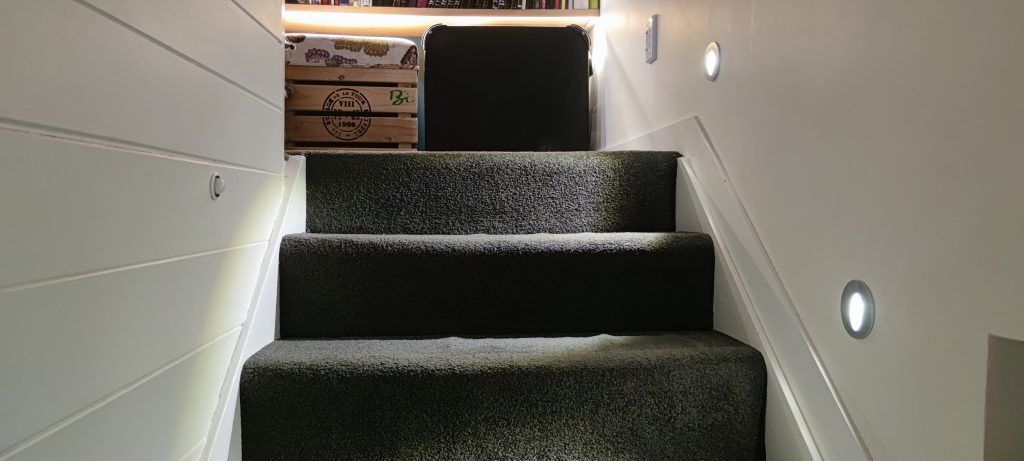
This setup was to be turn on some stairwell tread lights with movement.
Having issues with your ESP32 booting, when running Bluetooth proxy as well as other components on the ESP32? See my warning on my previous mmWave notes and the solution I used.
Equipment Used
- Hi-Link LD2410 mmWave 24GHz Occupancy sensor (Aliexpress)
- BME280 SPI Digital Environment sensor (Aliexpress)
- ESP32 Dev Board (Aliexpress) Other ESP32s will obviously do.
- 230V-5V Isolated buck converter in case (Aliexpress). Other methods to get 5V will be fine obviously, eg just plugging the ESP32 in via USB lead.
- Plug and lead set for the mmWave sensor which has a tiny 1.27mm pitch. This one is a good option and includes all 5 pins.
- I also used a small PIR on my setup into a GPIO pin. I used this one, which looks ok installed in a ceiling or wall, and works from 5V (actually anywhere from 5-24V).
- You might also want some sort of case (see my previous build for what I used for that)
Sensor description & manual
The LD1125H comes in a few flavours, with the B and C models having Bluetooth and the C model being a bit bigger with a more generous sized header pin set. The A&B models are pretty tiny overall and have a 1.27mm pin header.
These high frequency detectors are so sensitive, that they can detect a person even if they aren’t moving, but seeing heartbeat and breathing movement.
Bluetooth can be useful for setup (there is a phone app for configuration, testing and apparently also Firmware updates), and actually espHome and home assistant can both talk directly to a LD1125B/C via the Bluetooth component or Bluetooth proxy setup. All of this (with the exception maybe of Firmware updates?) can be achieved with this UART setup however.
Also, as at May 2024, I tried using a B model with Bluetooth, and even though it was a simple very setup, it was certainly not robust as the connection failed daily with a reset of the Bluetooth or home assistant required in most cases. It may improve in future updates. Apparently one ESP32 BT Proxy setup can happily support 3 of these mmWave units over Bluetooth.
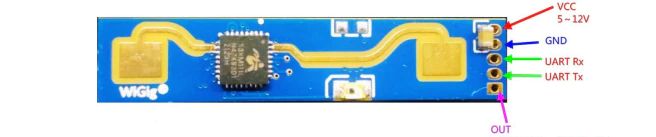
The LD2410 module outputs standard serial data, so you can connect it to an ESP32 UART and ESPHome can use it’s internal libraries. The LD2410 has a native ESPHome component. LD2410s also have a single binary pin ‘activated’ output, but I don’t use that here.
The Hi-Link manual is downloadable below that shows more detail including the suggested installation coverage, heights etc
LD2410 Pinout
Check out my previous setup with an LD1125H for how this and other components are connected to the ESP32.
Other Sensors
I used a BME280 and a simple PIR in this build. Have a look at my previous setup for how I connected the bme280 to the ESP32.
The PIR I used just needed a 5V and GND connection to power it, and the white wire showed GND when the PIR was NOT activated (normally closed). In the espHome code, you can see I used this in GPIO13, with an internal pullup and inverted.
ESPHome LD2410 Web Interface Display/Control
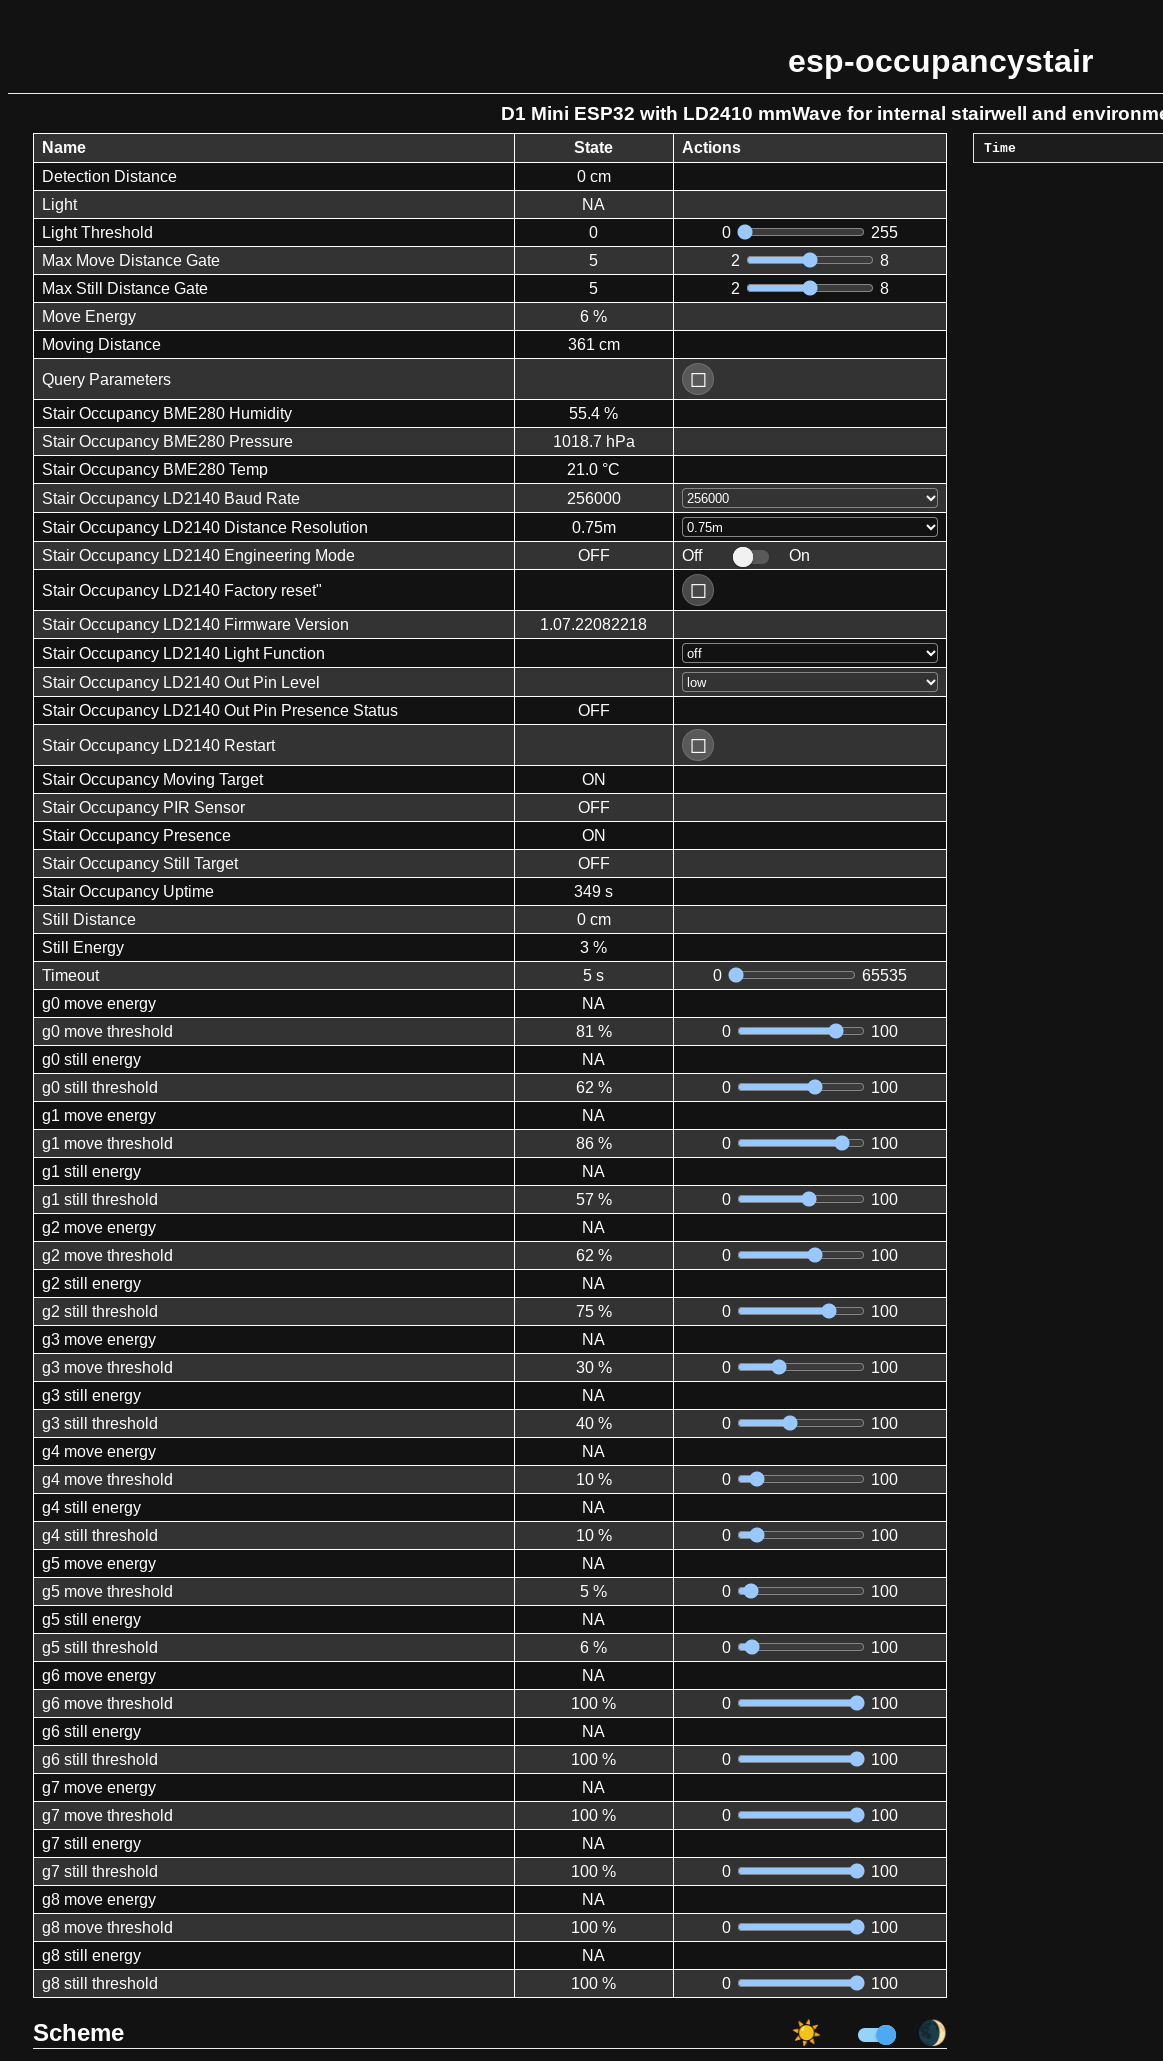
Tuning the LD2410
This model has 8 ‘Gates’ which are 0.75m long (or 0.2m, if you set that option with ‘Distance Resolution‘). You can tune each of these gates for ‘still energy‘ or the detection of non moving humans, and also for ‘move energy‘. All the gate settings are 0-100%
You’ll notice in the web display above, it shows N/A for the energy readings, but if you turn the ‘Engineering Mode‘ on, this will show a percentage signal for every value so you can do some tuning.
Be sure to set the ‘Max Move Distance Gate‘, and the ‘Max Still Distance Gate‘, which gives the maximum distance for detection (eg if both set to 5, it will only detect 5×0.75 or 3.5m.
You can obviously do this tuning in the web interface or the Home Assistant Devices display, and using the HA app on your phone to tune is very convenient.
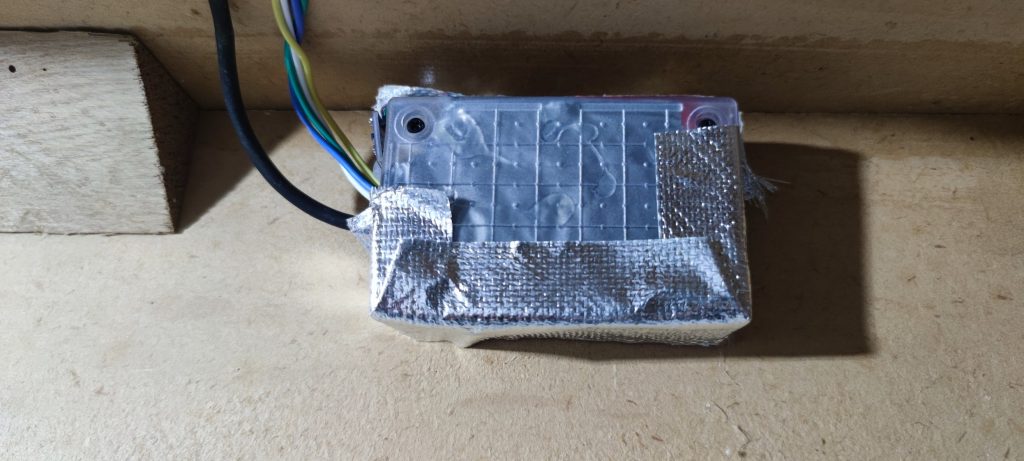
Mounting the unit
I put this unit in a cheap plastic box as it is behind the treads of an internal stairwell and not visible. It has no problem at all sensing people on the stairs though the 18mm chipboard.
I did also add the PIR near the top steps however, to ensure that people were sensed at the top before they started walking down. The LD2410 is inside the box, horizontally and angled slightly downwards to point to the bottom of the stairs. The BME280 is just stuck on the side of the box, to measure my underhouse environment.
LD2410 ESPHome Configuration
Below is the config I used for my LD2410 sensor, which is a bit simpler than the previous LD1125H as it has a native ESPHome component. Again, watch the combinations of what you enable, eg if you turn Bluetooth proxy on, you should use the ESP-IDF Framework and turn off the web server component as per the ESPhome instructions. Also, changing to the IDF framework really need an update with a cable (not OTA) as the partition table needs updating.
The LD2410B version of the sensor can actually use Bluetooth to talk to Home Assistant, so you could potentially add more devices this way. But that is not documented here, and not currently stable (see above).
You may not need all of this YAML setup, and also I struggled to get the Bluetooth proxy doing anything at all with the rest of this setup (I was planning to use it with other Bluetooth device), so either the ESP32 has conflict with some of these ESPHome items turned on, or it isn’t powerful enough for the multiple components I had.
#############################################
#############################################
# HiLink LD2410 mmWave sensor, with BME280 Temp/Hum/Pres Sensor and PIR on an ESP32
# https://github.com/patrick3399/Hi-Link_mmWave_Radar_ESPHome/tree/main
# https://github.com/patrick3399/Hi-Link_mmWave_Radar_ESPHome/blob/main/LD1125H/ESP32-LD1125H-Complete.yaml
#
# https://esphome.io/components/sensor/ld2410.html
# https://www.simplysmart.house/blog/presence-detection-ld2410-home-assistant
#
# The B and c versions of this device can use Bluetooth, but we are not using it here.
#############################################
#############################################

#############################################
# VARIABLE SUBSTITUTIONS
# Give the device a useful name & description here
# and change values accordingly.
#############################################
substitutions:
  devicename: "esp-occupancystair"
  friendly_name: "Stair Occupancy"
  description_comment: "D1 Mini ESP32 with LD2410 mmWave for internal stairwell and environment sensors for under house"
  api_key: !secret esp-occupancystair_api_key #unfortunately you can't use substitutions in secrets names
  ota_pass: !secret esp-occupancystair_ota_pass #unfortunately you can't use substitutions in secrets names
  wifi_ssid: !secret wifi_ssid
  wifi_password: !secret wifi_password
  fallback_ap_password: !secret fallback_ap_password
  #Add these if we are giving it a static ip, or remove them in the Wifi section
  #static_ip_address: !secret esp-occupancystair_static_ip
  #static_ip_gateway: !secret esp-occupancystair_gateway
  #static_ip_subnet: !secret esp-occupancystair_subnet

  mqtt_server: !secret mqtt_server
  mqtt_username: !secret mqtt_username
  mqtt_password: !secret mqtt_password
  mqtt_topic: "esphome" #main topic for the mqtt server, call it what you like

  #web_server_username: !secret web_server_username
  #web_server_password: !secret web_server_password

  update_time: 30s #update time for for general temp sensors etc

#############################################
# ESPHome
# https://esphome.io/components/esphome.html
#############################################
esphome:
  name: ${devicename}
  comment: ${description_comment} #appears on the esphome page in HA
  #on_boot:    #Initial Setting, will remember previous values (if set)
    #priority: -200
    #then:

#############################################
# ESP Platform and Framework
# https://esphome.io/components/esp32.html
#############################################
esp32:
  board: esp32dev
  framework:
    #type: arduino
    type: esp-idf  #Suggested Use ESP-IDF Framework, or Plug Out the UART Cable Might Cause ESP32 Hang.
    version: recommended #recommended, latest or dev

#############################################
# i2s bus
# https://esphome.io/components/i2c.html
#############################################
i2c:
  sda: GPIO19
  scl: GPIO21
  scan: True
  frequency: 100kHz #10, 50, 100, 200, 800 are possible settings, 100kHz was reliable for me

#############################################
# ESPHome Logging Enable
# https://esphome.io/components/logger.html
#############################################
logger:
  level: INFO  #INFO Level suggested, or DEBUG for testing
  baud_rate: 0 #set to 0 for no logging via UART, needed if you are using it for other serial things (eg PZEM)
  #esp8266_store_log_strings_in_flash: false
  #tx_buffer_size: 64

#############################################
# Enable the Home Assistant API
# https://esphome.io/components/api.html
#############################################
api:
  encryption:
    key: ${api_key}

#############################################
# Enable Over the Air Update Capability
# https://esphome.io/components/ota.html?highlight=ota
#############################################
ota:
  safe_mode: true  #Safe mode will detect boot loops
  password: ${ota_pass}

#############################################
# Wifi Settings
# https://esphome.io/components/wifi.html
#
# Power Save mode (can reduce wifi reliability)
# NONE (least power saving, Default for ESP8266)
# LIGHT (Default for ESP32)
# HIGH (most power saving)
#############################################
wifi:
  ssid: ${wifi_ssid}
  password: ${wifi_password}
  #power_save_mode: LIGHT #https://esphome.io/components/wifi.html#wifi-power-save-mode
  #manual_ip: #optional static IP address
    #static_ip: ${static_ip_address}
    #gateway: ${static_ip_gateway}
    #subnet: ${static_ip_subnet}
  ap:   #Details for fallback hotspot (captive portal) in case wifi connection fails https://esphome.io/components/wifi.html#access-point-mode
    ssid: ${devicename} fallback AP
    password: ${fallback_ap_password}
    ap_timeout: 5min #default is 1min

#############################################
# Web Portal for display and monitoring
# Turning this off is probably a good idea to save resources.
# https://esphome.io/components/web_server.html
#############################################
web_server:
  port: 80
#  auth:
#   username: ${web_server_username} #probably a good idea to secure it
#   password: ${web_server_password}

#############################################
# MQTT Monitoring
# https://esphome.io/components/mqtt.html?highlight=mqtt
# MUST also have api enabled if you enable MQTT
#############################################
mqtt:
  broker: ${mqtt_server}
  topic_prefix: ${mqtt_topic}/${devicename}
  username: ${mqtt_username}
  password: ${mqtt_password}

#############################################
# Bluetooth
# https://esphome.io/components/bluetooth_proxy.html
# https://esphome.io/components/esp32_ble_tracker.html
# Remember that this takes a LOT of processing. On the
# ESP32, enable the  IDF framework, and disable the
# Web server component.  Changing to the IDF framework
# needs to be via cable not OTA to change the
# partition setup.
#############################################
#bluetooth_proxy:

#esp32_ble_tracker:

#############################################
# UART Serial
# hardware on EPS32, but software, and can be glitchy on ESP8266
# https://esphome.io/components/uart.html?highlight=uart
#############################################
uart:
  id: ld2410_uart
  rx_pin: GPIO16  #For ESP32, you can use any pin, Recommend Use UART_2, Don't use UART_0, It might Cause Boot Fail or System Hang
  tx_pin: GPIO17  #For ESP32, you can use any pin, Recommend Use UART_2, Don't use UART_0, It might Cause Boot Fail or System Hang
  baud_rate: 256000 # default for LD2410 is 25600, 8, 0, NONE
  data_bits: 8
  stop_bits: 1
  parity: NONE

#############################################
# General esp status LED
# https://esphome.io/components/status_led.html
#############################################
status_led:
  pin:
    number: GPIO2 #ESP32 Onboard LED
    ignore_strapping_warning: True #https://esphome.io/guides/faq.html#why-am-i-getting-a-warning-about-strapping-pins
    inverted: false

#############################################
# LD2410 Sensors
# https://esphome.io/components/sensor/ld2410.html
# https://www.hlktech.net/index.php?id=988
#############################################
ld2410:
  uart_id: ld2410_uart
  #uart_id (Optional, ID): Manually specify the ID of the UART Component if you want to use multiple UART buses.
  #throttle (Optional, int): Time in milliseconds to control the rate of data updates. Defaults to 1000ms.
  #id (Optional, ID): Manually specify the ID for this LD2410 Sensor component if you need multiple components.

# light (Optional, int): When in engineering mode, indicates the light sensitivity, otherwise unknown. Value between 0 and 255 inclusive. Though it seems that the value 85 is the lowest value at complete darkness. All options from Sensor.
# moving_distance (Optional, int): Distance in cm of detected moving target. All options from Sensor.
# still_distance (Optional, int): Distance in cm of detected still target. All options from Sensor.
# moving_energy (Optional, int): Energy for moving target. Value between 0 and 100 inclusive. All options from Sensor.
# still_energy (Optional, int): Energy for still target. Value between 0 and 100 inclusive. All options from Sensor.
# detection_distance (Optional, int): Distance in cm of target. All options from Sensor.
# gX (Optional): Energies for the Xth gate (X => 0 to 8).
  # move_energy (Optional, int): When in engineering mode, the move energy of the gate, otherwise unknown. Value between 0 and 100 inclusive. All options from Sensor.
  #still_energy (Optional, int): When in engineering mode, the still energy of the gate, otherwise unknown. Value between 0 and 100 inclusive. All options from Sensor.
#ld2410_id (Optional, ID): Manually specify the ID for the LD2410 Sensor component if you are using multiple components.

#The ld2410 number values for setting thresholds
#  timeout: 5s
#  max_move_distance: 2.25m
#  max_still_distance: 2.25m
#  g0_move_threshold: 40  # 0m / 0'
#  g0_still_threshold: 10 # 0m / 0'
#  g1_move_threshold: 40  # 0 - 0.75m / 0 - 2.46'
#  g1_still_threshold: 10 # 0 - 0.75m / 0 - 2.46'
#  g2_move_threshold: 40  # 0.75 - 1.5m / 2.46' - 4.92'
#  g2_still_threshold: 10 # 0.75 - 1.5m / 2.46' - 4.92'
#  g3_move_threshold: 40  # 1.5 - 2.25m / 4.92' - 7.38'
#  g3_still_threshold: 10 # 1.5 - 2.25m / 4.92' - 7.38'
#  g4_move_threshold: 40  # 2.25 - 3m' / 7.38' - 9.84'
#  g4_still_threshold: 40 # 2.25 - 3m' / 7.38' - 9.84'
#  g5_move_threshold: 40  # 3 - 3.75 / 9.84' - 12.30'
#  g5_still_threshold: 40 # 3 - 3.75 / 9.84' - 12.30'
#  g6_move_threshold: 30  # 3.75 - 4.5m / 12.30' - 14.76'
#  g6_still_threshold: 15 # 3.75 - 4.5m / 12.30' - 14.76'
#  g7_move_threshold: 30  # 4.5 - 5.25m / 14.76' - 17.22'
#  g7_still_threshold: 15 # 4.5 - 5.25m / 14.76' - 17.22'
#  g8_move_threshold: 30  # 5.25 - 6m / 17.22' - 19.68'
#  g8_still_threshold: 15 # 5.25 - 6m / 17.22' - 19.68'
number:
  - platform: ld2410
    timeout:
      name: Timeout
    light_threshold:
      name: Light Threshold
    max_move_distance_gate:
      name: Max Move Distance Gate
    max_still_distance_gate:
      name: Max Still Distance Gate
    g0:
      move_threshold:
        name: g0 move threshold
      still_threshold:
        name: g0 still threshold
    g1:
      move_threshold:
        name: g1 move threshold
      still_threshold:
        name: g1 still threshold
    g2:
      move_threshold:
        name: g2 move threshold
      still_threshold:
        name: g2 still threshold
    g3:
      move_threshold:
        name: g3 move threshold
      still_threshold:
        name: g3 still threshold
    g4:
      move_threshold:
        name: g4 move threshold
      still_threshold:
        name: g4 still threshold
    g5:
      move_threshold:
        name: g5 move threshold
      still_threshold:
        name: g5 still threshold
    g6:
      move_threshold:
        name: g6 move threshold
      still_threshold:
        name: g6 still threshold
    g7:
      move_threshold:
        name: g7 move threshold
      still_threshold:
        name: g7 still threshold
    g8:
      move_threshold:
        name: g8 move threshold
      still_threshold:
        name: g8 still threshold

#The ld2410 select allows you to control your LD2410 Sensor.
#distance_resolution (Optional): Control the gates distance resolution. Can be 0.75m or 0.2m. Defaults to 0.75m. All options from Select.
#baud_rate (Optional): Control the serial port baud rate. Defaults to 256000. Once changed, all sensors will stop working until a fresh install with an updated UART Component configuration. All options from Select.
#light_function (Optional): If set, will affect the OUT pin value, based on light threshold. Can be off, low or above. Defaults to off. All options from Select.
#out_pin_level (Optional): Control OUT pin away value. Can be low or high. Defaults to low. All options from Select.
#ld2410_id (Optional, ID): Manually specify the ID for the LD2410 Sensor component if you are using multiple components.
select:
  - platform: ld2410
    distance_resolution:
      name: ${friendly_name} LD2140 Distance Resolution
    baud_rate:
      name: ${friendly_name} LD2140 Baud Rate
    light_function:
      name: ${friendly_name} LD2140 Light Function
    out_pin_level:
      name: ${friendly_name} LD2140 Out Pin Level

#############################################
# General Sensors
# https://esphome.io/components/sensor/index.html
#############################################
sensor:
  - platform: bme280_i2c
    temperature:
      name: ${friendly_name} BME280 Temp
      accuracy_decimals: 1
      oversampling: 2x
    pressure:
      name: ${friendly_name} BME280 Pressure
      oversampling: 2x
    humidity:
      name: ${friendly_name} BME280 Humidity
      accuracy_decimals: 1
      oversampling: 2x
    address: 0x76
    update_interval: ${update_time}
  - platform: uptime
    name: ${friendly_name} Uptime
#The ld2410 sensor values
  - platform: ld2410
    light:
      name: Light
    moving_distance:
      name : Moving Distance
    still_distance:
      name: Still Distance
    moving_energy:
      name: Move Energy
    still_energy:
      name: Still Energy
    detection_distance:
      name: Detection Distance
    g0:
      move_energy:
        name: g0 move energy
      still_energy:
        name: g0 still energy
    g1:
      move_energy:
        name: g1 move energy
      still_energy:
        name: g1 still energy
    g2:
      move_energy:
        name: g2 move energy
      still_energy:
        name: g2 still energy
    g3:
      move_energy:
        name: g3 move energy
      still_energy:
        name: g3 still energy
    g4:
      move_energy:
        name: g4 move energy
      still_energy:
        name: g4 still energy
    g5:
      move_energy:
        name: g5 move energy
      still_energy:
        name: g5 still energy
    g6:
      move_energy:
        name: g6 move energy
      still_energy:
        name: g6 still energy
    g7:
      move_energy:
        name: g7 move energy
      still_energy:
        name: g7 still energy
    g8:
      move_energy:
        name: g8 move energy
      still_energy:
        name: g8 still energy

# The ld2410 switch allows you to control your LD2410 Sensor.
#Bluetooth switch is only useful of you have a B or C model
switch:
  - platform: ld2410
    engineering_mode:
      name: ${friendly_name} LD2140 Engineering Mode
    #bluetooth:
      #name: ${friendly_name} LD2140 Control Bluetooth

#The ld2410 binary sensors to get presence notification
binary_sensor:
  - platform: ld2410
    has_target:
      name: ${friendly_name} Presence
    has_moving_target:
      name: ${friendly_name} Moving Target
    has_still_target:
      name: ${friendly_name} Still Target
    out_pin_presence_status:
      name: ${friendly_name} LD2140 Out Pin Presence Status

#Standard PIR Sensor
  - platform: gpio
    pin:
      number: GPIO13
      mode:
        input: true
        pullup: true
      inverted: true
    name: ${friendly_name} PIR Sensor
    device_class: motion

#The ld2410 button allows resetting
button:
  - platform: ld2410
    factory_reset:
      name: ${friendly_name} LD2140 Factory reset"
    restart:
      name: ${friendly_name} LD2140 Restart
    query_params:
      name: Query Parameters

#The ld2410 text sensor allows you to get information about your LD2410 Sensor.
#Bluetooth sensor is only useful of you have a B or C model
text_sensor:
  - platform: ld2410
    version:
      name: ${friendly_name} LD2140 Firmware Version
    #mac_address:
      #name: ${friendly_name} LD2140 BT MAC Address
Other LD2410 Links
The ESPHome page on the LD2410. This device is a native ESPHome component.
https://esphome.io/components/sensor/ld2410.html
Arduino library, and some more info on the LD2410
https://github.com/ncmreynolds/ld2410
Simply Smart House’s guide to the LD2410 and ESPHome
https://www.simplysmart.house/blog/presence-detection-ld2410-home-assistant
Smart Home Scene’s guide with the Ld2410 and bluetooth
https://smarthomescene.com/diy/diy-presence-sensor-with-hi-link-ld2410-and-esp32-for-home-assistant/