LED Strip Ambient Up-lighting
Summary
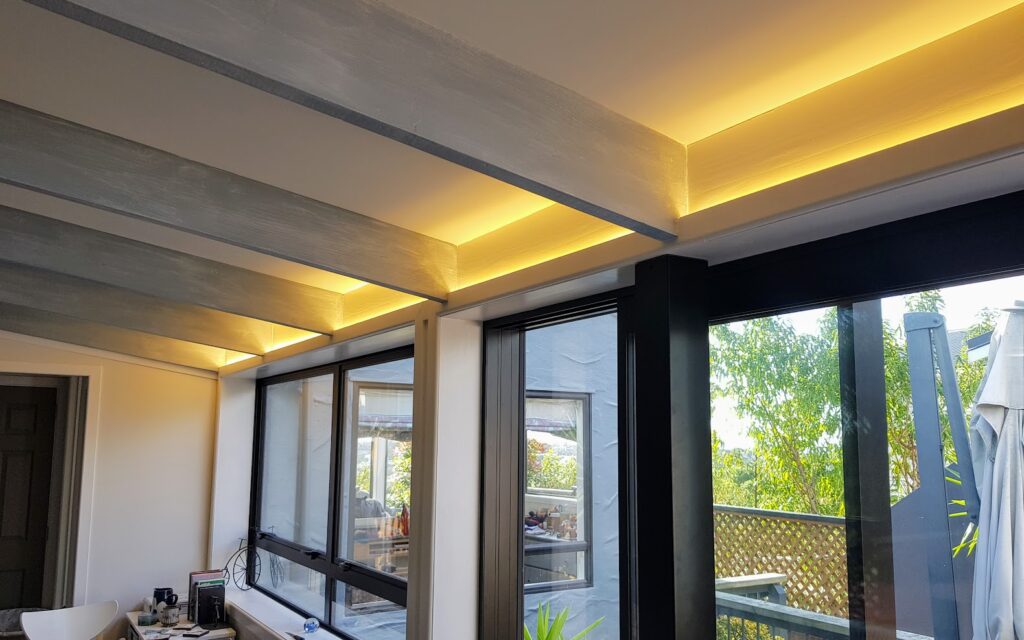
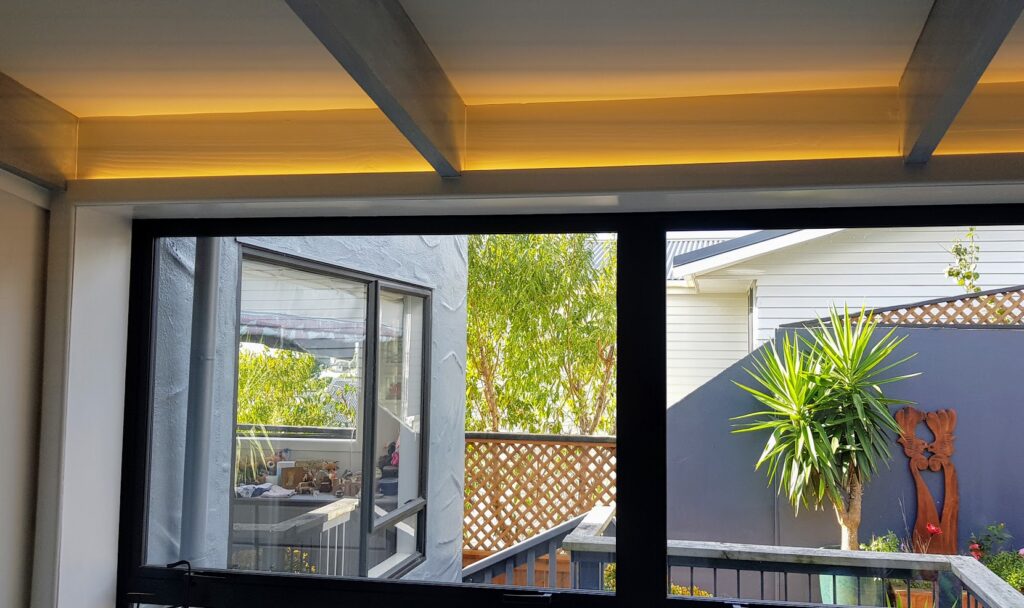
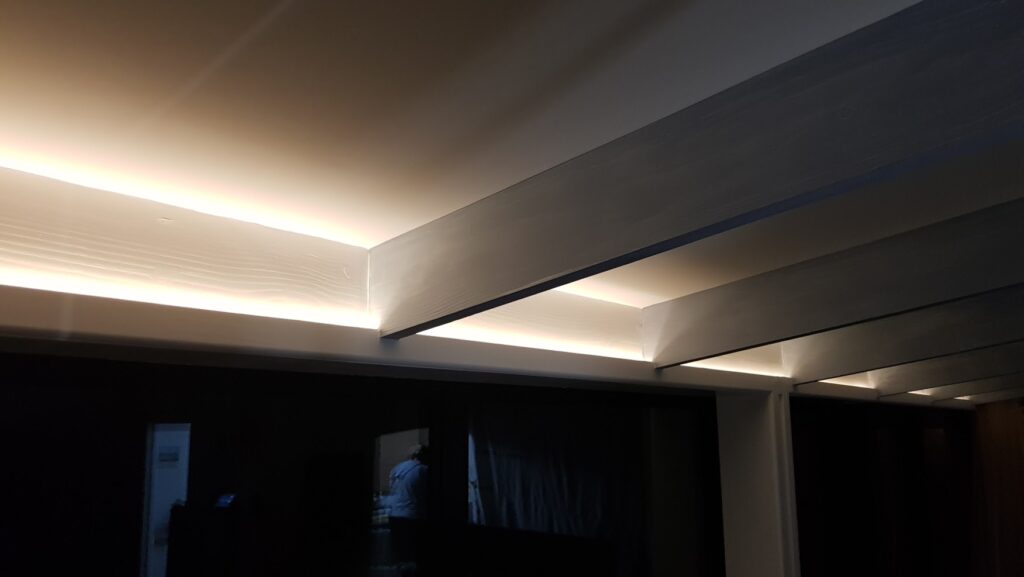
Some notes re how I have used LEDs for decorative up-lighting in between ceiling beams, and controlled with Tasmota and Node Red. The photos in this pic are in our lounge, and the first couple were taken in daytime… they are considerably brighter at night. It actually looks like there are strips also at the top, but this just a reflection from the white ceiling (and is less noticeable in real life). Also, the lights look very yellow in some photos (they are warm white at 3000K, but not yellow).
Summary of LED Strips
- approx 14m total used
- 2835 Chips
- Warm white (to suit the rest of the lounge environment)
- 12V, ~500mA/m
- 120 LEDs per m (for approx 1700LEDs)
- NZ$20 each for a 5m length (from a local supplier on the NZ auction site Trademe).
Mounting notes

The lounge uses just over 14m of strip, laid in 2 rows. The strips are a slim 8mm wide so I could fit the two rows in.
When we had the large window and triple slider door installed, the frame sat slightly proud of where the original window was. Originally, when looking at framing around the window I could have used a couple of thicknesses of Gib to line above the window (it was an uncovered stained beam before this) but decided to paint it white, and leave the frame with nothing behind it. This gave a channel approx 18mm wide the full width of the lounge.
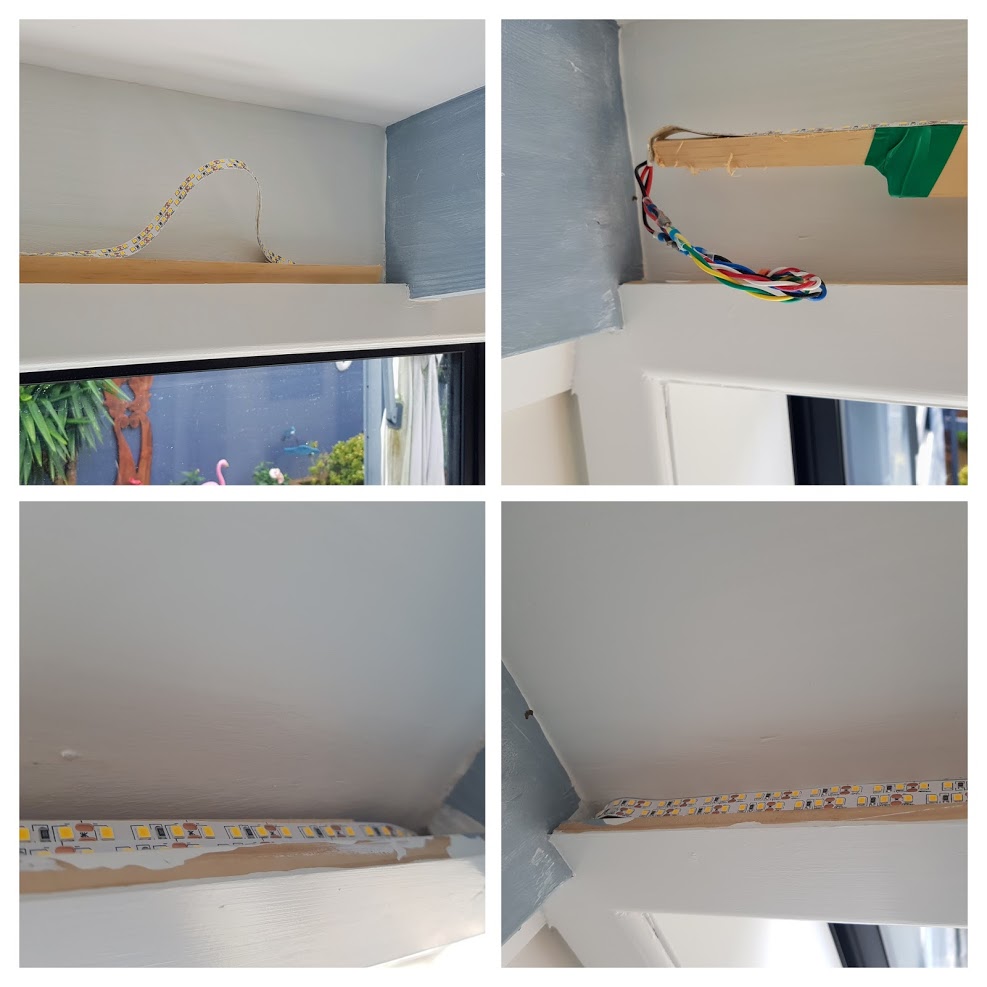
The frame trim is 60mm tall which left about a 50mm channel to put the LEDs in. First attempt I found they were way too low set in the channel so ripped down some timber trims to around 40mm x 16mm and sat it on that. Having it on a trim does make it slightly easier to remove if needed. The LEDs now sit less than 5mm from the top which is perfect – if they sit any higher you can see the odd LED if you are tall… and minor spotting from each chip in places.
I was careful to lay each strip with LEDs offset to also avoid spots of LED light and having both strips on does this nicely.
I didn’t want to cut in to any of the beams, and the house is slightly wonky (1950s… with LOTs of additions over the years). Most beams nicely had a flat spot which enabled routing strip under them, but the last few I needed to dig slightly into the window frame to get access through and keep everything level.
Power and Control
On the left hand side, I had fed a 6 core 0.64mm cable though and up into the ceiling (cores are doubled up)
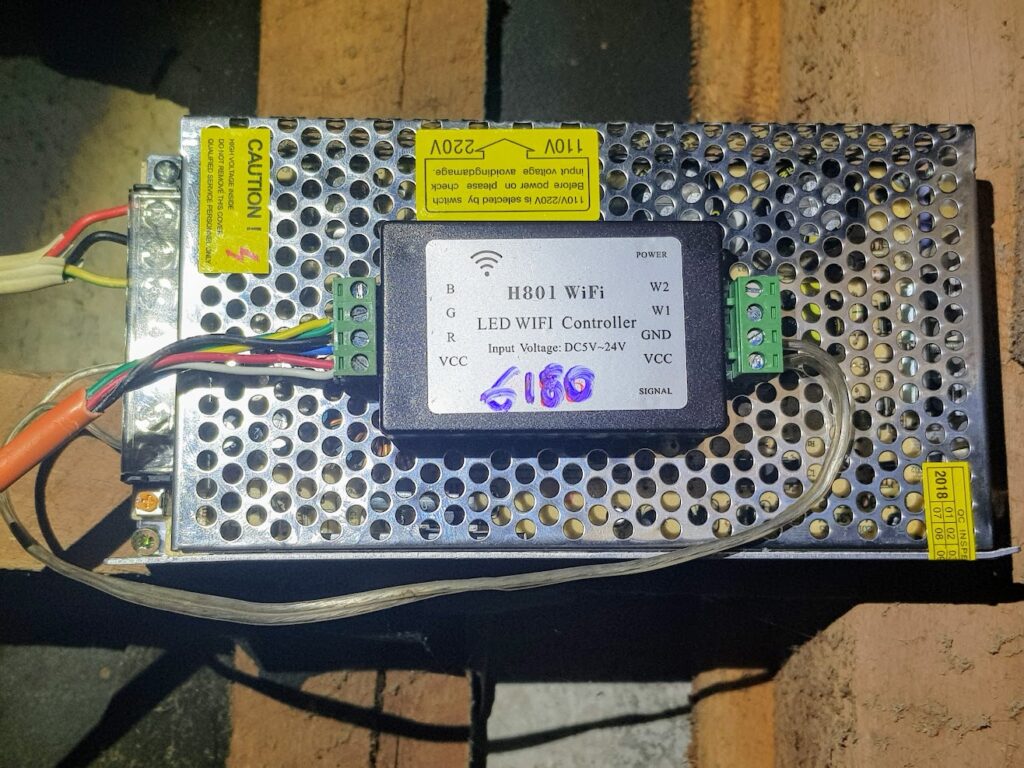
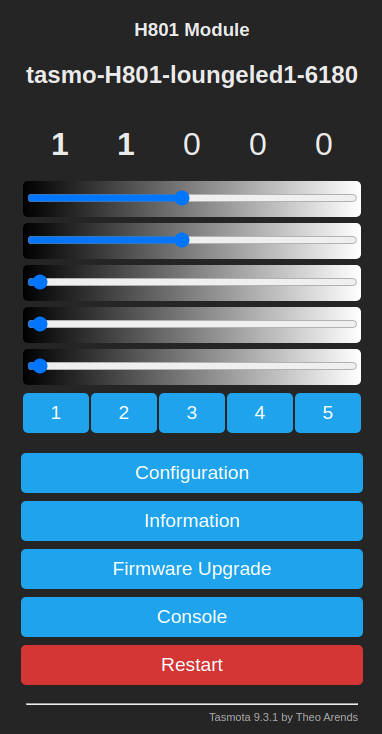
I used a 12V 20A switchmode power supply (around NZ$30 landed from China) mounted in the ceiling and powered from a Zemismart switch in the lounge (relay on/off control only). This feeds to a H801 5 channel LED PWM controller (designed for controlling RGBWW, but great also for multiple single strips, and the interface in Tasmota can account for this)
Currently when installed, the Zemismart switch will just switch the strips on though the H801 (i.e the H801 powers on and off). You can set dimming via the web interface and the H801 will remember the setting even though it is depowered (and switch-on time is less than a second). This is temporary, as the next step is decoupling the Zemismart relay in Tasmota, and having the buttons do the dimming over wifi control.
The H801 should easily control 4A per channel, and measuring the strips was about 2.4A for a 5m strip so about 3.4A for a 7m length (giving around 80W of lighting all up)
Automation & Dimming
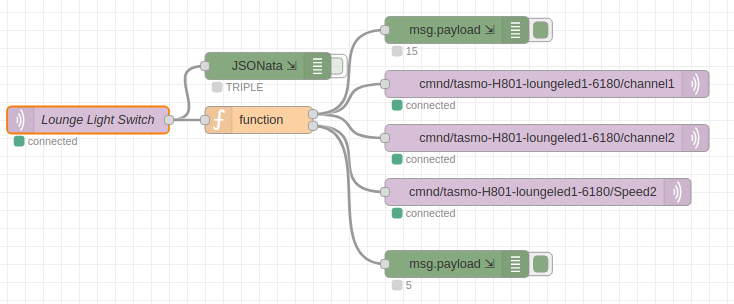
I used commands from a wallswitch (zemismart) to register single, double and triple clicks and node red to select the LED brightness. Tasmota has built in ramping/dimming which is easier than using node red to step values.
I wanted the multiple clicks select the brightness level, but another single click would always turn the light off.
Main Function Node in Node Red
// -----------------------------------------
// TASMOTA DIMMING
// Set dimming functions for a dimmable light
// controlled from another tasmota button
// allowing for single/double/triple press
// and inbuilt tasmota dimming
// -----------------------------------------
//
// DIMMING DEVICE tasmota setup commands
// SetOption68 1 - Sets individual dimmer channels for each PWM (i.e. not RGB)
// Fade 1 - use inbuilt fader - default is 0
// DimmerRange (3,100) - set range of dimming
// Speed 10 - Set facer speed, 1-40 where 1 is fast
// Speed2 5 - as per speed, but don't store settings
//
// BUTTON DEVICE tasmota setup commands
// SetOption73  Detach buttons from relays and send multi-press and hold MQTT messages instead


// The input message is the MQTT message from the device
// once setOption73 is set to just check presses and
// decouple relays.
var button = msg.payload.Button1.Action;  // SINGLE, DOUBLE, TRIPLE, HOLD

// store local context variable for toggling.  We ALWAYS want
// second single press to ramp light off.
var lightStatus = context.get("lightStatus") || [0];

// store a different speed for dimming as we want
// dimming to off to be slightly quicker
// Tasmota has the Speed2 command for one off changes
var fastSpeed = 5 ;
msg2  = { payload: fastSpeed };

switch(button) {
  case "SINGLE":
    if (lightStatus == 0) {
        msg.payload = 95 ;
        context.set("lightStatus", 1);
    }
    else {
        msg.payload = 0 ;
        node.send([null,msg2]) ; // This makes turning off dim at fastSpeed
        context.set("lightStatus", 0) ;
    }
    break;
  case "DOUBLE":
    msg.payload = 40 ;
    context.set("lightStatus", 1);
    break;
  case "TRIPLE":
    msg.payload = 15 ;
    context.set("lightStatus", 1);
    break;
  case "HOLD":
    // do nothing
    break;
  default:
    msg.payload = 0 ;
    context.set("lightStatus", 0);
}

return [msg,null];
Node Red Flow
Improvements and future
- As always, volt drop is a problem with strips so if I could be bothered I’d at least feed another decent cable the full length of the strips and inject power for the LEDs at the other end. It loses around 2V end to end, and is noticeable… although we aren’t too bothered as the bright end is the area we need most of the light. If I wasn’t PWM dimming them, I could just pop another 12V supply at the other end. The power supply seems to be putting out slightly less than 12V, so I might get in the roof an fix this sometime. (note: I now plan to power one of the two strips from the other end with another power supply)
- I had to join the cable in the middle and it is noticeable with some lack of light at the join as I just used flying leads. Lots of ways to fix this and will do it at some stage with purpose designed connectors.
- The power supply is over spec’d as I plan to add some strips on the other side of the beam. I can use the same H801 and the spare channels
- A diffuser could be useful (maybe just a thin plastic strip on tip) but it may give a slight loss of light output.
- I could use a brighter strip, but it was intended more as ambient light rather than task lighting. It does work pretty well though and I imagine will be dimmed most of the time. I have set them up to be max brightness of around 90% to ensure they last.
- The mains to the power supply has a cover, but it isn’t as protected as I’d normally like in the ceiling space so I’ll bend up something for better protection (it is a 1mm lighting cable and the whole house has RCD protection)
- I should have whacked a DHT11 or similar on the H801 in some spare GPIO. It would be useful to know how hot the power supply is getting.
Tasmota and single LED Channels
This is the useful link to setting up multiple single channel LEDs in Tasmota
https://tasmota.github.io/docs/Lights/
Essentially you just activate:
SetOption68 1to turn this on. This must be a relatively new feature at the time as this link from Feb 2021 led me astray with a template that only set a single channel PWM. The standard H801 template from the Blackadder device database and setoption68 worked for me to give 5 individual dimmable PWM channels (plus independent on/off for each)
Links and Info
- Zemismart switch (1, 2 and 3 gang versions in AU/NZ style). Easily flashable with Tasmota
- Zemismart 2 gang template for Tasmota
- H801 details in the Tasmota docs
- Another H801 info link
- More useful H801 info
- H801 template from the Blackadder device database