IKEA FÖRNUFTIG Air Filter Automation
Changes
2026-04-28 V1.0 First version
Summary
We recently have had IKEA open in NZ so I thought I’d pop in and look at their electrical section. I wanted to test some of their new Matter (over Thread) sensor products, but I also found some nicely designed appliances.
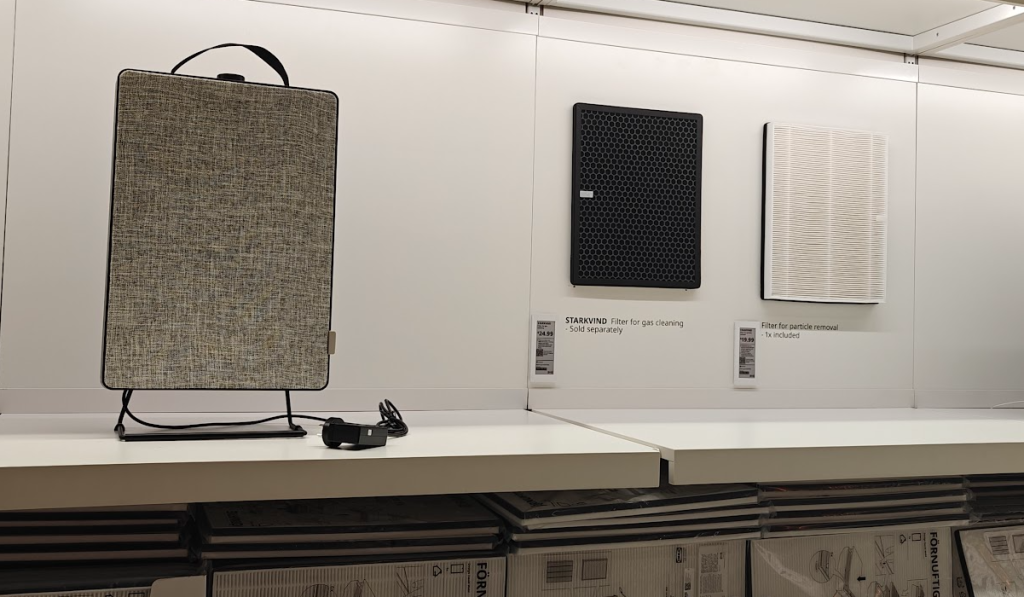
I have always thought about putting some air filtering in our house, maybe as part of a home DVS style air system. However, I found some interesting standalone flat plate style air filter units at IKEA designed to mount on a stand or on a wall. The FÖRNUFTIG …meaning “Reasonable”, as they have a bigger unit (Strong Wind) and smaller version (Up Wind). It doesn’t look intrusive like many other home air “purification” appliances, and would mount nicely on a wall. The clincher however was the filters… most systems fall down when it comes to replacing filters because either they are proprietary, hard to find, or expensive. IKEA has both a P2.5 pleated style filter and a charcoal filter in a pack for just NZ$35, with single pleated filters under NZ$20.
Do I need air filtering in my house? Possibly not, but it probably does a bit of work in slowing down dust buildup, and this device would use less than about $10 in electricity per year. Our heat pumps also have basic dust filtering but not to a PM2.5 level and we use a gas fire in the winter. Oh, did I mention it is a quick, fun half day hacking project?
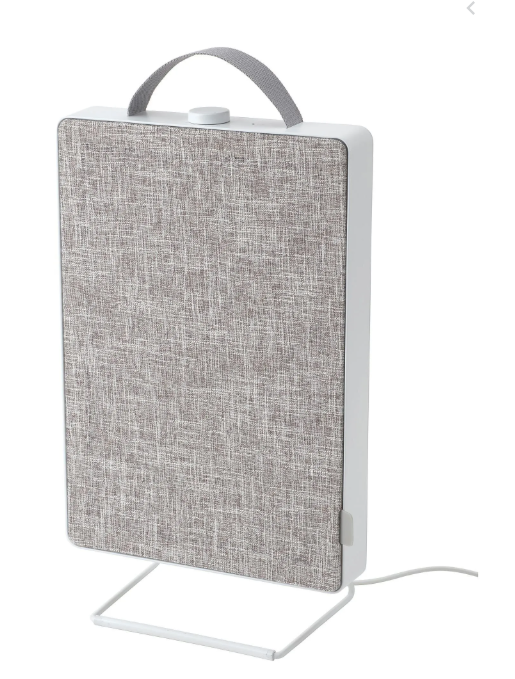
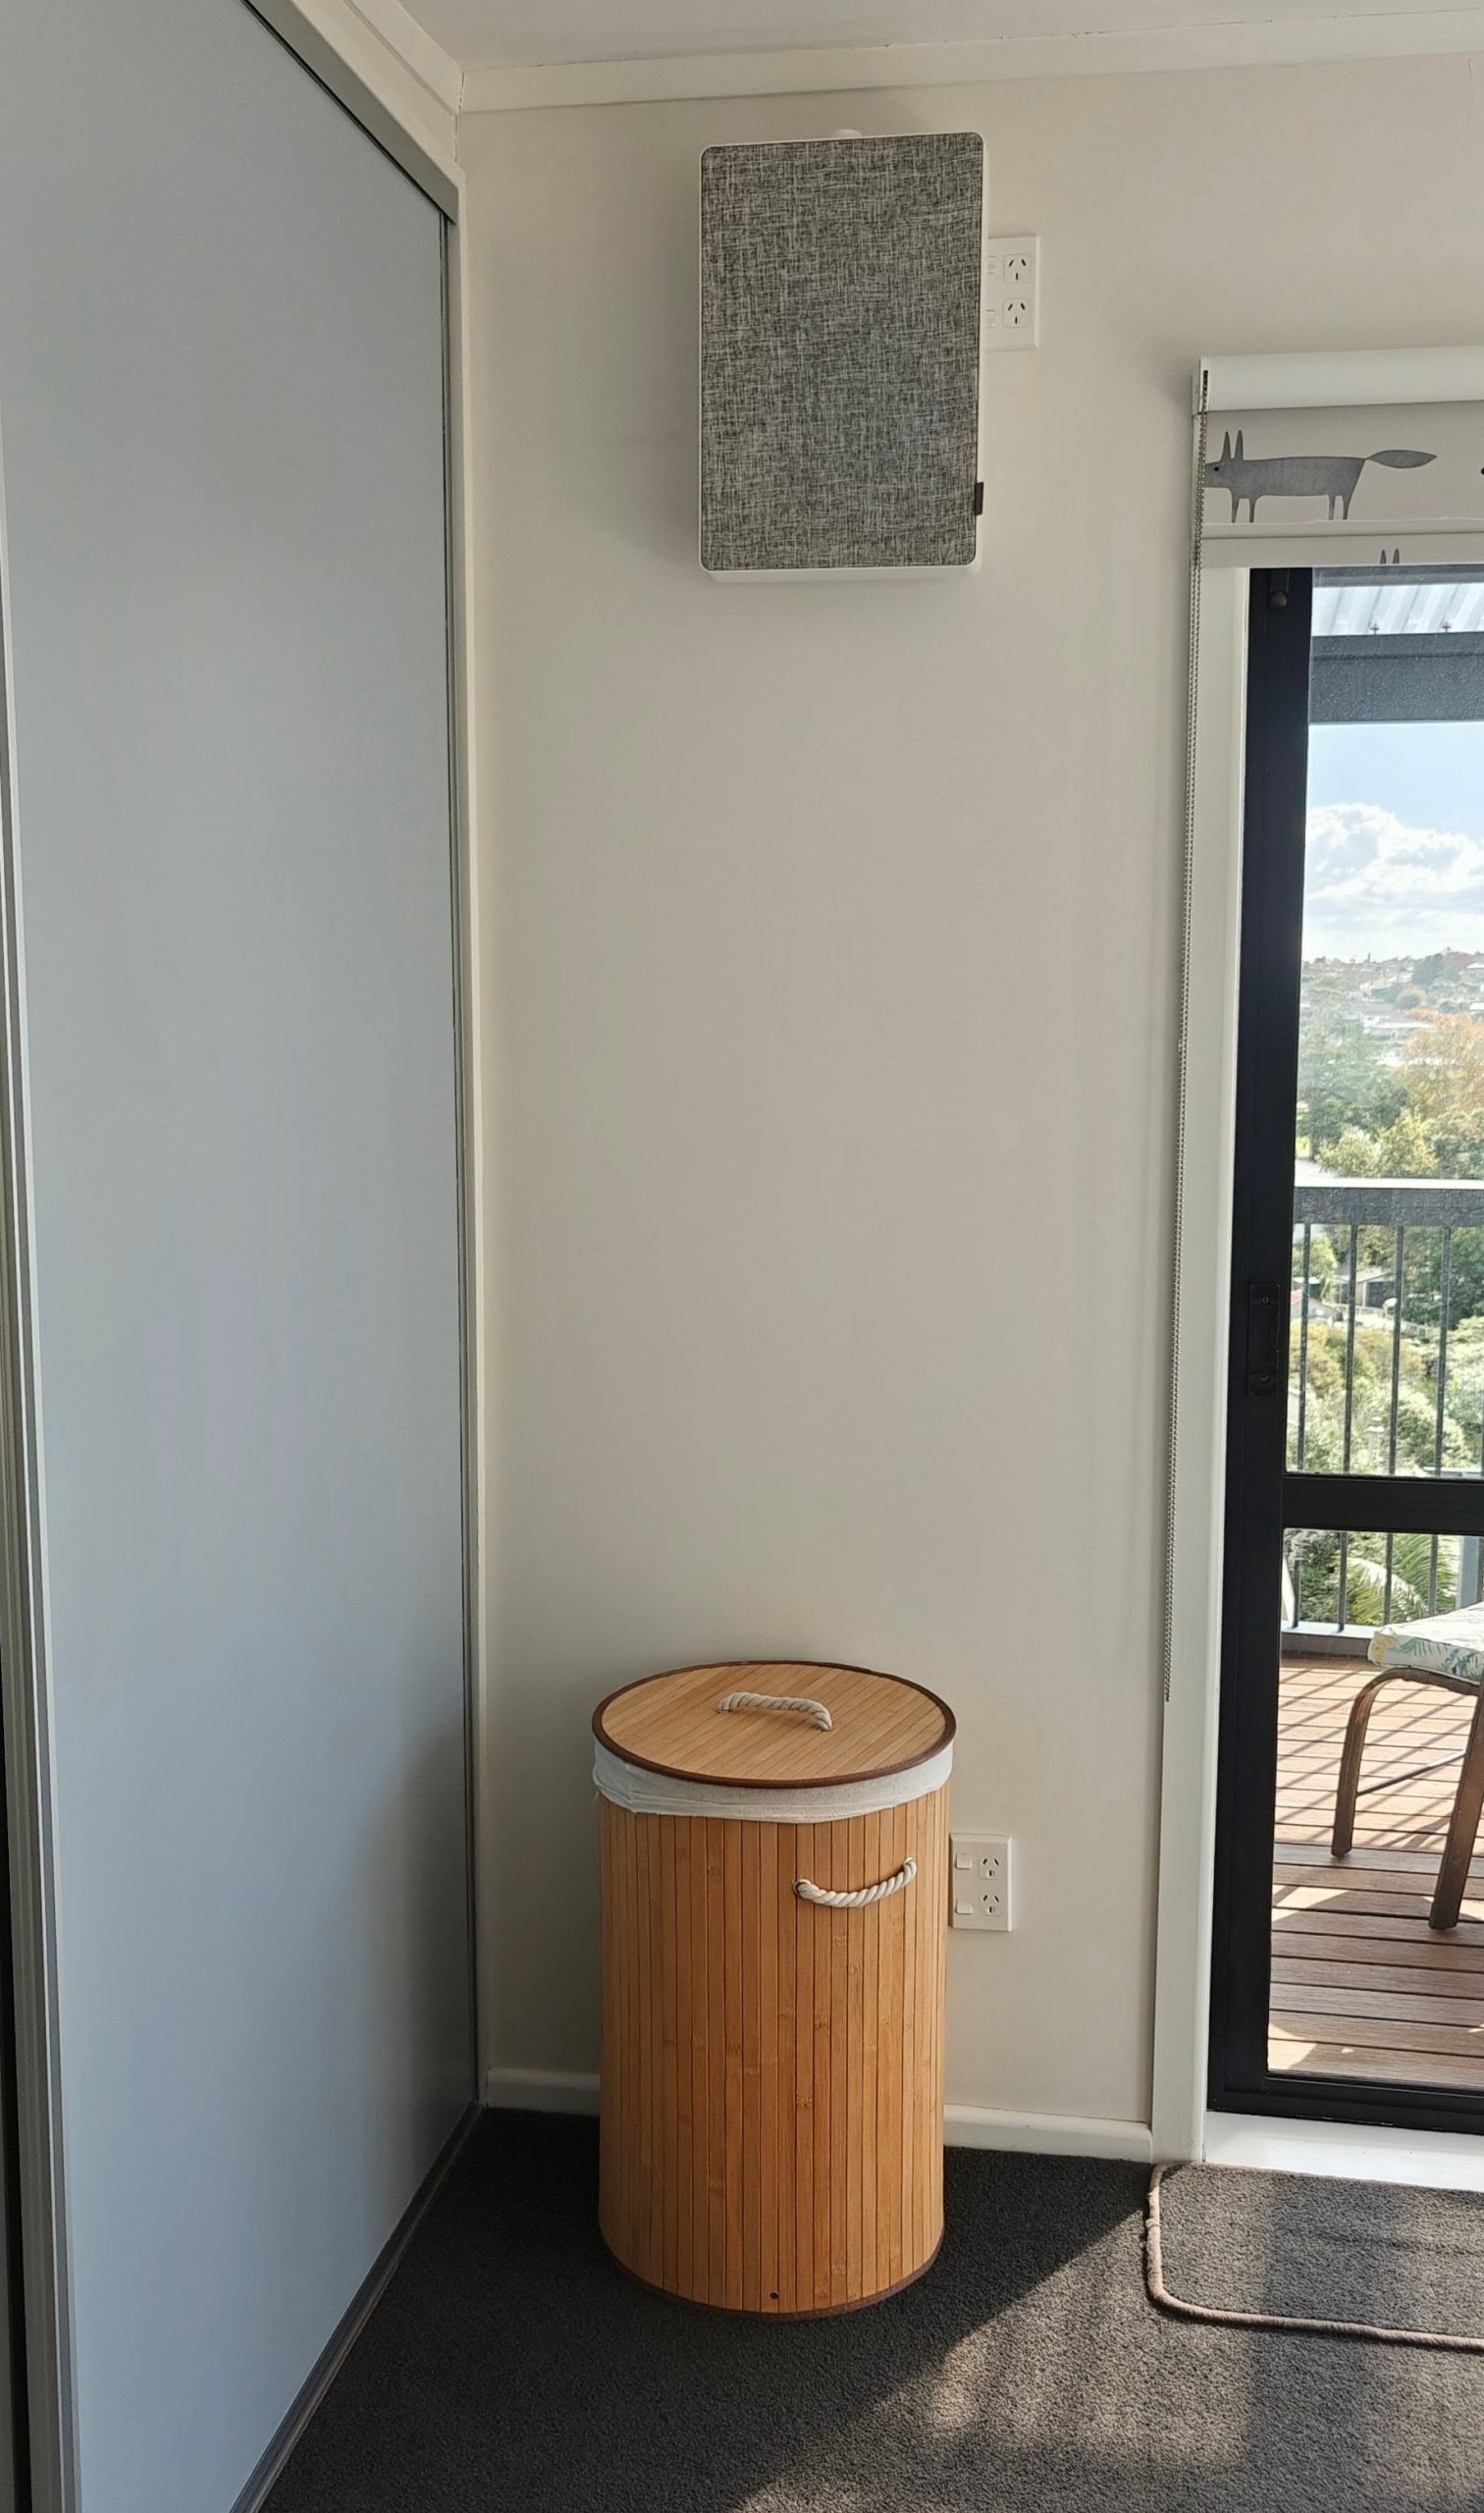
The plan was to mount it high on a wall, in a place with a power outlet – and we have outlets in bedrooms that were originally designed for mounting a TV.
They are nice, but of course, what aren’t they? Automated. For NZ$100 (including 1 filter) it looked like a fun half day hacking project which would be a useful product and still look nice, with limited house modifications and reasonable WAF.
Of course I set about pulling it apart as soon as I got home to see what was inside, (assuming nobody else had ever had the same idea) but some basic research showed that these are often modified or externally controlled, and people even make their own housings for the cheap filters (building them into box containers, tables, computer and 3D printer cabinets, or the DVS style air circulation systems).
They run off of a 24V plug pack (wall wort style) so the simplest method of control looked to be a smart plug or low voltage switch. The unit itself has a circuit board in it with 3 speed fan switch and an LED/Reset button that reminds you to replace the fan (apparently after a count of 6 months of operation)
This sounds great, but I really wanted to control the fan speed and do my own calculations and notifications regarding filter changes.
So what is out there?
I found projects ranging from internal on/off style control, to microprocessors. Some controlled the 4 fan speeds with a micro, and some used the micro to do more controls. People even produce replacement control board PCBs.
The most helpful info was this YouTube video from from 3ATIVE VFX which also links to some ESPHome yaml on his Github repository. Other great photos and some other double checks on board GPIO came from dgalue’s repo, where he is using the Homespan library and Homekit for ESP32.
I also planned to use ESPHome, but picked a few things from both projects and expanded on the functionality a bit. The final unit would be a cheap D1 Mini (ESP8266), connected into a few of the existing control board pins.
NOTE: There are a couple of changes to these previous projects that I added to fix issues that came up for me.
Method
Opening up the unit
Do not do what I did and take the whole thing apart… there is no need. You can lift off the grey filter cover (by the little tab) and there are only two screws to remove that holds on a cover to get to the controller board. It is almost as if IKEA ‘wants’ this device to be modified, as there is plenty of space under this cover to put other stuff.
Here are the two screws to remove.
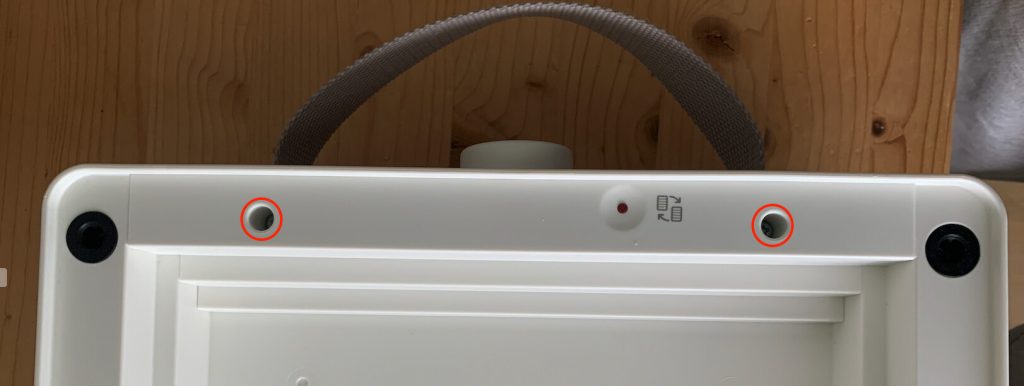
And this is showing the cover being lifted out (Both images taken from another project by user “tht” in the Home Assistant Forums)
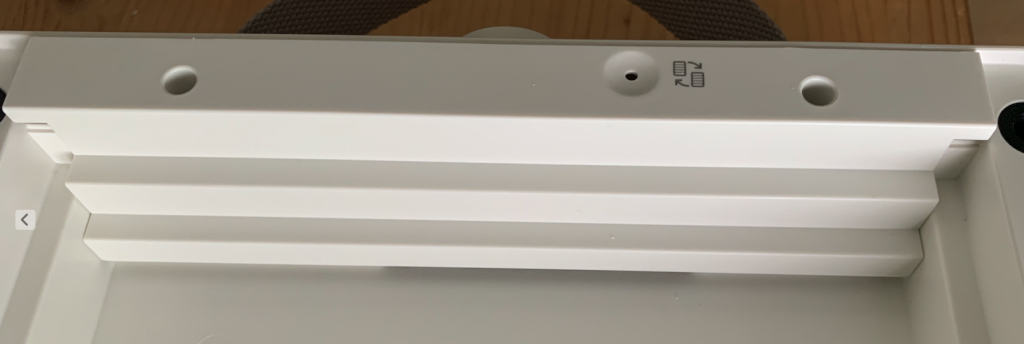
Once the cover is off, you’ll see the existing control board.
Microprocessor Control
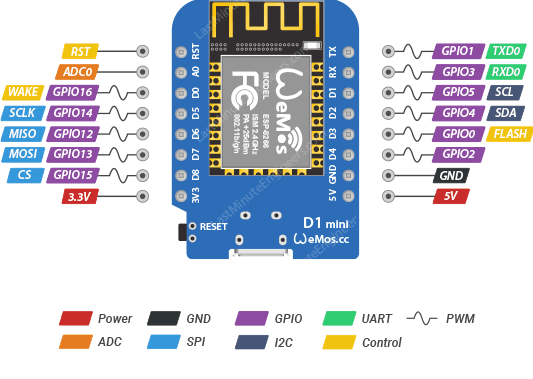
It was easiest for me to just use a generic D1 Mini. The D1 however (or really a clone of it) is a 5V board, with 3.3V logic for the microprocessor so we need to ensure that we have some power conversion – we should easily be able to pull power from the Ikea board, but it is 24VDC. We also need to remember that the D1 should only pull other devices on the Ikea board to low, or if an input… either use a logic converter or drop the voltage down with a carefully chosen resistor.
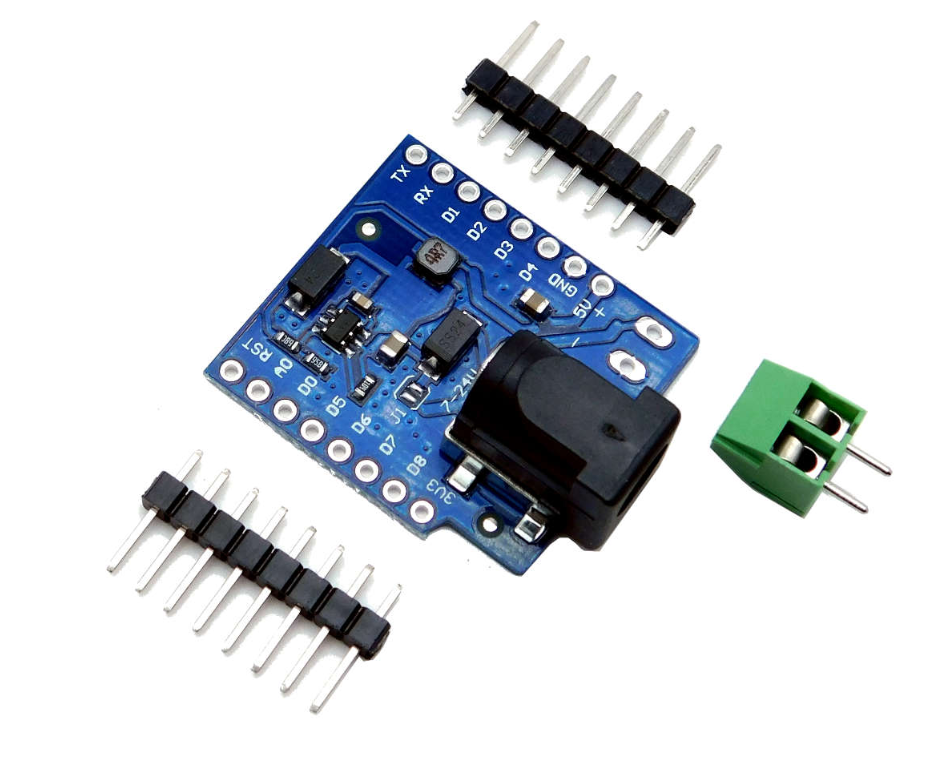
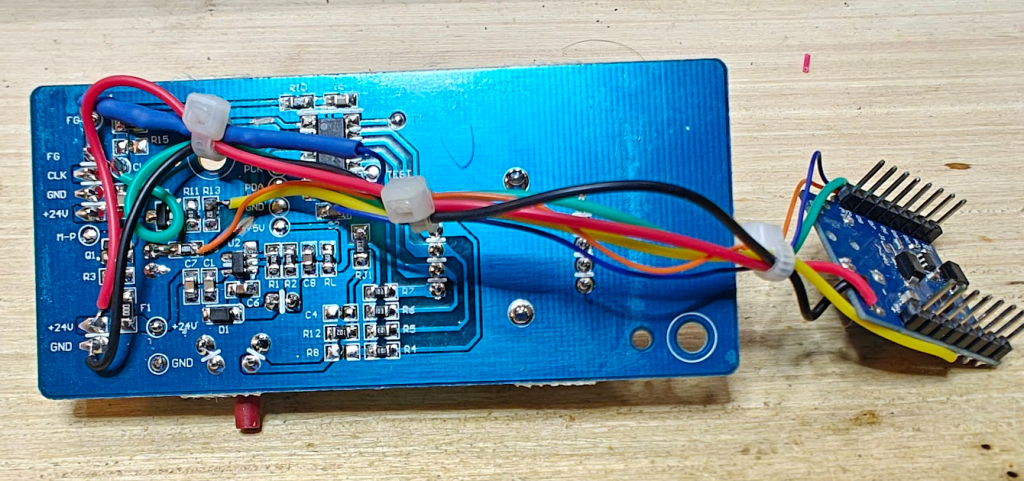
I happened to have some D1 power shield modules, so this is always a handy way to get power from something higher than 5V. The maximum these boards are rated for is a useful 24V. I like to remove the big barrel jack connector from the board for tidyness, and directly solder to it. The other useful reason to use one of these (rather than just a generic buck or regulator) is that you can plug and unplug the D1 board from the base shield and wire everything to the shield directly, rather than the D1 Mini. Handy for flashing or if you want to replace the D1 ever for some reason.
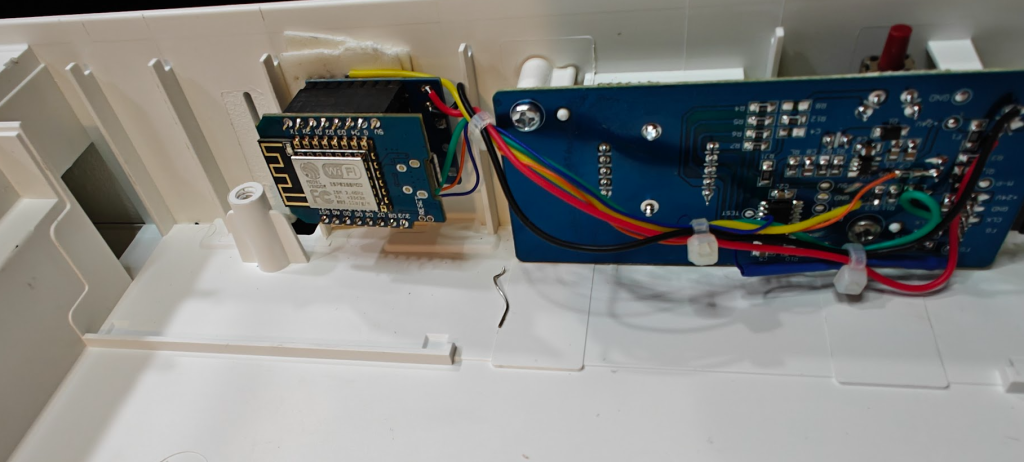
See the photos below as to how I setup the D1 mini, the power shield module and some tidy(ish) wiring… eventually mounted into the case (with some double sided foam tape)
Sensors and Outputs required
The other projects will give you an idea of what can be connected, but I decided to control the following below. Note that after doing this, there will be no control via the knob on top and the filter reset button on the unit will do nothing. Yes, we could also pull inputs from these if we went further (but possibly it might be easier just to get a new control board)
- Fan On. This is done by turning on a MOSFET to turn on 24V to the fan
- Fan Speed. To control speed, we send pulses to another output which is in the fan wiring.
- Fan RPM. It is useful to know how fast the fan is spinning, both for failures (although I haven’t bothered checking for that yet… and maybe the fan will slow as the pressure drops with blocked filters?) and also I wanted to use the number of spins to determine when to change the filter. This is similar to how 3ATIVE calculated filter age, but I wanted to do it in actual fan spins (not just pulses). Consensus elsewhere from a user who measured with a tachometer shows the pulse to RPM multiplier would be about 8rpm/Hz which equates to a RPM = pulses/min * 0.06.
- Panel LED. This is supposed to show when it is time to change the filter, and an onboard button resets this timer. Consensus shows that it comes on after about 6 months of operation, but I decided to control this myself (Filter age calculations).
Connecting up to a D1 Mini
Note there are changes to some of this from the previous projects mentioned. User 3ATIVE did no breaking tracks to the Ikea micro… I suspect in some cases it will be fine, but don’t really want the possibility of the micro pulling an output high whilst we pull low so I think it is a good idea.
Also, ignore the resistor I have for the RPM in some images (and as suggested in the other projects. I couldn’t get reliable RPM values with that setup – the D1 internal pullup was possibly too weak, so I give my working solution below (which changes slightly from how some of my photos show)
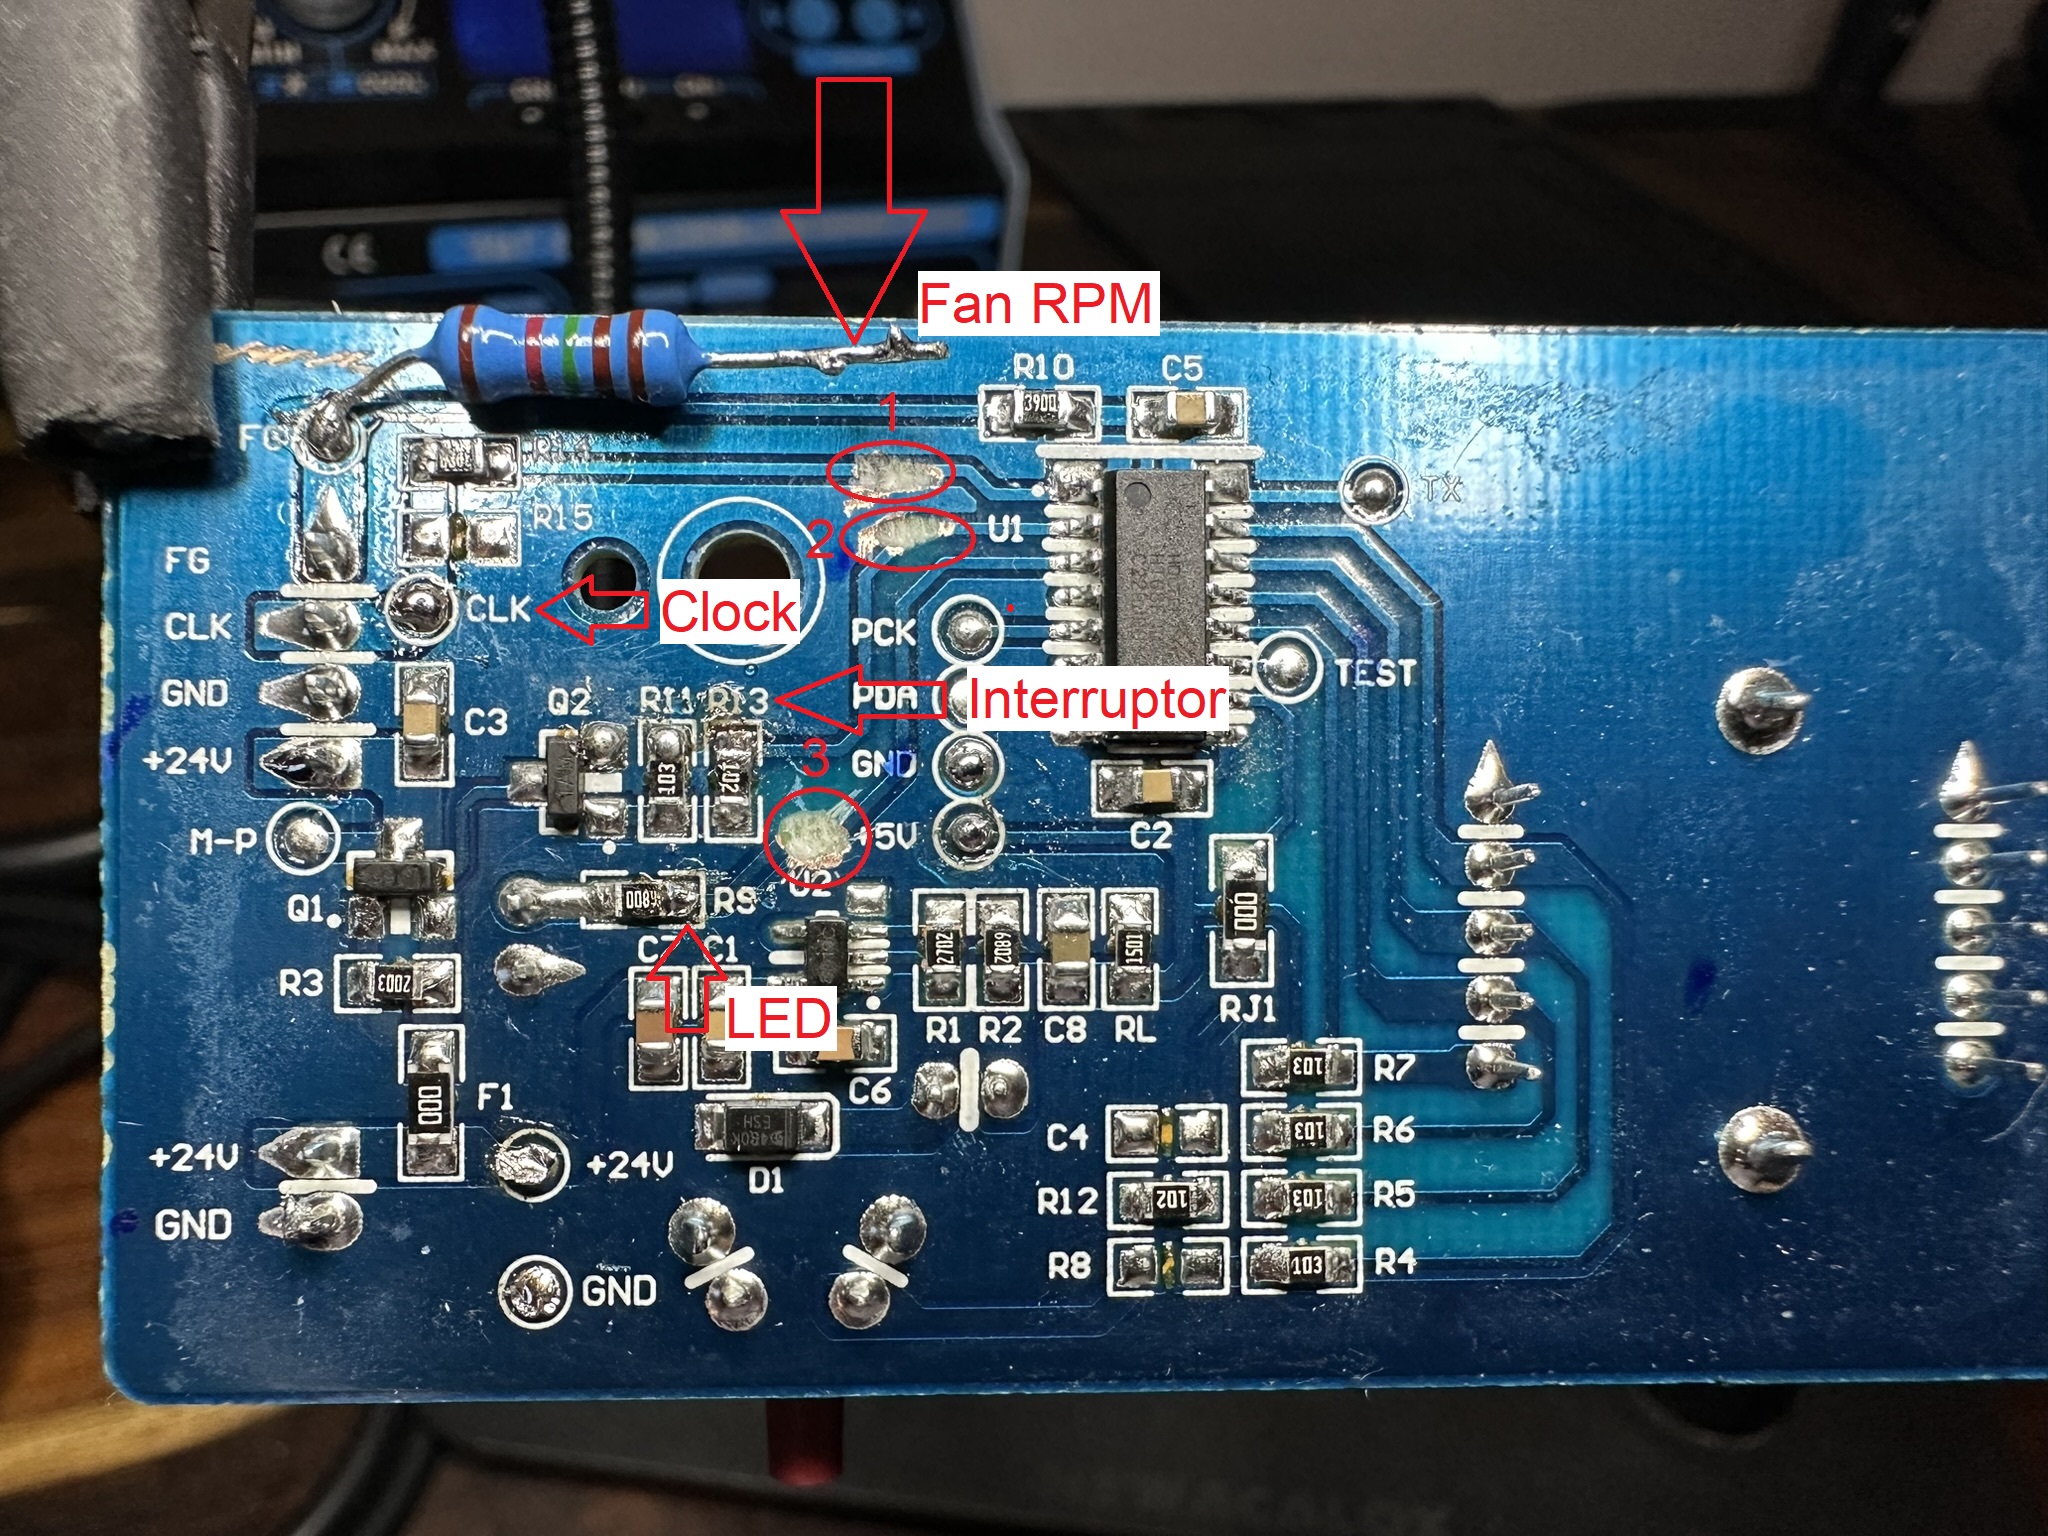
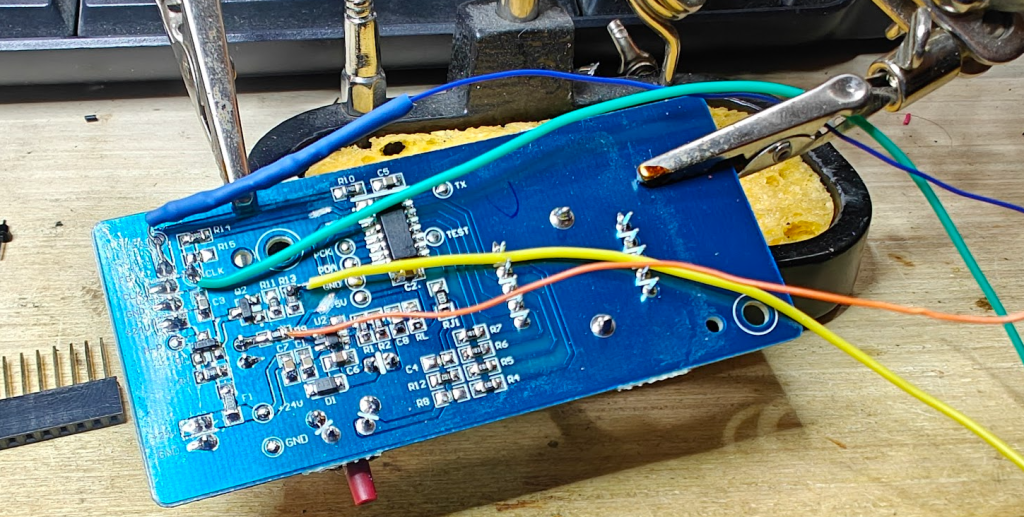
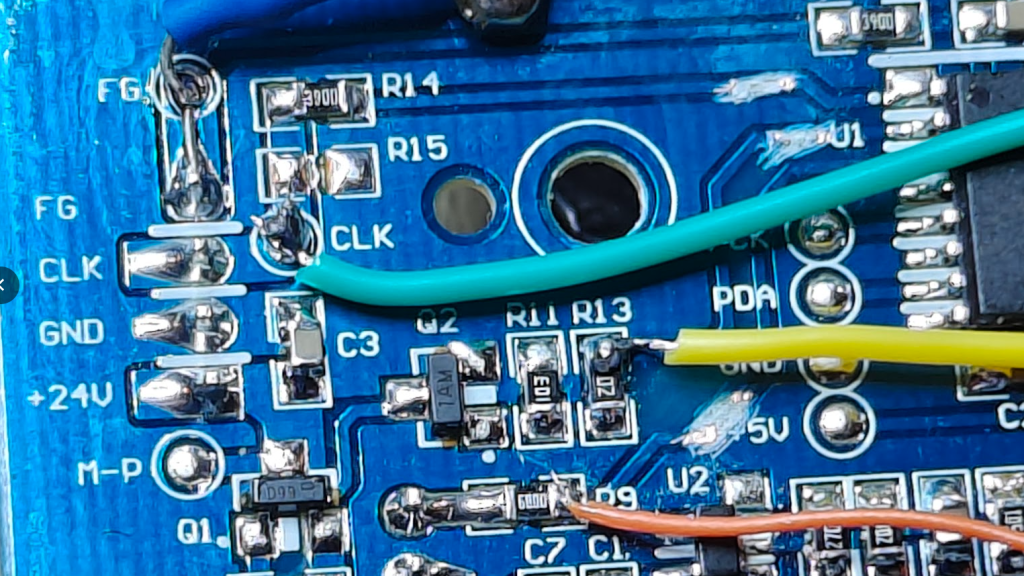
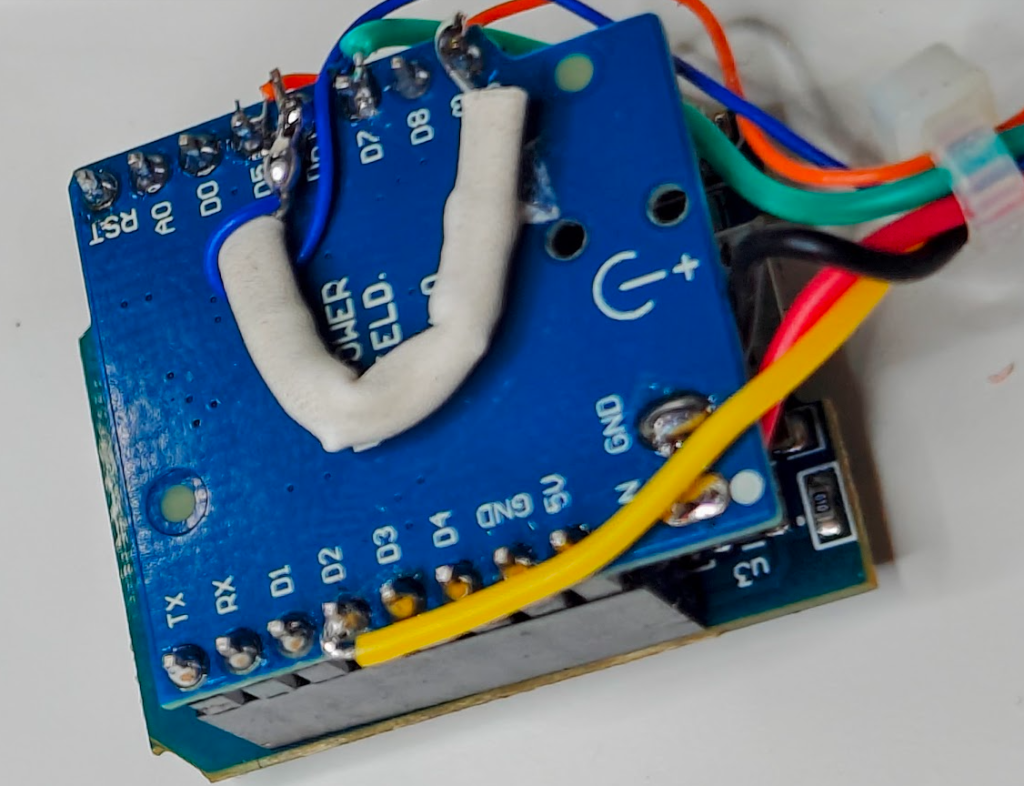
- Fan On. To turn the mosfet on, I just used GPIO to pull the MOSFET gate low. I scratched out the appropriate track (connected to Pin 2 of the Ikea micro), and soldered a yellow wire from the top of R13 to D2 (GPIO4) on the D1 mini (Pin connection shown on the board photo as “Interruptor”).
- Clock pulse. I used a green wire connected from the Clk pin (also shown on the board photo as CLK) to D7 (GPIO13) on the D1. It is not PWM, but there are pulses that tell the fan how fast to spin, which we will send via the ESPHome servo component. 3ATIVE calculated that 300 pulses per second gives full speed, so we can pulse between 0 and this value to change speed. (Also, a track to scratch out from Pin 1 of the Ikea micro)
- Fan RPM. I connected a blue wire with 2k2 resistor in line from the FG connection (shown as FG in the photo), to D6 (GPIO12) on the D1 mini (GPIO). (No PCB track to scratch out here). However, I only got reliable rising edge triggering by also putting a pullup resistor of 10k Ohms on the D1 mini across 3.3V and D6. Actually I used 2 4k7 resistors in series so something in this range I’m sure will be fine (and a reminder to ignore some values shown in other images here)
- Panel LED. To control the LED, I used an orange wire from the point shown as R9 on the board (Marked LED) to D8 (GPIO15) on the D1 Mini. (the 3rd and final track to scratch out from Pin 3 of the Ikea micro)
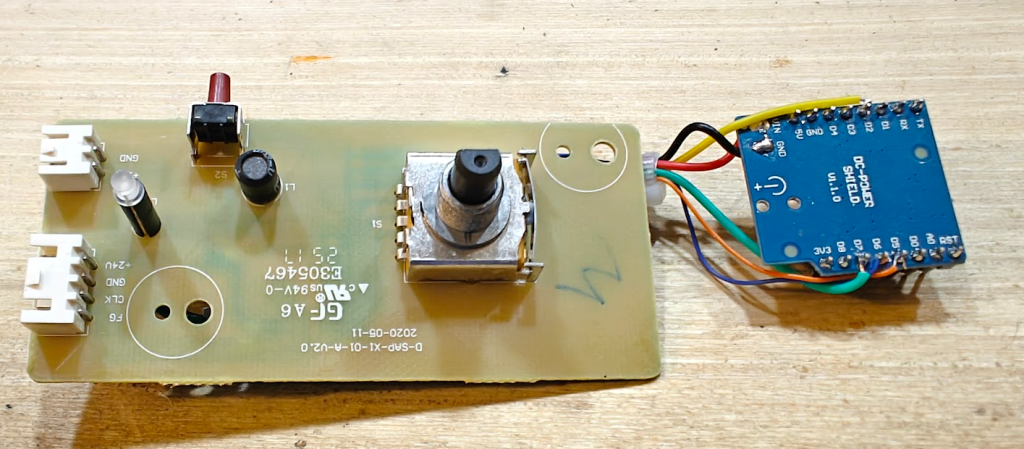
Final connection images

Software
I used ESPHome as mentioned above with some base ideas from 3ATIVE. I won’t be explaining the code much here (or how to flash it to the D1), but it is pretty well commented and laid out.
This is the link to my final YAML in my local git repository and I’ll also put the full code below (which is a current snapshot, not necessarily the latest version)
ESPHome YAML and Home Assistant Features
Some features that my ESPHome YAML gives:
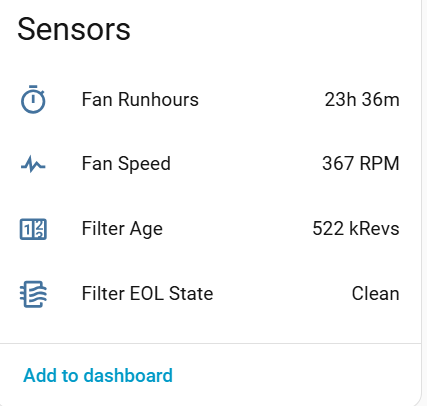
- “Fan Runhours” Total. This is the count of the time (in hours) that it has been turned on, which is obviously retained over a restart.
- The “Fan Speed” Sensor is the actual calculated value in RPM (based on pulses received). It is around 370RPM on Speed 1, ramping up to approx 1200 RPM at full speed.
- The “Filter Age” is the calculated total number of revolutions of the fan (until reset).
- The “Filter EOL State” is always “Clean”, until the unit reaches the EOL total, then changes to “Dirty” (until reset)
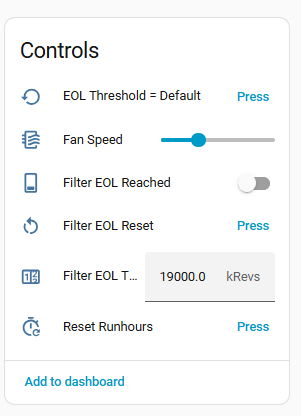
- You can reset run hours to zero with the “Reset Runhours” button.
- “Fan Speed” control. This is a 7 step slider from full (6) to Off (0) and 5 steps inbetween.
- “Filter EOL Threshold“. This is a value for when you will be notified if the filter is End Of Life. The default value is 19,000,000 revolutions, which is approx 6 months at general use… but you can calculate this yourself if you want to change it for the way you’ll use it. Remember a faster speed will get to end of life quicker.
- Pressing the “EOL Threshold = Default” will reset the threshold value back to 19000 kRevs (or you can change that in the ESPHome YAML substitutions)
- “Filter EOL Reached” will flash the LED on the Ikea panel. If you click it yourself it will briefly light the LED, but go back to Off. The calculations will turn this on automatically at the EOL value.
- “Filter EOL Reset” will turn off the LED and start the filter age calculations again
Mounting the unit
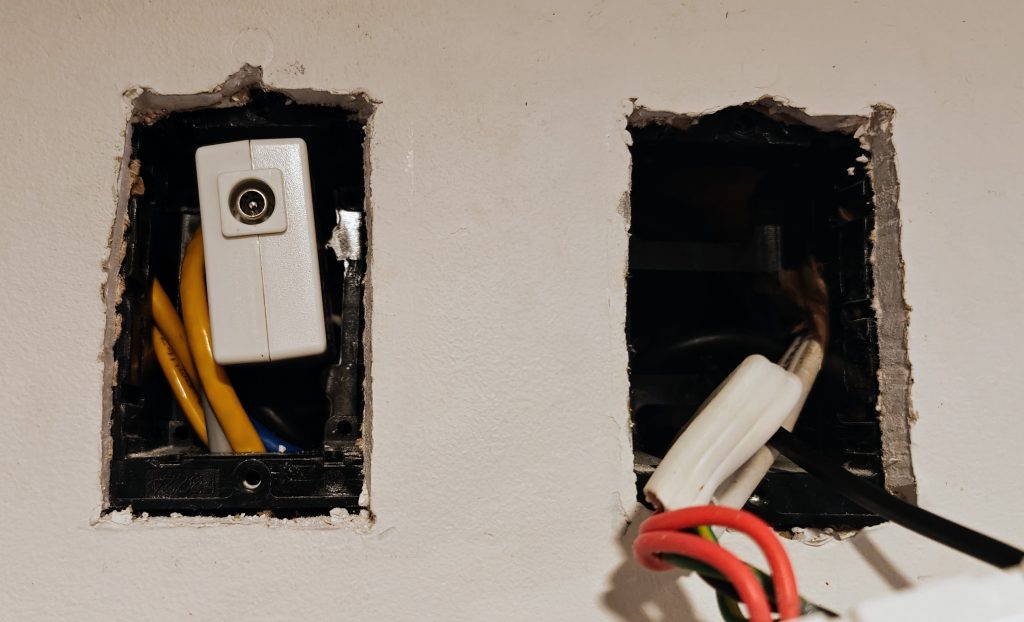
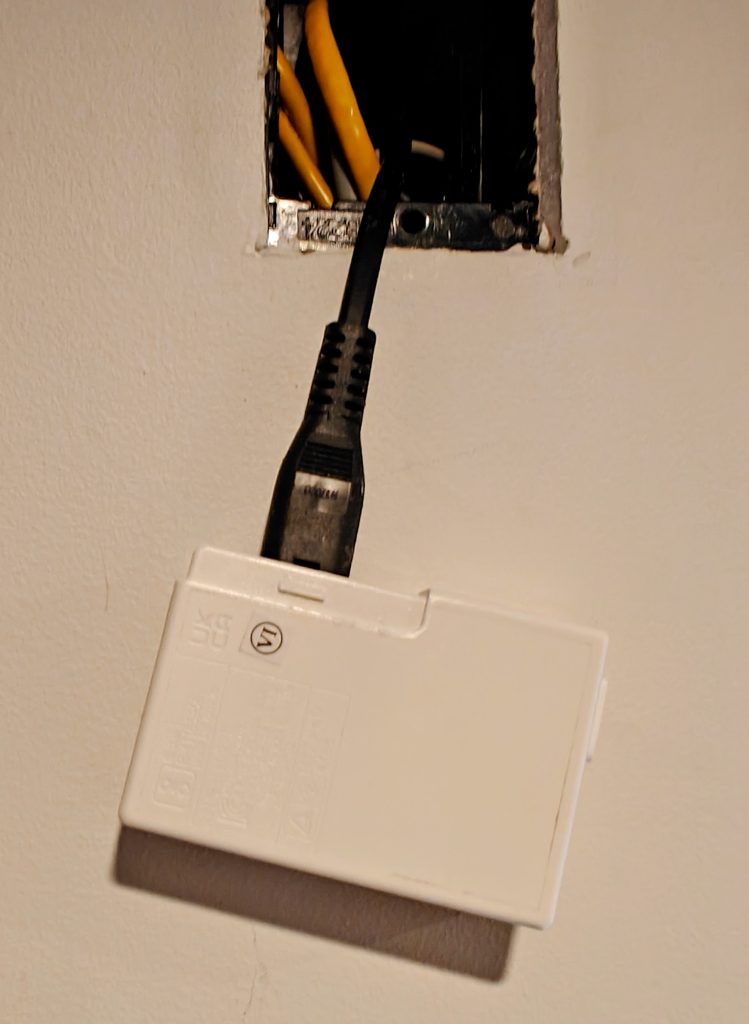
I had a place for it, as mentioned above – beside a power outlet. I didn’t really want a wall plugpack showing though, even though it isn’t bad looking as far as wall plugs go.
i compromised, and put the plugpack in the wall. The plugpack has a generic set of power pins on a clip in module, which is quite common now… attached with a small figure 8 plug. So we can remove the pin section (a bit of levering with a screwdriver and it comes off) and then just use a figure 8 power cable to wire in behind the power outlet behind. Better practice is to have a switch (PDL600 series have a 2 outlet, 1 switch module) so I’ll replace it when I pick one up. You can obviously just plug it in if you don’t want the hassle of a hidden connection.
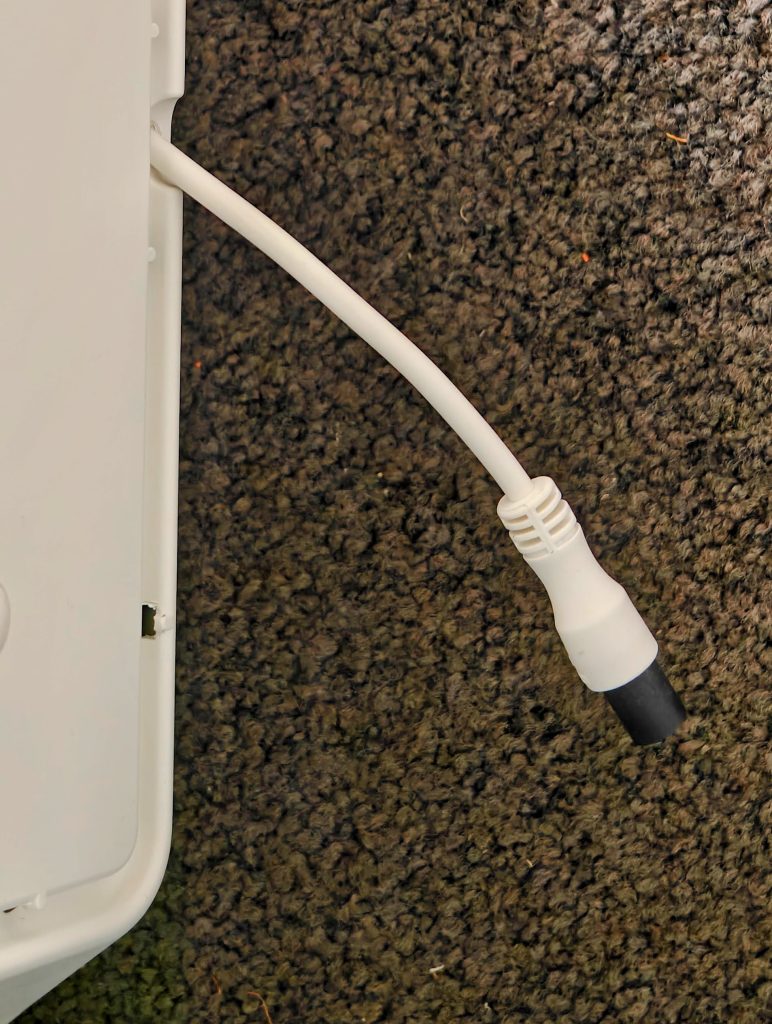
So below is what it looked like with the wall hole, then a couple of screws at the top to secure it. It can be mounted in portrait (with the air exit grille at the top) or either way in landscape. The unit doesn’t have screw hooking points to mount with the air grille down but i’m sure hacking something would be doable if needed. Note also that the 24V cable from the unit is designed to be pushed back into the unit to get a shorter length.
Improvements?
Some improvements that could potentially be made (in hardware as well as YAML:
- Also control the switch so you can have some localised speed control (and turn it off)
- Have the onboard button shut off the LED flashing…? it might prove annoying…
- Differential pressure sensing across the fan, to determine fan life.
- Maybe some calculations of filter use from the speed of the fan?
- Yes… a complete PCB board replacement might be easier (and there seem to be a few out there)
- Some sort of recessed wall mount would be interesting (not sure how you’d deal with airflow)
ESPHome YAML
I’ve included the YAML here below, but remember to pop back to my Git repository if you want to see the code that has probably now changed.
Note that there are a bunch of common YAML files I include for pulling wifi, network info API and MQTT details etc, but these are also in my Git repo if you need them. Otherwise just substitute with your own YAML directly. Obviously substitute secrets with your own secrets file (or direct replacement details)
Finally, with full disclosure I used some AI tools to assist with this, but mainly the commenting, versioning and summaries (and the occasional lambda). I prefer my yaml to have a standard layout and commenting system.
#:########################################################################################:#
# TITLE: IKEA AIR FILTER - BEDROOM 1
# zorruno.com layout v1.1 2026
# This is a conversion of the IKEA FORNUFTIG Air Filter unit to add smart control.
#
# References:
# - https://www.youtube.com/watch?v=WB4xxhgggHQ from 3ATIVE VFX
# - https://github.com/3ative/ikea-air-filter from 3ATIVE VFX
# - https://github.com/dgalue/Ikea-Air-Purifier-ESP32-Homespan from dgalue
#:########################################################################################:#
# REPO:
# https://home.fox.co.nz/gitea/zorruno/zorruno-homeassistant/src/branch/master/esphome/esp-bedrm1airfilter.yaml
#:########################################################################################:#
# VERSIONS:
# V1.2 2026-04-27 Converted filter replacement logic from pulse-count based to kRevs based.
#      Added editable Replacement Threshold number in kRevs.
#      Added Reset Replacement Threshold button to restore default 19000 kRevs.
#      Added fan pulse to revolution conversion substitutions.
#      Updated Filter Age to display accumulated fan use in kRevs.
#      Updated Clean/Dirty and LED logic to use fan kRevs rather than raw pulses.
# V1.1 2026-04-27 Updated yaml to zorruno layout V1.1.
#      Added D5 panel dirty LED flashing at 500ms on/off.
#      Decoupled onboard LED from fan MOSFET state.
#      Reset now clears pulse total, restored age value and both dirty LEDs.
#      Added fuller hardware, operation and offline notes.
# V1.0 2025-07-21 First Setup.
#:########################################################################################:#
# HARDWARE:
# - IKEA FORNUFTIG wall mount air filter conversion.
# - Wemos D1 Mini ESP8266.
# - D2: Fan MOSFET enable output.
# - D4: D1 Mini onboard LED, active low, used as filter dirty indicator.
# - D5: IKEA unit panel dirty LED, active high, flashes when filter is dirty.
# - D6: Fan pulse counter / tacho input.
# - D7: Fan PWM output.
# - Fan tacho hardware has been modified so the ESP8266 sees a clean 3.3V signal.
#:########################################################################################:#
# OPERATION NOTES:
# - Fan speed slider is 0 to 6.
# - Speed 0 turns the fan MOSFET off and sets PWM frequency to 0.
# - Speeds 1 to 6 turn the fan MOSFET on, enable 50 percent duty drive and set
#   PWM frequency to speed * 50Hz.
# - Fan Rate is calculated from raw tacho pulses using fan_revs_per_pulse.
# - Filter Age is tracked in kRevs, meaning 1000 fan revolutions.
# - Default replacement threshold is 19000 kRevs, stored in substitutions.
# - Replacement Threshold is editable from Home Assistant as a number entity.
# - Reset Replacement Threshold restores the editable threshold back to the default.
# - When Filter Age is greater than or equal to Replacement Threshold, the
#   onboard LED turns on steady, the panel LED flashes at 500ms on/off, and
#   Filter State changes to Dirty.
# - Reset button clears the filter age counter, restored filter age value,
#   Filter State, and both dirty LEDs.
#:########################################################################################:#
# MQTT COMMANDS:
# - MQTT common package is included for standard device availability/status.
# - No local custom MQTT command topics are currently defined in this file.
#:########################################################################################:#
# OFFLINE NOTES:
# a) HA offline (network and MQTT online)
#    - Device fan speed and dirty indicator logic continue locally.
#    - HA entities will not be available until HA/API reconnects.
# b) MQTT offline
#    - No custom MQTT commands are required for the local fan/dirty logic.
#    - HA API control remains available if HA and WiFi are online.
# c) Entire WiFi/Network offline
#    - Device fan speed and filter age logic continue locally once booted.
#    - SNTP is not needed; this device does not use accurate timeclocks.
#:########################################################################################:#


#:########################################################################################:#
# SUBSTITUTIONS: Specific device variable substitutions
# If NOT using a secrets file, just replace these with the passwords etc (in quotes)
#:########################################################################################:#
substitutions:
  # Device Naming
  device_name: "esp-bedrm1airfilter"
  friendly_name: "Bedroom 1 Air Filter"
  description_comment: "Wall Mount Air Filter :: D1 Mini ESP8266 (Layout V1.1)"
  device_area: "Bedroom 1" # Allows ESP device to be automatically linked to an 'Area' in Home Assistant.

  # Project Naming
  project_name: "Generic.D1 Mini" # Project Details
  project_version: "v1.2" # Project V denotes release of yaml file, allowing checking of deployed vs latest version

  # Passwords and Secrets
  api_key: !secret esp-api_key
  ota_pass: !secret esp-ota_pass
  static_ip_address: !secret esp-bedrm1airfilter_ip # unfortunately you can't use substitutions inside secrets names
  #mqtt_command_main_topic: !secret mqtt_command_main_topic
  #mqtt_status_main_topic: !secret mqtt_status_main_topic

  # If we are changing IP addresses, you must update the current IP address here, otherwise it remains
  # Don't forget to switch it back when changed.
  current_ip_address: ${static_ip_address}

  # Device Settings
  log_level: "INFO" # Define logging level: NONE, ERROR, WARN, INFO, DEBUG (Default), VERBOSE, VERY_VERBOSE
  update_interval: "60s" # update time for general sensors etc

  # MQTT LOCAL Controls
  #mqtt_device_name: "bedrm1airfilter"
  #mqtt_local_command_topic: "${mqtt_local_command_main_topic}/${mqtt_device_name}" # Topic used to command this locally without HA
  #mqtt_local_status_topic: "${mqtt_local_status_main_topic}/${mqtt_device_name}" # Topic used to view status locally without HA

  # Filter Settings
  # This is a usage approximation based on fan revolutions, not calendar time.
  # fan_revs_per_pulse is also used to convert pulse_counter pulses/min to RPM.
  # fan_krevs_per_pulse converts raw pulse total to 1000 fan revolutions.
  fan_revs_per_pulse: "0.06"
  fan_krevs_per_pulse: "0.00006"
  filter_replacement_default_krevs: "19000"


#:########################################################################################:#
# PACKAGES: Included Common Packages
# https://esphome.io/components/packages.html
#:########################################################################################:#
packages:
  #### WIFI, Network (Static/DHCP/IPV6 etc), Fallback AP, Safemode ####
  common_wifi: !include
    file: common/network_common.yaml
    vars:
      local_device_name: "${device_name}"
      local_static_ip_address: "${static_ip_address}"
      local_ota_pass: "${ota_pass}"
      local_current_ip_address: "${current_ip_address}"

  #### HOME ASSISTANT API (choose encryption or no encryption options) ####
  common_api: !include
    file: common/api_common.yaml
    #file: common/api_common_noencryption.yaml
    vars:
      local_api_key: "${api_key}"

  #### MQTT ####
  common_mqtt: !include
    file: common/mqtt_common.yaml
    vars:
      local_device_name: "${device_name}"

  #### WEB PORTAL ####
  #common_webportal: !include common/webportal_common.yaml

  #### SNTP (Only use if you want/need accurate timeclocks) ####
  #common_sntp: !include common/sntp_common.yaml

  #### DIAGNOSTICS Sensors ####
  diag_basic: !include common/include_basic_diag_sensors.yaml
  diag_more: !include common/include_more_diag_sensors.yaml
  #diag_debug: !include common/include_debug_diag_sensors.yaml
  #diag_resetcount: !include common/include_resetcount_diag_sensors.yaml

#:########################################################################################:#
# ESPHOME:
# https://esphome.io/components/esphome.html
#:########################################################################################:#
esphome:
  name: "${device_name}"
  friendly_name: "${friendly_name}"
  comment: "${description_comment}" # Appears on the esphome page in HA
  area: "${device_area}"
  project:
    name: "${project_name}"
    version: "${project_version}"
  on_boot: # Restore the saved filter age counter and dirty warning state on boot.
    priority: -100
    then:
      - delay: 200ms

      # Restore the raw pulse total from the saved filter age in kRevs.
      # raw_pulses = kRevs * 1000 / revs_per_pulse
      - pulse_counter.set_total_pulses:
          id: filter_counter
          value: !lambda |-
            return static_cast<uint32_t>((id(filter_age_krevs) * 1000.0f) / ${fan_revs_per_pulse});

      # Restore Clean/Dirty state and warning LEDs.
      - script.execute: update_filter_state

#:########################################################################################:#
# ESP PLATFORM AND FRAMEWORK:
# https://esphome.io/components/esp8266/
#:########################################################################################:#
esp8266:
  board: d1_mini # Generic Board
  restore_from_flash: true # Restore selected values on reboot.

preferences:
  flash_write_interval: 5min

mdns:
  disabled: false # Disabling will make the build file smaller, and the device is still available via static IP.

#:########################################################################################:#
# GLOBAL VARIABLES:
# https://esphome.io/guides/automations.html#global-variables
#:########################################################################################:#
globals:
  # Save the filter age value in kRevs and restore it on boot.
  # This replaces the old pulse-based/global filtered age value.
  - id: filter_age_krevs
    type: float
    restore_value: true
    initial_value: "0.0"

  # Save total fan runtime in seconds and restore it on boot.
  # This is used to display total runtime hours in Home Assistant.
  - id: fan_runtime_seconds
    type: uint32_t
    restore_value: true
    initial_value: "0"

  # Runtime session start/update marker.
  # This does not need to be restored because it only applies to the current boot.
  - id: fan_runtime_last_ms
    type: uint32_t
    restore_value: false
    initial_value: "0"

#:########################################################################################:#
# LOGGING: ESPHome Logging Enable
# https://esphome.io/components/logger.html
#:########################################################################################:#
logger:
  level: "${log_level}" # INFO suggested, or DEBUG for testing.
  baud_rate: 0 # Set to 0 for no logging via UART, needed if you are using it for other serial things.

#:########################################################################################:#
# BUTTON COMPONENT:
# https://esphome.io/components/button/
#:########################################################################################:#
button:
  # Reset Button for Filter Age
  - platform: template
    name: "${friendly_name} Filter EOL Reset"
    id: reset_button
    icon: mdi:restart

    # Reset the filter age counter and clear the dirty indicators.
    on_press:
      - pulse_counter.set_total_pulses:
          id: filter_counter
          value: 0

      - lambda: |-
          id(filter_age_krevs) = 0.0f;

      - script.execute: update_filter_state

      # Immediately save the reset filter age value to flash.
      - lambda: |-
          global_preferences->sync();

  # Reset Button for Total Fan Runtime
  - platform: template
    name: "${friendly_name} Reset Runhours"
    id: reset_runtime_button
    icon: mdi:timer-refresh-outline
    on_press:
      - lambda: |-
          id(fan_runtime_seconds) = 0;
          id(fan_runtime_last_ms) = id(fan_mosfet).state ? millis() : 0;
          id(fan_runtime_hours).publish_state(0.0f);

      - lambda: |-
          global_preferences->sync();

  # Reset Button for Filter Replacement Threshold
  - platform: template
    name: "${friendly_name} EOL Threshold = Default"
    id: reset_replacement_threshold_button
    icon: mdi:restore
    on_press:
      - number.set:
          id: filter_replacement_krevs
          value: ${filter_replacement_default_krevs}
      - script.execute: update_filter_state
      - lambda: |-
          global_preferences->sync();

  # Test Button for IKEA panel dirty LED on D5.
  # This is retained for easy hardware testing.
  #- platform: template
  #  name: "${friendly_name} Test Panel LED"
  #  id: test_panel_led_button
  #  icon: mdi:led-on
  #  on_press:
  #    - output.turn_on: panel_led_output
  #    - delay: 2s
  #    - output.turn_off: panel_led_output

#:########################################################################################:#
# NUMBER COMPONENT:
# https://esphome.io/components/number/
#:########################################################################################:#
number:
  # Slider for Fan Speed 0-6, 0 = Off, 6 = Max
  - platform: template
    name: "${friendly_name} Fan Speed"
    id: fan_speed
    icon: mdi:air-filter
    update_interval: never
    optimistic: true
    min_value: 0
    max_value: 6
    initial_value: 0
    step: 1
    set_action:
      - if:
          condition:
            # Is the slider 1 or above?
            lambda: |-
              return x >= 1;
          then:
            # Turn on the fan MOSFET and enable the PWM drive.
            - switch.turn_on: fan_mosfet
            - servo.write:
                id: fan_motor
                level: 1

            # Change the PWM signal based on the slider value.
            # 50Hz steps are based on the tested value used by the original IKEA device.
            - output.esp8266_pwm.set_frequency:
                id: fan_pwm
                frequency: !lambda |-
                  return x * 50;

          else:
            # Turn off the fan MOSFET and set PWM to 0.
            - switch.turn_off: fan_mosfet
            - output.esp8266_pwm.set_frequency:
                id: fan_pwm
                frequency: !lambda |-
                  return 0;

  # Editable filter replacement threshold in 1000 fan revolutions.
  # Default is 19000 kRevs, which is about 19 million fan revolutions.
  - platform: template
    name: "${friendly_name} Filter EOL Threshold"
    id: filter_replacement_krevs
    icon: mdi:counter
    mode: box
    unit_of_measurement: "kRevs"
    optimistic: true
    restore_value: true
    initial_value: ${filter_replacement_default_krevs}
    min_value: 1
    max_value: 100000
    step: 100
    set_action:
      - script.execute: update_filter_state
      - lambda: |-
          global_preferences->sync();

#:########################################################################################:#
# BINARY SENSOR COMPONENT:
# https://esphome.io/components/binary_sensor/
#:########################################################################################:#
binary_sensor:
  # Internal binary state used by ESPHome logic.
  # The public HA display is handled by the text_sensor below so it can show
  # Clean / Dirty instead of Off / On.
  - platform: template
    id: filter_dirty
    internal: true
    lambda: |-
      float threshold = id(filter_replacement_krevs).state;

      if (isnan(threshold) || threshold <= 0.0f) {
        threshold = ${filter_replacement_default_krevs};
      }

      return id(filter_age_krevs) >= threshold;

#:########################################################################################:#
# TEXT SENSOR COMPONENT:
# https://esphome.io/components/text_sensor/
#:########################################################################################:#
text_sensor:
  # Public filter status for Home Assistant.
  # This avoids Unknown/Off/On wording and always displays Clean or Dirty.
  - platform: template
    name: "${friendly_name} Filter EOL State"
    id: filter_dirty_text
    icon: mdi:air-filter
    update_interval: 5s
    lambda: |-
      float threshold = id(filter_replacement_krevs).state;

      if (isnan(threshold) || threshold <= 0.0f) {
        threshold = ${filter_replacement_default_krevs};
      }

      if (id(filter_age_krevs) >= threshold) {
        return std::string("Dirty");
      }

      return std::string("Clean");

#:########################################################################################:#
# SENSOR COMPONENT:
# https://esphome.io/components/sensor/
#:########################################################################################:#
sensor:

  # Total fan runtime in hours.
  # Counts whenever the fan MOSFET is on, regardless of selected speed.
  - platform: template
    name: "${friendly_name} Fan Runhours"
    id: fan_runtime_hours
    icon: mdi:timer-outline
    unit_of_measurement: "h"
    device_class: duration
    state_class: total_increasing
    accuracy_decimals: 1
    update_interval: 60s
    lambda: |-
      return id(fan_runtime_seconds) / 3600.0f;

  # Fan speed calculated from the fan tacho pulse rate.
  # pulse_counter reports pulses/min, then fan_revs_per_pulse converts it to RPM.
  - platform: pulse_counter
    name: "${friendly_name} Fan Speed"
    pin:
      number: D6
      mode:
        input: true
        pullup: false
    id: filter_counter
    unit_of_measurement: "RPM"
    accuracy_decimals: 0
    count_mode:
      rising_edge: INCREMENT
      falling_edge: DISABLE
    update_interval: 2s
    filters:
      - multiply: ${fan_revs_per_pulse}

    total:
      # Filter age is displayed in kRevs, meaning 1000 fan revolutions.
      # raw_pulses * fan_krevs_per_pulse = kRevs
      name: "${friendly_name} Filter Age"
      icon: mdi:counter
      unit_of_measurement: "kRevs"
      accuracy_decimals: 0
      filters:
        - multiply: ${fan_krevs_per_pulse}
      on_value:
        then:
          - if:
              condition:
                switch.is_on: fan_mosfet
              then:
                # Only save trusted filter age while the fan is deliberately running.
                - lambda: |-
                    id(filter_age_krevs) = x;
                - script.execute: update_filter_state

#:########################################################################################:#
# SERVO COMPONENT:
# https://esphome.io/components/servo/
# Not a servo here, but is the most appropriate component for the required output behaviour.
#:########################################################################################:#
servo:
  # Set the PWM signal to 50 percent duty cycle.
  - id: fan_motor
    output: fan_pwm
    max_level: 50%

#:########################################################################################:#
# OUTPUT COMPONENT:
# https://esphome.io/components/output/
#:########################################################################################:#
output:
  # Fan PWM output.
  - platform: esp8266_pwm
    id: fan_pwm
    pin:
      number: D7

  # Filter Dirty LED output on the IKEA unit.
  # This is active high: output ON means D5 goes high and lights the LED.
  - platform: gpio
    id: panel_led_output
    pin:
      number: D5
      inverted: false

#:########################################################################################:#
# SWITCH COMPONENT:
# https://esphome.io/components/switch/
#:########################################################################################:#
switch:
  # Control the fan motor power MOSFET.
  # When the fan starts, reset the raw pulse counter total to the last trusted
  # stored age so idle noise is ignored before real fan use begins.
  # Runtime is counted whenever this switch is on, regardless of fan speed.
  - platform: gpio
    pin: D2
    id: fan_mosfet
    restore_mode: ALWAYS_OFF
    on_turn_on:
      - lambda: |-
          id(fan_runtime_last_ms) = millis();

      - pulse_counter.set_total_pulses:
          id: filter_counter
          value: !lambda |-
            return static_cast<uint32_t>((id(filter_age_krevs) * 1000.0f) / ${fan_revs_per_pulse});

    on_turn_off:
      - lambda: |-
          const uint32_t now = millis();

          if (id(fan_runtime_last_ms) != 0) {
            const uint32_t elapsed_seconds = (now - id(fan_runtime_last_ms)) / 1000;

            if (elapsed_seconds > 0) {
              id(fan_runtime_seconds) += elapsed_seconds;
            }

            id(fan_runtime_last_ms) = 0;
            id(fan_runtime_hours).publish_state(id(fan_runtime_seconds) / 3600.0f);
          }

  # Filter Dirty LED 1: D1 Mini onboard LED.
  # D4 is active low on most D1 Mini boards.
  - platform: gpio
    id: onboard_led
    pin:
      number: D4
      inverted: true
    restore_mode: ALWAYS_OFF

  # Filter Dirty LED 2: IKEA unit panel LED.
  # This template switch starts/stops the flashing script and mirrors the
  # warning state to the D1 Mini onboard LED.
  - platform: template
    name: "${friendly_name} Filter EOL Reached"
    id: panel_led
    optimistic: true
    restore_mode: ALWAYS_OFF
    turn_on_action:
      - switch.turn_on: onboard_led
      - script.execute: panel_led_flash
    turn_off_action:
      - script.stop: panel_led_flash
      - output.turn_off: panel_led_output
      - switch.turn_off: onboard_led

#:########################################################################################:#
# INTERVAL COMPONENT:
# https://esphome.io/components/interval/
#:########################################################################################:#
interval:
  # Add runtime while the fan is operating.
  # This uses millis() so the count is based on elapsed time, not just interval ticks.
  - interval: 10s
    then:
      - if:
          condition:
            switch.is_on: fan_mosfet
          then:
            - lambda: |-
                const uint32_t now = millis();

                if (id(fan_runtime_last_ms) == 0) {
                  id(fan_runtime_last_ms) = now;
                  return;
                }

                const uint32_t elapsed_seconds = (now - id(fan_runtime_last_ms)) / 1000;

                if (elapsed_seconds > 0) {
                  id(fan_runtime_seconds) += elapsed_seconds;
                  id(fan_runtime_last_ms) += elapsed_seconds * 1000;
                  id(fan_runtime_hours).publish_state(id(fan_runtime_seconds) / 3600.0f);
                }

#:########################################################################################:#
# SCRIPT COMPONENT:
# https://esphome.io/components/script/
#:########################################################################################:#
script:
  # Update the filter state and warning LEDs using kRevs rather than raw pulses.
  - id: update_filter_state
    mode: restart
    then:
      - if:
          condition:
            lambda: |-
              float threshold = id(filter_replacement_krevs).state;

              if (isnan(threshold) || threshold <= 0.0f) {
                threshold = ${filter_replacement_default_krevs};
              }

              return id(filter_age_krevs) >= threshold;
          then:
            - switch.turn_on: onboard_led
            - switch.turn_on: panel_led
            - lambda: |-
                id(filter_dirty_text).publish_state("Dirty");
          else:
            - switch.turn_off: panel_led
            - switch.turn_off: onboard_led
            - lambda: |-
                id(filter_dirty_text).publish_state("Clean");

  # Flash the IKEA panel dirty LED continuously at 500ms on / 500ms off.
  # The loop is intentionally unconditional; switch.turn_off stops the script.
  - id: panel_led_flash
    mode: restart
    then:
      - while:
          condition:
            lambda: |-
              return true;
          then:
            - output.turn_on: panel_led_output
            - delay: 500ms
            - output.turn_off: panel_led_output
            - delay: 500ms