Small CCTV Monitor for RTSP Display
Changes
2022-10-19 V2.0 A rebuild of the Raspberry Pis, adding MQTT Monitoring/control and more notes
2021-08-18 V1.0 First set of notes once built
Summary
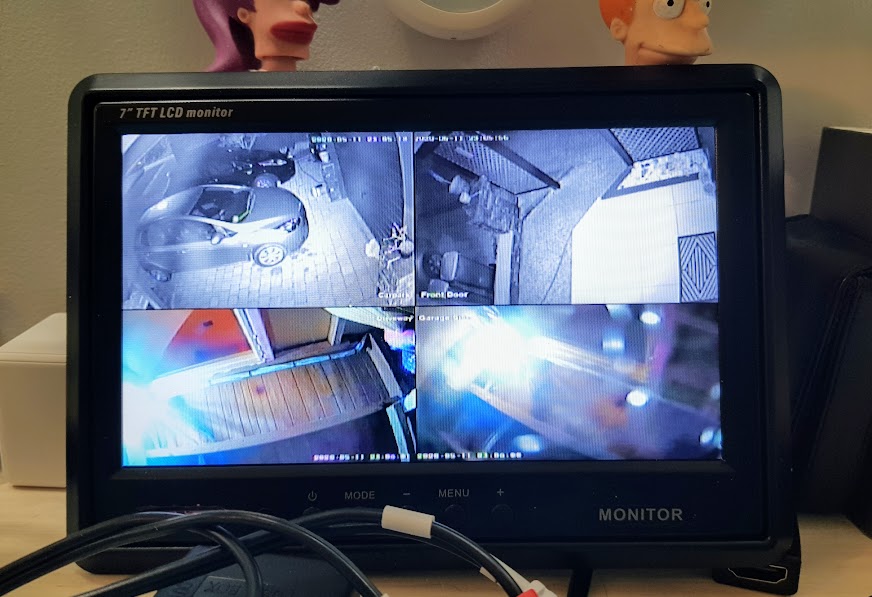
This project allows the use of an old raspberry pi (V1), plus a basic automotive 7″ analogue LCD screen to display streamed CCTV images.
Note that I tried a few methods, and using the displaycameras project was the one I went with in the end and it works exceedingly well. Since the initial project, I have added more RPis and monitors, and there is a fork of the code by nohn (https://github.com/nohn/displaycameras – not pulled into main as at Oct 2020) that handles rotation of images. I have some CCTV images that lend themselves better to a portrait style view and one of my monitors is displaying 3 vertical portraits.
I have also set my monitors to be powered by a PSU that switches off with home automation so it will drop monitor power when I leave the room for extended periods. I could potentially shut down the Pis when not needed, but it takes 90 seconds from restart to getting the images up (Post note: I did this also, using the home assistant Pi project)
Requirement
Resolution was not that important to me – it was more about using cheap/minimal hardware to see activity, and I could bring up another larger image on the main computer/TV/phone if needed. The monitor I’m using is only 800×480, so this is fine as a visual display, but most of the the cameras I use are 4MPix (and they are recorded in 4MPix) with a configurable substream (usually D1 of CIF).
Equipment
- Raspberry Pi (I just used V1), with ethernet and composite video output (less than $30 2nd hand).
- Composite male to male cable
- 12V car monitor (I have 3 of these, picked up in a sale for $15 each) similar to these: Trademe, Jaycar, Aliexpress,
- Power supplies for Pi and monitor (The monitors are obviously 12V)
Choice of software players
I planned to use omxplayer as this mostly just works on the Pi using framebuffer (no gui or other x layers). Additionally there is a great python project called displaycameras that uses this to overlay multiple rtsp streams on screen, and can cycle though them and place them in quadrants like a CCTV DVR display etc.
omxplayer needs hardware decoding and on first check the pi that I used can only software decode the H.265 streams from my cameras so I could not get the streams to decode at first. I did go back and manage to reconfigure my camera substreams to work on it eventually though (with some tweaks to camera settings), so have 2 methods working.
For reference, my cameras tout H.265, H.265+ and H.265AI modes (but not all for main and substream), and because these are pretty generic Chinese manufactured IP cameras, what these actually mean in terms of stream standards are unclear. Not all my cameras seem to have all these settings, even though they are similar cameras from the same supplier (and I’ve updated the firmware for all)
Method 1 – VLC
This is a simple way to get a single image running in full screen.
I installed Raspbian full desktop, but set it to start without x running (set using raspi-config) and the pi user automatically logged in. VLC doesn’t like running as root.
I appended this to /home/pi/.profile
(so it will start up when the pi user logs in… which is on startup now)
cvlc -f --aspect-ratio=16:9 "rtsp://192.168.1.123:554/user=blah&password=blah&channel=1&stream=1.sdp?Real_stream"The -f switch is to display fullscreen, and using cvlc plays without any of the other VLC window overhead
The IP address is the camera, and port of the RTSP stream. Use the camera username and pass. Most cameras have differing strings for an RTSP URL so you need to check in your camera manual.
I had issues with larger streams, in that the stream would eventually drop out never to return. A camera stream in CIF with a decent number of i-frames seemed to work. Even a D1 stream seemed to be too much, but more playing may have solved it.
Method 2 – Displaycameras and omxplayer
Install raspian lite on the raspberry pi. I used 2020-02-13-raspian-buster-lite at the time.
set up ssh, locale etc as needed, but not a lot of other changes needed from the default raspian minimal setup.
Follow the instructions in https://github.com/Anonymousdog/displaycameras and download/install the scripts. The project is pretty much dead as of 4 years prior to 2022, but it seems to work ok.
There is also this fork (that I used) that allows rotation of displays, so grab this one if you want to. At this time it hasn’t been merged, and I doubt it ever will be. https://github.com/nohn/displaycameras
The install adds all dependencies and queries you for other changes. For my early Pi V1 I set video split to 128MB for GPU and overscan turned off.
REMEMBER, if you are cloning an SDCard to more than one Raspberry Pi, ensure they are identical models. This caught me out for hours when the Pi I cloned was a Model B with 512GB RAM (Model B, Rev 2), and the clone was a model B with only 256GB (Model B, Rev 1). I had set the video memory on the first one to 256MB, and the cloned Pi would not boot. Setting it as 128MB was fine.
I recommend you verify omxplayer will play your feed RTSP URLs first. To definitively rule out problems with omxplayer not playing RTSP feeds, run the following in an SSH session, or maybe even install and test on another machine first:
sudo omxplayer --no-keys --no-osd --avdict rtsp_transport:tcp <camera feed URL> --live -n -1 --timeout 30The conf for my main monitor, using 3 rotated cameras in portrait mode looks like this
/etc/displaycameras/layout.conf.default
#Vestibule
#"<Camera stream URL>" \
#)

# Are we rotating cameras through the window matrix? (default false if not set here)
# rotate="true"

# A variable setting how many windows to rotate through in one operation.  Setting this to the number of on-screen windows at one time achieves a sort of screen "flop" from one set of feeds to another (or a series of screen fulls)
# If you set this higher than the number of cameras, the system just sets it back to 1.  Sane values are 1 through the number of cameras configured.


windows=(left middle right)

#window_positions=(
#"25 10 359 259" \
#"360 10 700 259" \
#"25 260 359 480" \
#"360 260 700 480" \
#)

window_positions=(
"25 10 255 480" \
"256 10 485 480" \
"486 10 700 480" \
)


camera_names=(Cam1 Cam2 Cam3)

camera_feeds=( \
"rtsp://192.168.1.255:554/user=blah&password=blah&channel=1&stream=1.sdp?Real_stream" \
"rtsp://192.168.1.256:554/user=blah&password=blah&channel=1&stream=1.sdp?Real_stream" \
"rtsp://192.168.1.257:554/user=blah&password=blah&channel=1&stream=1.sdp?Real_stream" \
)

camera_orientations=( \
# Camera display orientation. Possible values are 0, 90, 180 and 270
"90" \
"270" \
"90" \
)
For a basic quad display, with no changing of camera feeds on screen (you can rotate more feeds onto the display), this was the configuration after a fair bit of playing to get the layout balanced and the entire images on screen.
/etc/displaycameras/layout.conf.default
windows=(upper_left upper_right lower_left lower_right)

window_positions=(
"25 10 359 259" \
"360 10 700 259" \
"25 260 359 480" \
"360 260 700 480" \
)

camera_names=(Cam1 Cam2 Cam3 Cam4)

camera_feeds=( \
"rtsp://192.168.1.258:554/user=blah&password=blah&channel=1&stream=1.sdp?Real_stream" \
"rtsp://192.168.1.259:554/user=blah&password=blah&channel=1&stream=1.sdp?Real_stream" \
"rtsp://192.168.1.260:554/user=blah&password=blah&channel=1&stream=1.sdp?Real_stream" \
"rtsp://192.168.1.261:554/user=blah&password=blah&channel=1&stream=1.sisdp?Real_stream" \
)
You can also tweak settings in /etc/displaycameras/displaycameras.conf, I upped the timeouts and changed blank=”true” to blank the terminal window nicely before displaying the feeds, but suspect the default timeouts will be fine.
/etc/displaycameras/displaycameras.conf
#### Global Options

# Do we need screen blanking before displaying cameras (default false)
# This depends on "fbi" being installed.  Blanking fails without it.
blank="true"

# Optimize reliability by tweaking omx_timeout and/or sleep factor.

# omxplayer network timeout (for establishing feed playback) in seconds.
# I recommend this be no less than 15s and that you increase it as you add
# more than six low-res or four mid-res feeds or add network hops or bandwidth
# challenges to playing the feeds.
omx_timeout=30

# Amount of sleep time we allow per camera when starting|restarting|repairing.
# Recommend no less than 3s start sleep and 1s feedsleep.  You may increase this
# when running higher-res feeds, a large number of cameras, or over slow
# network links.
startsleep=3
feedsleep=1
# Retry is how many seconds of sleep that the script waits after the start or feed
# sleep for omxplayer to first report playback, then playback beyond zero seconds.
retry=5

# Enable display detection (disabled by default) if you setup layout configuration
# files of the naming convention 'layout.conf.<display mode>' (e.g.
# layout.conf.1280x1024).  These files should include window names,
# window positions, camera names, camera feeds, and rotation configuration.
#displaydetect=true

# When rotating camera feeds across a display, how many seconds does each rotation last? (default=5)
#rotatedelay=8
restarting the service:
sudo systemctl restart displaycamerasNotes
- My monitor draws around 400mA on 12V
- On the Pi, omxplayer.bin uses between 8 and 15% CPU load for each instance (4 D1 streams in this case) and about 10% memory for each.
- A 3rd method would be to use the motion project https://motion-project.github.io/ as it supports rtsp streams- this would have the added advantage of doing some motion detection directly to alert if something is going on (on screen or with sound). This obviously would require some processing power – not sure if the V1 of the Pi would be suitable for more than one camera.
- With the VLC method, If the stream drops (eg camera reboots) it isn’t picked up again by VLC. The script should probably check that, or just restart the stream say every hour. Displaycameras is much more reliable at maintaining the stream properly.
- I could use some of the wasted hardware from the pi to do some switching of displays (a button to bring up one of the inputs full screen? PIR to turn off/blank the screen if no-one is watching?
- I use the text overlay as if the stream stops, it is helpful to have a clock to see if the stream has stopped or is delayed.
- RTSP streams can be reaeeeallly delayed if they are large (eg a 4MPix stream). I had one on my computer that confused me as I was watching 20 minute old footage thinking it was live. Check your clock display occasionally to be sure this isn’t an issue (not an issue with displaycameras)
- Be aware that dropping a stream down in resolution is resource intensive, so using a sub-stream or low quality/resolution stream is important.
Stream URL hints
— This stream also works for some Gadinan Cameras
rtsp://192.168.1.x/user=admin_password=_channel=1_stream=0.sdp
— tiny black V380 wireless cam (once mod’d)
rtsp://192.168.2.xx/live/ch00_1
Make the Pi more robust with an overlay FS
DS cards are inherintly bad at being written to all the time. If you don’t need logs, then run raspi-config and go in to performance options to set the Overlay File System to on. This will give you a system that reads everything to memory, and once booted doesn’t touch the SD Card again.
When you select it, it will take a while to update the initramfs, and then will ask if you also want to make the /boot partition read only (which I have).
Improvements
- I could potentially find a micro board even more minimal that would run this, if it had composite output (and if it would reduce power use) (eg Orange Pi Zero)
- I could potentially use a raspberry pi cam or usb camera on the pi to display an additional feed locally? Not sure what… maybe the office door.
- My screens also have a second composite input, and a trigger wire (designed for a reversing camera) so this could be used to switch displays… but probably easier to do in software.
- I’d be interested to see if I can make one of my streams portrait, as it lends itself to that (and have two landscape, one portrait images on the monitor) (Post Note: This was done with displaycameras)
- I’m not using any audio and the monitors do have speakers, but I just plan to just feed this back into my desk audio mixer from the Pi with other desk audio (computers/TV) so I can ramp cctv sound up/down as needed.
- The monitor is a little annoying as it displays the input name (AV1) in the top right until you press the IR remote to select something. If I was more pedantic I’d try and automate this.
- My monitors draw 110mA on standby (remote on/off)
so I will be switching power off when not used(2020-08-21 monitor is now on a 12V supply switched by the home automation system, and they turn off when I’m not in the room). - The V1 Raspberry Pis are incredibly slow in terms of procesing power, but really the only issue is doing updates. It shows the camera images pretty close to real time (maybe a second or two delay sometimes, which is fine). More powerful hardware would be better, but this is a great use for older Pis.
References
https://selfhostedhome.com/raspberry-pi-video-surveillance-monitor/
https://community.ui.com/questions/Tutorial-Raspberry-Pi-3-RTSP-Stream-Viewer/cc54f892-b8d6-46c5-81f3-ee58b9284889